Unofficial Bevy Cheat Book
This is a reference-style book for the Bevy game engine (GitHub).
It aims to teach Bevy concepts in a concise way, help you be productive, and discover the knowledge you need.
This book aggregates a lot of community wisdom that is often not covered by official documentation, saving you the need to struggle with issues that others have figured out already!
While it aims to be exhaustive, documenting an entire game engine is a monumental task. I focus my time on whatever I believe the community needs most.
Therefore, there are still a lot of omissions, both for basics and advanced topics. Nevertheless, I am confident this book will prove to be a valuable resource to you!
Welcome! May this book serve you well!
(don’t forget to Star the book’s GitHub repository, and consider donating 🙂)
How to use this book
The pages in this book are not designed to be read in order. Each page covers a standalone topic. Feel free to jump to whatever interests you.
If you have a specific topic in mind that you would like to learn about, you can find it from the table-of-contents (sidebar) or using the search function (in the top bar).
The Chapter Overview page will give you a general idea of how the book is structured.
The text on each page will link to other pages, where you can learn about other things mentioned in the text. This helps you jump around the book.
If you are new to Bevy, or would like a more guided experience, try the Guided Tour tutorial. It will help you navigate the book in an order that makes sense for learning, from beginner to advanced topics.
The Bevy Builtins page is a concise cheatsheet of useful information about types and features provided by Bevy.
Recommended Additional Resources
Bevy has a rich collection of official code examples.
Check out bevy-assets, for community-made resources.
Our community is very friendly and helpful. Feel welcome to join the Bevy Discord to chat, ask questions, or get involved in the project!
If you want to see some games made with Bevy, see itch.io or Bevy Assets.
Is this book up to date?
This book is no longer maintained. Much of the information in it is outdated and possibly not relevant to the current version of Bevy. Consult Bevy’s official website for documentation and migration guides.
At the top of every page, you will see the version it was last updated for. All content on that page is relevant for the stated Bevy version.
Bevy is still a new and experimental game engine! It has only been public since August 2020!
While improvements have been happening at an incredible pace, and development is active, Bevy simply hasn’t yet had the time to mature.
There are no stability guarantees and breaking changes happen often!
Usually, it not hard to adapt to changes with new releases, but you have been warned!
Support Bevy
If you like the Bevy Game Engine, you should consider donating to the project.
You can do that via the Bevy Foundation.
Support Me
I no longer maintain this book or actively work on anything Bevy-related. However, if you like the book and would like to send me a tip for having done this in the past, my sponsor links are still open.
License
Copyright © 2021-2024 Ida Borisova (IyesGames)
All code in the book is provided under the MIT-0 License. At your option, you may also use it under the regular MIT License.
The text of the book is provided under the CC BY-NC-SA 4.0.
Exception: If used for the purpose of contribution to the “Official Bevy Project”, the entire content of the book may be used under the MIT-0 License.
“Official Bevy Project” is defined as:
- Contents of the Git repository hosted at https://github.com/bevyengine/bevy
- Contents of the Git repository hosted at https://github.com/bevyengine/bevy-website
- Anything publicly visible on the bevyengine.org website
The MIT-0 license applies as soon as your contribution has been accepted upstream.
GitHub Forks and Pull Requests created for the purposes of contributing to the Official Bevy Project are given the following license exception: the Attribution requirements of CC BY-NC-SA 4.0 are waived for as long as the work is pending upstream review (Pull Request Open). If upstream rejects your contribution, you are given a period of 1 month to comply with the full terms of the CC BY-NC-SA 4.0 license or delete your work. If upstream accepts your contribution, the MIT-0 license applies.
| Bevy Version: | (any) |
|---|
This entire book is outdated and no longer maintained. I am keeping it online, in case anyone still finds any of the information in it useful. To adapt to newer versions of Bevy, please consult Bevy's migration guides.
Chapter Overview
The Bevy Builtins page is a concise cheatsheet of useful information about types and features provided by Bevy.
The Bevy Tutorials chapter is for tutorials / guides that you can follow from start to finish.
The Bevy Cookbook is for more self-contained / narrow-scoped examples that teach you how to solve specific problems.
The rest of the book is designed as a reference, covering different aspects of working with Bevy. Feel free to jump around the book, to learn about any topic that interests you. On every page of the book, any time other topics are mentioned, the relevant pages or official API documentation is linked.
If you would like a guided experience, or to browse the book by relative difficulty (from beginner to advanced), try the guided tutorial page. It recommends topics in a logical order for learning.
The book has the following general chapters:
- Bevy Setup Tips: project setup advice, recommendations for tools and plugins
- Common Pitfalls: solutions for common issues encountered by the community
- Bevy on Different Platforms: information about working with specific plaforms / OSs
To learn how to program in Bevy, see these chapters:
- Bevy Core Programming Framework: the ECS+App frameworks, the foundation of everything
- Programming Patterns: opinionated advice, patterns, idioms
- Bevy Render (GPU) Framework: advanced (lower-level) GPU programming
The following chapters cover various Bevy feature areas:
- Game Engine Fundamentals
- General Graphics Features
- Working with 2D
- Working with 3D
- Input Handling
- Window Management
- Asset Management
- Audio
- Bevy UI Framework
| Bevy Version: | 0.11 | (outdated!) |
|---|
This entire book is outdated and no longer maintained. I am keeping it online, in case anyone still finds any of the information in it useful. To adapt to newer versions of Bevy, please consult Bevy's migration guides.
List of Bevy Builtins
This page is a quick condensed listing of all the important things provided by Bevy.
- SystemParams
- Assets
- File Formats
- GLTF Asset Labels
- Shader Imports
wgpuBackends- Schedules
- Run Conditions
- Plugins
- Bundles
- Resources (Configuration)
- Resources (Engine User)
- Resources (Input)
- Events (Input)
- Events (Engine)
- Events (System/Control)
- Components
SystemParams
These are all the special types that can be used as system parameters.
In regular systems:
Commands: Manipulate the ECS using commandsQuery<T, F = ()>(can contain tuples of up to 15 types): Access to entities and componentsRes<T>: Shared access to a resourceResMut<T>: Exclusive (mutable) access to a resourceOption<Res<T>>: Shared access to a resource that may not existOption<ResMut<T>>: Exclusive (mutable) access to a resource that may not existLocal<T>: Data local to the systemEventReader<T>: Receive eventsEventWriter<T>: Send events&World: Read-only direct access to the ECS WorldParamSet<...>(with up to 8 params): Resolve conflicts between incompatible system parametersDeferred<T>: Custom “deferred mutation”, similar toCommands, but for your own thingsRemovedComponents<T>: Removal detectionGizmos: A way to draw lines and shapes on the screen for debugging and dev purposesDiagnostics: A way to report measurements/debug data to Bevy for tracking and visualizationSystemName: The name (string) of the system, may be useful for debuggingParallelCommands: Abstraction to help useCommandswhen you will do your own parallelismWorldId: The World ID of the world the system is running onComponentIdFor<T>: Get theComponentIdof a given component typeEntities: Low-level ECS metadata: All entitiesComponents: Low-level ECS metadata: All componentsBundles: Low-level ECS metadata: All bundlesArchetypes: Low-level ECS metadata: All archetypesSystemChangeTick: Low-level ECS metadata: Tick used for change detectionNonSend<T>: Shared access to Non-Send(main thread only) dataNonSendMut<T>: Exclusive access to Non-Send(main thread only) dataOption<NonSend<T>>: Shared access to Non-Send(main thread only) data that may not existOption<NonSendMut<T>>: Exclusive access to Non-Send(main thread only) data that may not existStaticSystemParam: Helper for generic system abstractions, to avoid lifetime annotations- tuples containing any of these types, with up to 16 members
- [
&mut World]: Full direct access to the ECS World - [
Local<T>]: Data local to the system - [
&mut SystemState<P>][SystemState]: Emulates a regular system, allowing you to easily access data from the World.Pare the system parameters. - [
&mut QueryState<Q, F = ()>][QueryState]: Allows you to perform queries on the World, similar to a [Query] in regular systems.
Your function can have a maximum of 16 total parameters. If you need more, group them into tuples to work around the limit. Tuples can contain up to 16 members, but can be nested indefinitely.
Systems running during the Extract schedule can also use
Extract<T>, to access data from the Main World instead of the
Render World. T can be any read-only system parameter type.
Assets
(more info about working with assets)
These are the Asset types registered by Bevy by default.
Image: Pixel data, used as a texture for 2D and 3D rendering; also contains theSamplerDescriptorfor texture filtering settingsTextureAtlas: 2D “Sprite Sheet” defining sub-images within a single larger imageMesh: 3D Mesh (geometry data), contains vertex attributes (like position, UVs, normals)Shader: GPU shader code, in one of the supported languages (WGSL/SPIR-V/GLSL)ColorMaterial: Basic “2D material”: contains color, optionally an imageStandardMaterial: “3D material” with support for Physically-Based RenderingAnimationClip: Data for a single animation sequence, can be used withAnimationPlayerFont: Font data used for text renderingScene: Scene composed of literal ECS entities to instantiateDynamicScene: Scene composed with dynamic typing and reflectionGltf: GLTF Master Asset: index of the entire contents of a GLTF fileGltfNode: Logical GLTF object in a sceneGltfMesh: Logical GLTF 3D model, consisting of multipleGltfPrimitivesGltfPrimitive: Single unit to be rendered, contains the Mesh and Material to useAudioSource: Audio data forbevy_audioFontAtlasSet: (internal use for text rendering)SkinnedMeshInverseBindposes: (internal use for skeletal animation)
File Formats
These are the asset file formats (asset loaders) supported by Bevy. Support for each one can be enabled/disabled using cargo features. Some are enabled by default, many are not.
Image formats (loaded as Image assets):
| Format | Cargo feature | Default? | Filename extensions |
|---|---|---|---|
| PNG | "png" | Yes | .png |
| HDR | "hdr" | Yes | .hdr |
| KTX2 | "ktx2" | Yes | .ktx2 |
| KTX2+zstd | "ktx2", "zstd" | Yes | .ktx2 |
| JPEG | "jpeg" | No | .jpg, .jpeg |
| WebP | "webp" | No | .webp |
| OpenEXR | "exr" | No | .exr |
| TGA | "tga" | No | .tga |
| PNM | "pnm" | No | .pam, .pbm, .pgm, .ppm |
| BMP | "bmp" | No | .bmp |
| DDS | "dds" | No | .dds |
| KTX2+zlib | "ktx2", "zlib" | No | .ktx2 |
| Basis | "basis-universal" | No | .basis |
Audio formats (loaded as AudioSource assets):
| Format | Cargo feature | Default? | Filename extensions |
|---|---|---|---|
| OGG Vorbis | "vorbis" | Yes | .ogg, .oga, .spx |
| FLAC | "flac" | No | .flac |
| WAV | "wav" | No | .wav |
| MP3 | "mp3" | No | .mp3 |
3D asset (model or scene) formats:
| Format | Cargo feature | Default? | Filename extensions |
|---|---|---|---|
| GLTF | "bevy_gltf" | Yes | .gltf, .glb |
Shader formats (loaded as Shader assets):
| Format | Cargo feature | Default? | Filename extensions |
|---|---|---|---|
| WGSL | n/a | Yes | .wgsl |
| GLSL | "shader_format_glsl" | No | .vert, .frag, .comp |
| SPIR-V | "shader_format_spirv" | No | .spv |
Font formats (loaded as Font assets):
| Format | Cargo feature | Default? | Filename extensions |
|---|---|---|---|
| TrueType | n/a | Yes | .ttf |
| OpenType | n/a | Yes | .otf |
Bevy Scenes:
| Format | Filename extensions |
|---|---|
| RON-serialized scene | .scn,.scn.ron |
There are unofficial plugins available for adding support for even more file formats.
GLTF Asset Labels
Asset path labels to refer to GLTF sub-assets.
The following asset labels are supported ({} is the numerical index):
Scene{}: GLTF Scene as BevySceneNode{}: GLTF Node asGltfNodeMesh{}: GLTF Mesh asGltfMeshMesh{}/Primitive{}: GLTF Primitive as BevyMeshMesh{}/Primitive{}/MorphTargets: Morph target animation data for a GLTF PrimitiveTexture{}: GLTF Texture as BevyImageMaterial{}: GLTF Material as BevyStandardMaterialDefaultMaterial: as above, if the GLTF file contains a default material with no indexAnimation{}: GLTF Animation as BevyAnimationClipSkin{}: GLTF mesh skin as BevySkinnedMeshInverseBindposes
Shader Imports
TODO
wgpu Backends
wgpu (and hence Bevy) supports the following backends:
| Platform | Backends (in order of priority) |
|---|---|
| Linux | Vulkan, GLES3 |
| Windows | DirectX 12, Vulkan, GLES3 |
| macOS | Metal |
| iOS | Metal |
| Android | Vulkan, GLES3 |
| Web | WebGPU, WebGL2 |
On GLES3 and WebGL2, some renderer features are unsupported and performance is worse.
WebGPU is experimental and few browsers support it.
Schedules
Internally, Bevy has these built-in schedules:
Main: runs every frame update cycle, to perform general app logicExtractSchedule: runs afterMain, to copy data from the Main World into the Render WorldRender: runs afterExtractSchedule, to perform all rendering/graphics, in parallel with the nextMainrun
The Main schedule simply runs a sequence of other schedules:
On the first run (first frame update of the app):
On every run (controlled via the MainScheduleOrder resource):
First: any initialization that must be done at the start of every framePreUpdate: for engine-internal systems intended to run before user logicStateTransition: perform any pending state transitionsRunFixedUpdateLoop: runs theFixedUpdateschedule as many times as neededUpdate: for all user logic (your systems) that should run every framePostUpdate: for engine-internal systems intended to run after user logicLast: any final cleanup that must be done at the end of every frame
FixedUpdate is for all user logic (your systems) that should run at a fixed timestep.
StateTransition runs the
OnEnter(...)/OnTransition(...)/OnExit(...)
schedules for your states, when you want to change state.
The Render schedule is organized using sets (RenderSet):
ExtractCommands: apply deferred buffers from systems that ran inExtractSchedulePrepare/PrepareFlush: set up data on the GPU (buffers, textures, etc.)Queue/QueueFlush: generate the render jobs to be run (usually phase items)PhaseSort/PhaseSortFlush: sort and batch phase items for efficient renderingRender/RenderFlush: execute the render graph to actually trigger the GPU to do workCleanup/CleanupFlush: clear any data from the render World that should not persist to the next frame
The *Flush variants are just to apply any deferred buffers after every step, if needed.
Run Conditions
TODO
Plugins
TODO
Bundles
Bevy’s built-in bundle types, for spawning different common kinds of entities.
Any tuples of up to 15 Component types are valid bundles.
General:
SpatialBundle: Contains the required transform and visibility components that must be included on all entities that need rendering or hierarchyTransformBundle: Contains only the transform types, subset ofSpatialBundleVisibilityBundle: Contains only the visibility types, subset ofSpatialBundle
Scenes:
SceneBundle: Used for spawning scenesDynamicSceneBundle: Used for spawning dynamic scenes
Audio:
AudioBundle: Play [audio][cb::audio] from anAudioSourceassetSpatialAudioBundle: Play positional audio from anAudioSourceassetAudioSourceBundle: Play audio from a custom data source/streamSpatialAudioSourceBundle: Play positional audio from a custom data source/stream
Bevy 3D:
Camera3dBundle: 3D camera, can use perspective (default) or orthographic projectionTemporalAntiAliasBundle: Add this to a 3D camera to enable TAAScreenSpaceAmbientOcclusionBundle: Add this to a 3D camera to enable SSAOMaterialMeshBundle: 3D Object/Primitive: a Mesh and a custom Material to draw it withPbrBundle:MaterialMeshBundlewith the default Physically-Based Material (StandardMaterial)DirectionalLightBundle: 3D directional light (like the sun)PointLightBundle: 3D point light (like a lamp or candle)SpotLightBundle: 3D spot light (like a projector or flashlight)
Bevy 2D:
Camera2dBundle: 2D camera, uses orthographic projection + other special configuration for 2DSpriteBundle: 2D sprite (Imageasset type)SpriteSheetBundle: 2D sprite (TextureAtlasasset type)MaterialMesh2dBundle: 2D shape, with custom Mesh and Material (similar to 3D objects)Text2dBundle: Text to be drawn in the 2D world (not the UI)
Bevy UI:
NodeBundle: Empty node element (like HTML<div>)ButtonBundle: Button elementImageBundle: Image element (Imageasset type)AtlasImageBundle: Image element (TextureAtlasasset type)TextBundle: Text element
Resources
(more info about working with resources)
Configuration Resources
These resources allow you to change the settings for how various parts of Bevy work.
These may be inserted at the start, but should also be fine to change at runtime (from a system):
ClearColor: Global renderer background color to clear the window at the start of each frameGlobalVolume: The overall volume for playing audioAmbientLight: Global renderer “fake lighting”, so that shadows don’t look too dark / blackMsaa: Global renderer setting for Multi-Sample Anti-Aliasing (some platforms might only support the values 1 and 4)UiScale: Global scale value to make all UIs bigger/smallerGizmoConfig: Controls how gizmos are renderedWireframeConfig: Global toggle to make everything be rendered as wireframeGamepadSettings: Gamepad input device settings, like joystick deadzones and button sensitivitiesWinitSettings: Settings for the OS Windowing backend, including update loop / power-management settingsTimeUpdateStrategy: Used to control how theTimeis updatedSchedules: Stores all schedules, letting you register additional functionality at runtimeMainScheduleOrder: The sequence of schedules that will run every frame update
Settings that are not modifiable at runtime are not represented using resources. Instead, they are configured via the respective plugins.
Engine Resources
These resources provide access to different features of the game engine at runtime.
Access them from your systems, if you need their state, or to control the respective parts of Bevy. These resources are in the Main World. See here for the resources in the Render World.
Time: Global time-related information (current frame delta time, time since startup, etc.)FixedTime: Tracks remaining time until the next fixed updateAssetServer: Control the asset system: Load assets, check load status, etc.Assets<T>: Contains the actual data of the loaded assets of a given typeState<T>: The current value of a states typeNextState<T>: Used to queue a transition to another stateGamepads: Tracks the IDs for all currently-detected (connected) gamepad devicesSceneSpawner: Direct control over spawning Scenes into the main app WorldFrameCount: The total number of framesScreenshotManager: Used to request a screenshot of a window to be taken/savedAppTypeRegistry: Access to the Reflection Type RegistryAsyncComputeTaskPool: Task pool for running background CPU tasksComputeTaskPool: Task pool where the main app schedule (all the systems) runsIoTaskPool: Task pool where background i/o tasks run (like asset loading)WinitWindows(non-send): Raw state of thewinitbackend for each windowNonSendMarker: Dummy resource to ensure a system always runs on the main thread
Render World Resources
These resources are present in the Render World. They can be accessed from rendering systems (that run during render stages).
MainWorld: (extract schedule only!) access data from the Main WorldRenderGraph: The Bevy Render GraphPipelineCache: Bevy’s manager of render pipelines. Used to store render pipelines used by the app, to avoid recreating them more than once.TextureCache: Bevy’s manager of temporary textures. Useful when you need textures to use internally during rendering.DrawFunctions<P>: Stores draw functions for a given phase item typeRenderAssets<T>: Contains handles to the GPU representations of currently loaded asset dataDefaultImageSampler: The default sampler forImageasset texturesFallbackImage: Dummy 1x1 pixel white texture. Useful for shaders that normally need a texture, when you don’t have one available.
There are many other resources in the Render World, which are not mentioned here, either because they are internal to Bevy’s rendering algorithms, or because they are just extracted copies of the equivalent resources in the Main World.
Low-Level wgpu Resources
Using these resources, you can have direct access to the wgpu APIs for controlling the GPU.
These are available in both the Main World and the Render World.
RenderDevice: The GPU device, used for creating hardware resources for rendering/compute- [
RenderQueue][bevy::RenderQueue]: The GPU queue for submitting work to the hardware RenderAdapter: Handle to the physical GPU hardwareRenderAdapterInfo: Information about the GPU hardware that Bevy is running on
Input Handling Resources
These resources represent the current state of different input devices. Read them from your systems to handle user input.
Input<KeyCode>: Keyboard key state, as a binary Input valueInput<MouseButton>: Mouse button state, as a binary Input valueInput<GamepadButton>: Gamepad buttons, as a binary Input valueAxis<GamepadAxis>: Analog Axis gamepad inputs (joysticks and triggers)Axis<GamepadButton>: Gamepad buttons, represented as an analog Axis valueTouches: The state of all fingers currently touching the touchscreenGamepads: Registry of all the connectedGamepadIDs
Events
(more info about working with events)
Input Events
These events fire on activity with input devices. Read them to [handle user input][cb::input].
MouseButtonInput: Changes in the state of mouse buttonsMouseWheel: Scrolling by a number of pixels or lines (MouseScrollUnit)MouseMotion: Relative movement of the mouse (pixels from previous frame), regardless of the OS pointer/cursorCursorMoved: New position of the OS mouse pointer/cursorKeyboardInput: Changes in the state of keyboard keys (keypresses, not text)ReceivedCharacter: Unicode text input from the OS (correct handling of the user’s language and layout)Ime: Unicode text input from IME (support for advanced text input in different scripts)TouchInput: Change in the state of a finger touching the touchscreenGamepadEvent: Changes in the state of a gamepad or any of its buttons or axesGamepadRumbleRequest: Send these events to control gamepad rumbleTouchpadMagnify: Pinch-to-zoom gesture on laptop touchpad (macOS)TouchpadRotate: Two-finger rotate gesture on laptop touchpad (macOS)
Engine Events
Events related to various internal things happening during the normal runtime of a Bevy app.
AssetEvent<T>: Sent by Bevy when asset data has been added/modified/removed; can be used to detect changes to assetsHierarchyEvent: Sent by Bevy when entity parents/children changeAppExit: Tell Bevy to shut down
System and Control Events
Events from the OS / windowing system, or to control Bevy.
RequestRedraw: In an app that does not refresh continuously, request one more update before going to sleepFileDragAndDrop: The user drag-and-dropped a file into our appCursorEntered: OS mouse pointer/cursor entered one of our windowsCursorLeft: OS mouse pointer/cursor exited one of our windowsWindowCloseRequested: OS wants to close one of our windowsWindowCreated: New application window openedWindowClosed: Bevy window closedWindowDestroyed: OS window freed/dropped after window closeWindowFocused: One of our windows is now focusedWindowMoved: OS/user moved one of our windowsWindowResized: OS/user resized one of our windowsWindowScaleFactorChanged: One of our windows has changed its DPI scaling factorWindowBackendScaleFactorChanged: OS reports change in DPI scaling factor for a window
Components
The complete list of individual component types is too specific to be useful to list here.
See: (List in API Docs)
| Bevy Version: | (any) |
|---|
This entire book is outdated and no longer maintained. I am keeping it online, in case anyone still finds any of the information in it useful. To adapt to newer versions of Bevy, please consult Bevy's migration guides.
Bevy Tutorials
This chapter of the book contains tutorials. Tutorials teach you things in a logical order from start to finish. If you are looking for something to guide you through learning Bevy, maybe some of them will be useful to you.
The rest of this book is designed to be used as a reference, so you can jump around to specific topics you want to learn about.
The first tutorial in this chapter, Guided Tour, simply organizes all the topics in this book in an order suggested for learning, from the basics to advanced concepts. You can use it as an alternative to the main table of contents (the left side bar), if you are just learning Bevy and don’t know how to progress. If you are new to Bevy, you can start here to find your way around.
If you would like more narrow-scoped examples that teach you how to solve specific problems, those can be found in the Bevy Cookbook chapter.
You should also look at Bevy’s official collection of examples. There is something for almost every area of the engine, though they usually only show simple usage of the APIs without much explanation.
| Bevy Version: | 0.13 | (outdated!) |
|---|
This entire book is outdated and no longer maintained. I am keeping it online, in case anyone still finds any of the information in it useful. To adapt to newer versions of Bevy, please consult Bevy's migration guides.
New to Bevy? Guided Tutorial!
Welcome to Bevy! :) We are glad to have you in our community!
This page will guide you through this book, to help you gain comprehensive knowledge of how to work with Bevy. The topics are structured in an order that makes sense for learning: from basics to advanced.
It is just a suggestion to help you navigate. Feel free to jump around the book and read whatever interests you. The main table-of-contents (the left sidebar) was designed to be a reference for Bevy users of any skill level.
Make sure to also look at the official Bevy examples. If you need help, use GitHub Discussions, or feel welcome to join us to chat and ask for help in Discord.
If you run into issues, be sure to check the Common Pitfalls chapter, to see if this book has something to help you. Solutions to some of the most common issues that Bevy community members have encountered are documented there.
Basics
These are the absolute essentials of using Bevy. Every Bevy project, even a simple one, would require you to be familiar with these concepts.
You could conceivably make something like a simple game-jam game or prototype, using just this knowledge. Though, as your project grows, you will likely quickly need to learn more.
- Bevy Setup Tips
- Bevy Programming Framework
- Game Engine Fundamentals
- General Graphics Features
- Bevy Asset Management
- Input Handling
- Window Management
- Audio
Next Steps
You will likely need to learn most of these topics to make a non-trivial Bevy project. After you are confident with the basics, you should learn these.
- Bevy Programming Framework
- Game Engine Fundamentals
- Input Handling
- Bevy Asset Management
- Bevy Setup Tips
- Audio:
Intermediate
These are more specialized topics. You may need some of them, depending on your project.
- Bevy Programming Framework
- Game Engine Fundamentals
- General Graphics Features
- Bevy Asset Management
- Programming Patterns
- Window Management
- Audio
Advanced
These topics are for niche technical situations. You can learn them, if you want to know more about how Bevy works internally, extend the engine with custom functionality, or do other advanced things with Bevy.
- Bevy Programming Framework
- Programming Patterns
- Input Handling
- Bevy Setup Tips
- Bevy Render (GPU) Framework
| Bevy Version: | (any) |
|---|
This entire book is outdated and no longer maintained. I am keeping it online, in case anyone still finds any of the information in it useful. To adapt to newer versions of Bevy, please consult Bevy's migration guides.
Bevy Cookbook
This chapter shows you how to do various practical things using Bevy.
Every page is focused on a specific problem and provides explanations and example code to teach you how to solve it.
It is assumed that you are already familiar with Bevy Programming.
You should also look at Bevy’s official collection of examples. There is something for almost every area of the engine, though they usually only show simple usage of the APIs without much explanation.
If you would like step-by-step tutorials that you can follow from start to finish, those are in the Bevy Tutorials chapter.
| Bevy Version: | 0.13 | (outdated!) |
|---|
This entire book is outdated and no longer maintained. I am keeping it online, in case anyone still finds any of the information in it useful. To adapt to newer versions of Bevy, please consult Bevy's migration guides.
Show Framerate
You can use Bevy’s builtin diagnostics to measure framerate (FPS), for monitoring performance.
To enable it, add Bevy’s diagnostic plugin to your app:
use bevy::diagnostic::FrameTimeDiagnosticsPlugin;
app.add_plugins(FrameTimeDiagnosticsPlugin::default());
Print to Console / Log
The simplest way to use it is to print the diagnostics to the console (log). If you want to only do it in dev builds, you can add a conditional-compilation attribute.
#[cfg(debug_assertions)] // debug/dev builds only
{
    use bevy::diagnostic::LogDiagnosticsPlugin;
    app.add_plugins(LogDiagnosticsPlugin::default());
}
In-Game / On-Screen FPS counter
UPDATE! I have now released a Bevy plugin which provides a much better
version of the code on this page, ready for you to use! Consider trying
my iyes_perf_ui plugin!
Bevy maintainers have expressed interest in upstreaming it, and we will try to make it official in the next Bevy release (0.14)!
For now, I am also keeping the old code example below in the book, for completeness:
You can use Bevy UI to create an in-game FPS counter.
It is recommended that you create a new UI root (entity without a parent) with absolute positioning, so that you can control the exact position where the FPS counter appears, and so it doesn’t affect the rest of your UI.
Here is some example code showing you how to make a very nice-looking and readable FPS counter:
Code Example (Long):
use bevy::diagnostic::DiagnosticsStore;
use bevy::diagnostic::FrameTimeDiagnosticsPlugin;

/// Marker to find the container entity so we can show/hide the FPS counter
#[derive(Component)]
struct FpsRoot;

/// Marker to find the text entity so we can update it
#[derive(Component)]
struct FpsText;

fn setup_fps_counter(
    mut commands: Commands,
) {
    // create our UI root node
    // this is the wrapper/container for the text
    let root = commands.spawn((
        FpsRoot,
        NodeBundle {
            // give it a dark background for readability
            background_color: BackgroundColor(Color::BLACK.with_a(0.5)),
            // make it "always on top" by setting the Z index to maximum
            // we want it to be displayed over all other UI
            z_index: ZIndex::Global(i32::MAX),
            style: Style {
                position_type: PositionType::Absolute,
                // position it at the top-right corner
                // 1% away from the top window edge
                right: Val::Percent(1.),
                top: Val::Percent(1.),
                // set bottom/left to Auto, so it can be
                // automatically sized depending on the text
                bottom: Val::Auto,
                left: Val::Auto,
                // give it some padding for readability
                padding: UiRect::all(Val::Px(4.0)),
                ..Default::default()
            },
            ..Default::default()
        },
    )).id();
    // create our text
    let text_fps = commands.spawn((
        FpsText,
        TextBundle {
            // use two sections, so it is easy to update just the number
            text: Text::from_sections([
                TextSection {
                    value: "FPS: ".into(),
                    style: TextStyle {
                        font_size: 16.0,
                        color: Color::WHITE,
                        // if you want to use your game's font asset,
                        // uncomment this and provide the handle:
                        // font: my_font_handle
                        ..default()
                    }
                },
                TextSection {
                    value: " N/A".into(),
                    style: TextStyle {
                        font_size: 16.0,
                        color: Color::WHITE,
                        // if you want to use your game's font asset,
                        // uncomment this and provide the handle:
                        // font: my_font_handle
                        ..default()
                    }
                },
            ]),
            ..Default::default()
        },
    )).id();
    commands.entity(root).push_children(&[text_fps]);
}

fn fps_text_update_system(
    diagnostics: Res<DiagnosticsStore>,
    mut query: Query<&mut Text, With<FpsText>>,
) {
    for mut text in &mut query {
        // try to get a "smoothed" FPS value from Bevy
        if let Some(value) = diagnostics
            .get(&FrameTimeDiagnosticsPlugin::FPS)
            .and_then(|fps| fps.smoothed())
        {
            // Format the number as to leave space for 4 digits, just in case,
            // right-aligned and rounded. This helps readability when the
            // number changes rapidly.
            text.sections[1].value = format!("{value:>4.0}");

            // Let's make it extra fancy by changing the color of the
            // text according to the FPS value:
            text.sections[1].style.color = if value >= 120.0 {
                // Above 120 FPS, use green color
                Color::rgb(0.0, 1.0, 0.0)
            } else if value >= 60.0 {
                // Between 60-120 FPS, gradually transition from yellow to green
                Color::rgb(
                    (1.0 - (value - 60.0) / (120.0 - 60.0)) as f32,
                    1.0,
                    0.0,
                )
            } else if value >= 30.0 {
                // Between 30-60 FPS, gradually transition from red to yellow
                Color::rgb(
                    1.0,
                    ((value - 30.0) / (60.0 - 30.0)) as f32,
                    0.0,
                )
            } else {
                // Below 30 FPS, use red color
                Color::rgb(1.0, 0.0, 0.0)
            }
        } else {
            // display "N/A" if we can't get a FPS measurement
            // add an extra space to preserve alignment
            text.sections[1].value = " N/A".into();
            text.sections[1].style.color = Color::WHITE;
        }
    }
}

/// Toggle the FPS counter when pressing F12
fn fps_counter_showhide(
    mut q: Query<&mut Visibility, With<FpsRoot>>,
    kbd: Res<ButtonInput<KeyCode>>,
) {
    if kbd.just_pressed(KeyCode::F12) {
        let mut vis = q.single_mut();
        *vis = match *vis {
            Visibility::Hidden => Visibility::Visible,
            _ => Visibility::Hidden,
        };
    }
}
app.add_systems(Startup, setup_fps_counter);
app.add_systems(Update, (
fps_text_update_system,
fps_counter_showhide,
));| Bevy Version: | 0.13 | (outdated!) |
|---|
This entire book is outdated and no longer maintained. I am keeping it online, in case anyone still finds any of the information in it useful. To adapt to newer versions of Bevy, please consult Bevy's migration guides.
Convert cursor to world coordinates
2D games
If you only have one window (the primary window), as is the case for most apps and games, you can do this:
Code (simple version):
use bevy::window::PrimaryWindow;

/// We will store the world position of the mouse cursor here.
#[derive(Resource, Default)]
struct MyWorldCoords(Vec2);

/// Used to help identify our main camera
#[derive(Component)]
struct MainCamera;

fn setup(mut commands: Commands) {
    // Make sure to add the marker component when you set up your camera
    commands.spawn((Camera2dBundle::default(), MainCamera));
}

fn my_cursor_system(
    mut mycoords: ResMut<MyWorldCoords>,
    // query to get the window (so we can read the current cursor position)
    q_window: Query<&Window, With<PrimaryWindow>>,
    // query to get camera transform
    q_camera: Query<(&Camera, &GlobalTransform), With<MainCamera>>,
) {
    // get the camera info and transform
    // assuming there is exactly one main camera entity, so Query::single() is OK
    let (camera, camera_transform) = q_camera.single();

    // There is only one primary window, so we can similarly get it from the query:
    let window = q_window.single();

    // check if the cursor is inside the window and get its position
    // then, ask bevy to convert into world coordinates, and truncate to discard Z
    if let Some(world_position) = window.cursor_position()
        .and_then(|cursor| camera.viewport_to_world(camera_transform, cursor))
        .map(|ray| ray.origin.truncate())
    {
        mycoords.0 = world_position;
        eprintln!("World coords: {}/{}", world_position.x, world_position.y);
    }
}
app.init_resource::<MyWorldCoords>();
app.add_systems(Startup, setup);
app.add_systems(Update, my_cursor_system);If you have a more complex application with multiple windows, here is a more complex version of the code that can handle that:
Code (multi-window version):
use bevy::render::camera::RenderTarget;
use bevy::window::WindowRef;

/// We will add this to each camera we want to compute cursor position for.
/// Add the component to the camera that renders to each window.
#[derive(Component, Default)]
struct WorldCursorCoords(Vec2);

fn setup_multiwindow(mut commands: Commands) {
    // TODO: set up multiple cameras for multiple windows.
    // See bevy's example code for how to do that.

    // Make sure we add our component to each camera
    commands.spawn((Camera2dBundle::default(), WorldCursorCoords::default()));
}

fn my_cursor_system_multiwindow(
    // query to get the primary window
    q_window_primary: Query<&Window, With<PrimaryWindow>>,
    // query to get other windows
    q_window: Query<&Window>,
    // query to get camera transform
    mut q_camera: Query<(&Camera, &GlobalTransform, &mut WorldCursorCoords)>,
) {
    for (camera, camera_transform, mut worldcursor) in &mut q_camera {
        // get the window the camera is rendering to
        let window = match camera.target {
            // the camera is rendering to the primary window
            RenderTarget::Window(WindowRef::Primary) => {
                q_window_primary.single()
            },
            // the camera is rendering to some other window
            RenderTarget::Window(WindowRef::Entity(e_window)) => {
                q_window.get(e_window).unwrap()
            },
            // the camera is rendering to something else (like a texture), not a window
            _ => {
                // skip this camera
                continue;
            }
        };

        // check if the cursor is inside the window and get its position
        // then, ask bevy to convert into world coordinates, and truncate to discard Z
        if let Some(world_position) = window.cursor_position()
            .and_then(|cursor| camera.viewport_to_world(camera_transform, cursor))
            .map(|ray| ray.origin.truncate())
        {
            worldcursor.0 = world_position;
        }
    }
}
app.add_systems(Startup, setup_multiwindow);
app.add_systems(Update, my_cursor_system_multiwindow);3D games
If you’d like to be able to detect what 3D object the cursor is pointing at, select
objects, etc., there is a good (unofficial) plugin:
bevy_mod_picking.
For a simple top-down camera view game with a flat ground plane, it might be sufficient to just compute the coordinates on the ground under the cursor.
In the interactive example, there is a ground plane with a non-default position and rotation. There is a red cube, which is positioned using the global coordinates, and a blue cube, which is a child entity of the ground plane and positioned using local coordinates. They should both follow the cursor.
Code and explanation:
/// Here we will store the position of the mouse cursor on the 3D ground plane.
#[derive(Resource, Default)]
struct MyGroundCoords {
    // Global (world-space) coordinates
    global: Vec3,
    // Local (relative to the ground plane) coordinates
    local: Vec2,
}

/// Used to help identify our main camera
#[derive(Component)]
struct MyGameCamera;

/// Used to help identify our ground plane
#[derive(Component)]
struct MyGroundPlane;

fn setup_3d_scene(mut commands: Commands) {
    // Make sure to add the marker component when you set up your camera
    commands.spawn((
        MyGameCamera,
        Camera3dBundle {
            // ... your camera configuration ...
            ..default()
        },
    ));
    // Spawn the ground
    commands.spawn((
        MyGroundPlane,
        PbrBundle {
            // feel free to change this to rotate/tilt or reposition the ground
            transform: Transform::default(),
            // TODO: set up your mesh / visuals for rendering:
            // mesh: ...
            // material: ...
            ..default()
        },
    ));
}

fn cursor_to_ground_plane(
    mut mycoords: ResMut<MyGroundCoords>,
    // query to get the window (so we can read the current cursor position)
    // (we will only work with the primary window)
    q_window: Query<&Window, With<PrimaryWindow>>,
    // query to get camera transform
    q_camera: Query<(&Camera, &GlobalTransform), With<MyGameCamera>>,
    // query to get ground plane's transform
    q_plane: Query<&GlobalTransform, With<MyGroundPlane>>,
) {
    // get the camera info and transform
    // assuming there is exactly one main camera entity, so Query::single() is OK
    let (camera, camera_transform) = q_camera.single();

    // Ditto for the ground plane's transform
    let ground_transform = q_plane.single();

    // There is only one primary window, so we can similarly get it from the query:
    let window = q_window.single();

    // check if the cursor is inside the window and get its position
    let Some(cursor_position) = window.cursor_position() else {
        // if the cursor is not inside the window, we can't do anything
        return;
    };

    // Mathematically, we can represent the ground as an infinite flat plane.
    // To do that, we need a point (to position the plane) and a normal vector
    // (the "up" direction, perpendicular to the ground plane).

    // We can get the correct values from the ground entity's GlobalTransform
    let plane_origin = ground_transform.translation();
    let plane = Plane3d::new(ground_transform.up());

    // Ask Bevy to give us a ray pointing from the viewport (screen) into the world
    let Some(ray) = camera.viewport_to_world(camera_transform, cursor_position) else {
        // if it was impossible to compute for whatever reason; we can't do anything
        return;
    };

    // do a ray-plane intersection test, giving us the distance to the ground
    let Some(distance) = ray.intersect_plane(plane_origin, plane) else {
        // If the ray does not intersect the ground
        // (the camera is not looking towards the ground), we can't do anything
        return;
    };

    // use the distance to compute the actual point on the ground in world-space
    let global_cursor = ray.get_point(distance);

    mycoords.global = global_cursor;
    eprintln!("Global cursor coords: {}/{}/{}",
        global_cursor.x, global_cursor.y, global_cursor.z
    );

    // to compute the local coordinates, we need the inverse of the plane's transform
    let inverse_transform_matrix = ground_transform.compute_matrix().inverse();
    let local_cursor = inverse_transform_matrix.transform_point3(global_cursor);

    // we can discard the Y coordinate, because it should always be zero
    // (our point is supposed to be on the plane)
    mycoords.local = local_cursor.xz();
    eprintln!("Local cursor coords: {}/{}", local_cursor.x, local_cursor.z);
}
app.init_resource::<MyGroundCoords>();
app.add_systems(Startup, setup_3d_scene);
app.add_systems(Update, cursor_to_ground_plane);If the ground is tilted/rotated or moved, the global and local coordinates will differ, and may be useful for different use cases, so we compute both.
For some examples:
- if you want to spawn a child entity, or to quantize the coordinates to a grid (for a tile-based game, to detect the grid tile under the cursor), the local coordinates will be more useful
- if you want to spawn some overlays, particle effects, other independent game entities, at the position of the cursor, the global coordinates will be more useful
| Bevy Version: | 0.14 | (outdated!) |
|---|
This entire book is outdated and no longer maintained. I am keeping it online, in case anyone still finds any of the information in it useful. To adapt to newer versions of Bevy, please consult Bevy's migration guides.
Transform Interpolation / Extrapolation
Movement code for controlling the player (and other gameplay entities) can pose a tricky problem.
You want it to be computed reliably as part of your gameplay/physics simulation, which means doing it on a fixed timestep. This is to ensure consistent gameplay behavior regardless of the display framerate. It is a must, to avoid glitchy behavior like clipping into walls.
However, you also want movement to look smooth on-screen. If you simply
mutate the transforms from within FixedUpdate, that
will look choppy, especially on modern high-refresh-rate gaming displays.
The solution is to not manipulate Transform directly, but to create your
own custom component types to use instead. Implement your
gameplay using your own types. Then, have a system in Update, which uses
your custom components to compute the Transform that Bevy should use to
display the entity on every frame.
Interpolation vs. Extrapolation
Interpolation means computing a Transform that is somewhere in-between the
current state of the entity, and the old state from the previous gameplay tick.
Extrapolation means computing a Transform that is somewhere in-between
the current state of the entity, and the predicted future state on the next
gameplay tick.
Interpolation creates movement that always looks both smooth and accurate, but feels laggy / less responsive. The user will never see a truly up-to-date representation of the gameplay state, as what you are rendering is always delayed by one fixed timestep duration. Thus, interpolation is not suitable for games where a responsive low-latency feel is important to gameplay.
Extrapolation creates movement that looks smooth and feels responsive, but may be inaccurate. Since you are trying to predict the future, you might guess wrong, and occasionally the rendered position of the entity on-screen might jump slightly, to correct mispredictions.
Example
First, create some custom components to store your movement state.
If you’d like to do interpolation, you need to remember the old position from the previous gameplay tick. We created a separate component for that purpose.
If you’d like to do extrapolation, it might not be necessary, depending on how you go about predicting the future position.
#[derive(Component)]
struct MyMovementState {
    position: Vec3,
    velocity: Vec3,
}

#[derive(Component)]
struct OldMovementState {
    position: Vec3,
}
Now, you can create your systems to implement your movement
simulation. These systems should run in FixedUpdate. For this simple
example, we just apply our velocity value.
fn my_movement(
    time: Res<Time>,
    mut q_movement: Query<(&mut MyMovementState, &mut OldMovementState)>,
) {
    for (mut state, mut old_state) in &mut q_movement {
        // Reborrow `state` to mutably access both of its fields
        // See Cheatbook page on "Split Borrows"
        let state = &mut *state;

        // Store the old position.
        old_state.position = state.position;

        // Compute the new position.
        // (`delta_seconds` always returns the fixed timestep
        // duration, if this system is added to `FixedUpdate`)
        state.position += state.velocity * time.delta_seconds();
    }
}
app.add_systems(FixedUpdate, my_movement);Now we need to create the system to run every frame in
Update, which computes the actual transform that Bevy
will use to display our entity on-screen.
Time<Fixed> can give us the “overstep fraction”, which is a
value between 0.0 and 1.0 indicating how much of a “partial timestep”
has accumulated since the last fixed timestep run.
This value is our lerp coefficient.
Interpolation
fn transform_movement_interpolate(
    fixed_time: Res<Time<Fixed>>,
    mut q_movement: Query<(
        &mut Transform, &MyMovementState, &OldMovementState
    )>,
) {
    for (mut xf, state, old_state) in &mut q_movement {
        let a = fixed_time.overstep_fraction();
        xf.translation = old_state.position.lerp(state.position, a);
    }
}
Extrapolation
To do extrapolation, you need some sort of prediction about the future position on the next gameplay tick.
In our example, we have our velocity value and we can reasonably assume
that on the next tick, it will simply be added to the position. So we can
use that as our prediction. As a general principle, if you have the necessary
information to make a good prediction about the future position, you should
use it.
fn transform_movement_extrapolate_velocity(
    fixed_time: Res<Time<Fixed>>,
    mut q_movement: Query<(
        &mut Transform, &MyMovementState,
    )>,
) {
    for (mut xf, state) in &mut q_movement {
        let a = fixed_time.overstep_fraction();
        let future_position = state.position
            + state.velocity * fixed_time.delta_seconds();
        xf.translation = state.position.lerp(future_position, a);
    }
}
If you’d like to make a general implementation of extrapolation, that does
not rely on knowing any information about how the movement works (such as
our velocity value in this example), you could try predicting the future
position based on the old position, assuming it will continue moving the
same way.
fn transform_movement_extrapolate_from_old(
    fixed_time: Res<Time<Fixed>>,
    mut q_movement: Query<(
        &mut Transform, &MyMovementState, &OldMovementState
    )>,
) {
    for (mut xf, state, old_state) in &mut q_movement {
        let a = fixed_time.overstep_fraction();
        let delta = state.position - old_state.position;
        let future_position = state.position + delta;
        xf.translation = state.position.lerp(future_position, a);
    }
}
However, such an implementation will always guess wrong if the velocity is changing, leading to poor results (jumpy movement that needs to correct its course often).
| Bevy Version: | 0.14 | (outdated!) |
|---|
This entire book is outdated and no longer maintained. I am keeping it online, in case anyone still finds any of the information in it useful. To adapt to newer versions of Bevy, please consult Bevy's migration guides.
Pan + Orbit Camera
This is a camera controller similar to the ones in 3D editors like Blender.
To make the implementation simpler, we do not manipulate the transform directly. Instead, we work with values inside of a custom component struct and then compute the transform at the end.
Furthermore, for completeness, this example will also show a simple way of making the input controls reconfigurable / rebindable.
First, let’s define our data. Create some component types, which we will store on the 3D camera entity, and a bundle to make it easy to spawn the camera:
Code:
// Bundle to spawn our custom camera easily
#[derive(Bundle, Default)]
pub struct PanOrbitCameraBundle {
    pub camera: Camera3dBundle,
    pub state: PanOrbitState,
    pub settings: PanOrbitSettings,
}

// The internal state of the pan-orbit controller
#[derive(Component)]
pub struct PanOrbitState {
    pub center: Vec3,
    pub radius: f32,
    pub upside_down: bool,
    pub pitch: f32,
    pub yaw: f32,
}

/// The configuration of the pan-orbit controller
#[derive(Component)]
pub struct PanOrbitSettings {
    /// World units per pixel of mouse motion
    pub pan_sensitivity: f32,
    /// Radians per pixel of mouse motion
    pub orbit_sensitivity: f32,
    /// Exponent per pixel of mouse motion
    pub zoom_sensitivity: f32,
    /// Key to hold for panning
    pub pan_key: Option<KeyCode>,
    /// Key to hold for orbiting
    pub orbit_key: Option<KeyCode>,
    /// Key to hold for zooming
    pub zoom_key: Option<KeyCode>,
    /// What action is bound to the scroll wheel?
    pub scroll_action: Option<PanOrbitAction>,
    /// For devices with a notched scroll wheel, like desktop mice
    pub scroll_line_sensitivity: f32,
    /// For devices with smooth scrolling, like touchpads
    pub scroll_pixel_sensitivity: f32,
}

#[derive(Debug, Clone, Copy, PartialEq, Eq, Hash)]
pub enum PanOrbitAction {
    Pan,
    Orbit,
    Zoom,
}
We can implement Default to give them reasonable default values:
Code:
impl Default for PanOrbitState {
    fn default() -> Self {
        PanOrbitState {
            center: Vec3::ZERO,
            radius: 1.0,
            upside_down: false,
            pitch: 0.0,
            yaw: 0.0,
        }
    }
}

impl Default for PanOrbitSettings {
    fn default() -> Self {
        PanOrbitSettings {
            pan_sensitivity: 0.001, // 1000 pixels per world unit
            orbit_sensitivity: 0.1f32.to_radians(), // 0.1 degree per pixel
            zoom_sensitivity: 0.01,
            pan_key: Some(KeyCode::ControlLeft),
            orbit_key: Some(KeyCode::AltLeft),
            zoom_key: Some(KeyCode::ShiftLeft),
            scroll_action: Some(PanOrbitAction::Zoom),
            scroll_line_sensitivity: 16.0, // 1 "line" == 16 "pixels of motion"
            scroll_pixel_sensitivity: 1.0,
        }
    }
}
We need a setup system to spawn our camera:
Code:
fn spawn_camera(mut commands: Commands) {
    let mut camera = PanOrbitCameraBundle::default();
    // Position our camera using our component,
    // not Transform (it would get overwritten)
    camera.state.center = Vec3::new(1.0, 2.0, 3.0);
    camera.state.radius = 50.0;
    camera.state.pitch = 15.0f32.to_radians();
    camera.state.yaw = 30.0f32.to_radians();
    commands.spawn(camera);
}
app.add_systems(Startup, spawn_camera);And finally, the actual implementation of the camera controller:
Code:
use bevy::input::mouse::{MouseMotion, MouseScrollUnit, MouseWheel};

use std::f32::consts::{FRAC_PI_2, PI, TAU};

fn pan_orbit_camera(
    kbd: Res<ButtonInput<KeyCode>>,
    mut evr_motion: EventReader<MouseMotion>,
    mut evr_scroll: EventReader<MouseWheel>,
    mut q_camera: Query<(
        &PanOrbitSettings,
        &mut PanOrbitState,
        &mut Transform,
    )>,
) {
    // First, accumulate the total amount of
    // mouse motion and scroll, from all pending events:
    let mut total_motion: Vec2 = evr_motion.read()
        .map(|ev| ev.delta).sum();

    // Reverse Y (Bevy's Worldspace coordinate system is Y-Up,
    // but events are in window/ui coordinates, which are Y-Down)
    total_motion.y = -total_motion.y;

    let mut total_scroll_lines = Vec2::ZERO;
    let mut total_scroll_pixels = Vec2::ZERO;
    for ev in evr_scroll.read() {
        match ev.unit {
            MouseScrollUnit::Line => {
                total_scroll_lines.x += ev.x;
                total_scroll_lines.y -= ev.y;
            }
            MouseScrollUnit::Pixel => {
                total_scroll_pixels.x += ev.x;
                total_scroll_pixels.y -= ev.y;
            }
        }
    }

    for (settings, mut state, mut transform) in &mut q_camera {
        // Check how much of each thing we need to apply.
        // Accumulate values from motion and scroll,
        // based on our configuration settings.

        let mut total_pan = Vec2::ZERO;
        if settings.pan_key.map(|key| kbd.pressed(key)).unwrap_or(false) {
            total_pan -= total_motion * settings.pan_sensitivity;
        }
        if settings.scroll_action == Some(PanOrbitAction::Pan) {
            total_pan -= total_scroll_lines
                * settings.scroll_line_sensitivity * settings.pan_sensitivity;
            total_pan -= total_scroll_pixels
                * settings.scroll_pixel_sensitivity * settings.pan_sensitivity;
        }

        let mut total_orbit = Vec2::ZERO;
        if settings.orbit_key.map(|key| kbd.pressed(key)).unwrap_or(false) {
            total_orbit -= total_motion * settings.orbit_sensitivity;
        }
        if settings.scroll_action == Some(PanOrbitAction::Orbit) {
            total_orbit -= total_scroll_lines
                * settings.scroll_line_sensitivity * settings.orbit_sensitivity;
            total_orbit -= total_scroll_pixels
                * settings.scroll_pixel_sensitivity * settings.orbit_sensitivity;
        }

        let mut total_zoom = Vec2::ZERO;
        if settings.zoom_key.map(|key| kbd.pressed(key)).unwrap_or(false) {
            total_zoom -= total_motion * settings.zoom_sensitivity;
        }
        if settings.scroll_action == Some(PanOrbitAction::Zoom) {
            total_zoom -= total_scroll_lines
                * settings.scroll_line_sensitivity * settings.zoom_sensitivity;
            total_zoom -= total_scroll_pixels
                * settings.scroll_pixel_sensitivity * settings.zoom_sensitivity;
        }

        // Upon starting a new orbit maneuver (key is just pressed),
        // check if we are starting it upside-down
        if settings.orbit_key.map(|key| kbd.just_pressed(key)).unwrap_or(false) {
            state.upside_down = state.pitch < -FRAC_PI_2 || state.pitch > FRAC_PI_2;
        }

        // If we are upside down, reverse the X orbiting
        if state.upside_down {
            total_orbit.x = -total_orbit.x;
        }

        // Now we can actually do the things!

        let mut any = false;

        // To ZOOM, we need to multiply our radius.
        if total_zoom != Vec2::ZERO {
            any = true;
            // in order for zoom to feel intuitive,
            // everything needs to be exponential
            // (done via multiplication)
            // not linear
            // (done via addition)

            // so we compute the exponential of our
            // accumulated value and multiply by that
            state.radius *= (-total_zoom.y).exp();
        }

        // To ORBIT, we change our pitch and yaw values
        if total_orbit != Vec2::ZERO {
            any = true;
            state.yaw += total_orbit.x;
            state.pitch += total_orbit.y;
            // wrap around, to stay between +- 180 degrees
            if state.yaw > PI {
                state.yaw -= TAU; // 2 * PI
            }
            if state.yaw < -PI {
                state.yaw += TAU; // 2 * PI
            }
            if state.pitch > PI {
                state.pitch -= TAU; // 2 * PI
            }
            if state.pitch < -PI {
                state.pitch += TAU; // 2 * PI
            }
        }

        // To PAN, we can get the UP and RIGHT direction
        // vectors from the camera's transform, and use
        // them to move the center point. Multiply by the
        // radius to make the pan adapt to the current zoom.
        if total_pan != Vec2::ZERO {
            any = true;
            let radius = state.radius;
            state.center += transform.right() * total_pan.x * radius;
            state.center += transform.up() * total_pan.y * radius;
        }

        // Finally, compute the new camera transform.
        // (if we changed anything, or if the pan-orbit
        // controller was just added and thus we are running
        // for the first time and need to initialize)
        if any || state.is_added() {
            // YXZ Euler Rotation performs yaw/pitch/roll.
            transform.rotation =
                Quat::from_euler(EulerRot::YXZ, state.yaw, state.pitch, 0.0);
            // To position the camera, get the backward direction vector
            // and place the camera at the desired radius from the center.
            transform.translation = state.center + transform.back() * state.radius;
        }
    }
}
We can add a Run Condition to tell Bevy to run our system only if pan-orbit entities exist:
app.add_systems(Update,
    pan_orbit_camera
        .run_if(any_with_component::<PanOrbitState>),
);| Bevy Version: | 0.9 | (outdated!) |
|---|
This entire book is outdated and no longer maintained. I am keeping it online, in case anyone still finds any of the information in it useful. To adapt to newer versions of Bevy, please consult Bevy's migration guides.
Custom Camera Projection
Note: this example is showing you how to do something not officially supported/endorsed by Bevy. Do at your own risk.
Camera with a custom projection (not using one of Bevy’s standard perspective or orthographic projections).
You could also use this to change the coordinate system, if you insist on using something other than Bevy’s default coordinate system, for whatever reason.
Here we implement a simple orthographic projection that maps -1.0 to 1.0
to the vertical axis of the window, and respects the window’s aspect ratio
for the horizontal axis:
See how Bevy constructs its camera bundles, for reference:
This example is based on the setup for a 2D camera:
use bevy::core_pipeline::tonemapping::Tonemapping;
use bevy::render::primitives::Frustum;
use bevy::render::camera::{Camera, CameraProjection};
use bevy::render::view::VisibleEntities;

#[derive(Component, Debug, Clone, Reflect)]
#[reflect(Component, Default)]
struct SimpleOrthoProjection {
    near: f32,
    far: f32,
    aspect: f32,
}

impl CameraProjection for SimpleOrthoProjection {
    fn get_projection_matrix(&self) -> Mat4 {
        Mat4::orthographic_rh(
            -self.aspect, self.aspect, -1.0, 1.0, self.near, self.far
        )
    }

    // what to do on window resize
    fn update(&mut self, width: f32, height: f32) {
        self.aspect = width / height;
    }

    fn far(&self) -> f32 {
        self.far
    }
}

impl Default for SimpleOrthoProjection {
    fn default() -> Self {
        Self { near: 0.0, far: 1000.0, aspect: 1.0 }
    }
}

fn setup(mut commands: Commands) {
    // We need all the components that Bevy's built-in camera bundles would add
    // Refer to the Bevy source code to make sure you do it correctly:

    // here we show a 2d example

    let projection = SimpleOrthoProjection::default();

    // position the camera like bevy would do by default for 2D:
    let transform = Transform::from_xyz(0.0, 0.0, projection.far - 0.1);

    // frustum construction code copied from Bevy
    let view_projection =
        projection.get_projection_matrix() * transform.compute_matrix().inverse();
    let frustum = Frustum::from_view_projection(
        &view_projection,
        &transform.translation,
        &transform.back(),
        projection.far,
    );

    commands.spawn((
        bevy::render::camera::CameraRenderGraph::new(bevy::core_pipeline::core_2d::graph::NAME),
        projection,
        frustum,
        transform,
        GlobalTransform::default(),
        VisibleEntities::default(),
        Camera::default(),
        Camera2d::default(),
        Tonemapping::Disabled,
    ));
}

fn main() {
    // need to add bevy-internal camera projection management functionality
    // for our custom projection type
    use bevy::render::camera::CameraProjectionPlugin;

    App::new()
        .add_plugins(DefaultPlugins)
        .add_startup_system(setup)
        .add_plugin(CameraProjectionPlugin::<SimpleOrthoProjection>::default())
        .run();
}| Bevy Version: | 0.13 | (outdated!) |
|---|
This entire book is outdated and no longer maintained. I am keeping it online, in case anyone still finds any of the information in it useful. To adapt to newer versions of Bevy, please consult Bevy's migration guides.
List All Resource Types
This example shows how to print a list of all types that have been added as resources.
fn print_resources(world: &World) {
    let components = world.components();

    let mut r: Vec<_> = world
        .storages()
        .resources
        .iter()
        .map(|(id, _)| components.get_info(id).unwrap())
        .map(|info| info.name())
        .collect();

    // sort list alphebetically
    r.sort();
    r.iter().for_each(|name| println!("{}", name));
}
// print main world resources
app.add_systems(Last, print_resources);
// print render world resources
app.sub_app_mut(RenderApp)
.add_systems(Render, print_resources.in_set(RenderSet::Render));It lists the types of all the resources that currently exist in your ECS World (by all registered plugins, your own, etc.).
Note that this does not give you a list of every type that is
useful as a resource. For that, you should consult API documentation,
looking for implementers of the Resource trait.
See here for a summary of types provided in Bevy.
| Bevy Version: | (any) |
|---|
This entire book is outdated and no longer maintained. I am keeping it online, in case anyone still finds any of the information in it useful. To adapt to newer versions of Bevy, please consult Bevy's migration guides.
Bevy Setup Tips
This chapter is a collection of additional tips for configuring your project or development tools, collected from the Bevy community, beyond what is covered in Bevy’s official setup documentation.
Feel free to suggest things to add under this chapter.
Also see the following other relevant content from this book:
| Bevy Version: | 0.16 | (outdated!) |
|---|
This entire book is outdated and no longer maintained. I am keeping it online, in case anyone still finds any of the information in it useful. To adapt to newer versions of Bevy, please consult Bevy's migration guides.
Getting Started
This page covers the basic setup needed for Bevy development.
Also see the Setup page in the official Bevy Book and the official Bevy Readme.
Prerequisites
For the most part, Bevy is just like any other Rust library. You need to install Rust and setup your dev environment just like for any other Rust project. You can install Rust using Rustup. See Rust’s official setup page. You also need various other dependencies, depending on your operating system.
Linux / UNIX
- Follow the official instructions for installing dependencies.
- Run the rustup install script.
Windows
- Download and run the rustup installer. It will prompt you to install the Visual Studio build tools as part of the process.
- Alternatively, you can install Visual Studio yourself: installer
- Easy setup: select “Desktop development with C++”
- Minimal setup: under “Individual Components”, select:
- “MSVC” for your architecture and version of Windows
- “Windows SDK” for your version of Windows
- “C++ CMake tools”
Mac
If you are interested in mobile development, check out the pages on Android and iOS.
If you are interested in web development, check out the WASM chapter.
Creating a New Project
You can simply create a new Rust project, either from your IDE/editor, or the commandline:
cargo new --bin my_game
(creates a project called my_game)
The Cargo.toml file contains all the configuration of your project.
Add the latest version of bevy as a dependency.
cargo add bevy --features wayland
(I recommend enabling the non-default wayland feature, so your game can
better support modern Linux distros)
You can also add other optional features to bevy, if you’d like.
Your Cargo.toml should now look something like this:
[package]
name = "my_game"
version = "0.1.0"
edition = "2021"

[dependencies]
bevy = { version = "0.16", features = ["wayland"] }
If you plan to customize bevy a lot, I recommend a dedicated dependency section. It makes everything easier to read, compared to having everything on one line.
[dependencies.bevy]
version = "0.16"
features = [
  "wayland",
  # ...
]
The src/main.rs file is your main source code file. This is where you
start writing your Rust code. For a minimal Bevy app, you need
at least the following:
use bevy::prelude::*;

fn main() {
    App::new()
        .add_plugins(DefaultPlugins)
        .run();
}
You can now compile and run your project. The first time, this will take a while, as it needs to build the whole Bevy engine and dependencies. Subsequent runs should be fast. You can do this from your IDE/editor, or the commandline:
cargo run
While this is enough to get you started, there are many tweaks you can do to your compiler / build toolchain configuration, for faster compile times and better performance. At the very least, consider enabling optimizations.
Documentation
You can generate your own docs (like what is on docs.rs), for offline use, including everything from your own project and all dependencies, all in one place.
cargo doc --open
This will build all the HTML docs and open them in your web browser.
It does not require an internet connection, and gives you an easy way to search the API docs for all crates in your dependency tree all at once. It is more useful than the online version of the docs.
What’s Next?
Have a look at the guided tutorial page of this book and Bevy’s official examples.
Check out the Bevy Assets Website to find other tutorials, learning resources from the community, and plugins to use in your project.
Join the community on Discord to chat with us!
Running into Issues?
If something is not working, be sure to check the Common Pitfalls chapter, to see if this book has something to help you. Solutions to some of the most common issues that Bevy community members have encountered are documented there.
If you need help, use GitHub Discussions, or feel welcome to come chat and ask for help in Discord.
GPU Drivers
To work at its best, Bevy needs DirectX 12 (Windows) or Vulkan (Linux, Android, Windows). macOS/iOS should just work, without any special driver setup, using Metal.
OpenGL (GLES3) can be used as a fallback, but will likely have issues (some bugs, unsupported features, worse performance).
Make sure you have compatible hardware and drivers installed on your system. Your users will also need to satisfy this requirement.
If Bevy is not working, install the latest drivers for your OS, or check with your Linux distribution whether Vulkan needs additional packages to be installed.
Web games are supported and should work in any modern browser, using WebGL2. Performance is limited and some Bevy features will not work. The new experimental high-performance WebGPU API is also supported, but browser adoption is still limited.
| Bevy Version: | (any) |
|---|
This entire book is outdated and no longer maintained. I am keeping it online, in case anyone still finds any of the information in it useful. To adapt to newer versions of Bevy, please consult Bevy's migration guides.
Text Editor / IDE
This sub-chapter contains tips for different text editors and IDEs.
Bevy is, for the most part, like any other Rust project. If your editor/IDE is set up for Rust, that might be all you need. This sub-chapter contains additional information that may be useful for Bevy development.
If you have any tips/advice/configurations for your editor of choice, that you’d like to share with the community, please create a GitHub Issue, so we can add it to the book. If your editor is not in the list, I will add it.
| Bevy Version: | 0.16 | (outdated!) |
|---|
This entire book is outdated and no longer maintained. I am keeping it online, in case anyone still finds any of the information in it useful. To adapt to newer versions of Bevy, please consult Bevy's migration guides.
Visual Studio Code
If you are a VSCode user and you’d like something to be added to this page, please file a GitHub Issue.
Rust Language Support
For good Rust support, install the Rust Analyzer plugin.
Speed Up Rust Analyzer
If you have used .cargo/config.toml to set a non-default linker for fast
compiles, Rust Analyzer will, unfortunately, ignore it. You need to also
configure RA to use it, with the following setting (in VSCode settings.json):
Windows:
"rust-analyzer.cargo.extraEnv": {
    "RUSTFLAGS": "-Clinker=rust-lld.exe"
}
Linux (mold):
"rust-analyzer.cargo.extraEnv": {
    "RUSTFLAGS": "-Clinker=clang -Clink-arg=-fuse-ld=mold"
}
Linux (lld):
"rust-analyzer.cargo.extraEnv": {
    "RUSTFLAGS": "-Clinker=clang -Clink-arg=-fuse-ld=lld"
}
Run configuration
When running your app/game, Bevy will search for the assets folder in the path
specified in the BEVY_ASSET_ROOT or CARGO_MANIFEST_DIR environment variable.
This allows cargo run to work correctly from the terminal.
If you want to run your project from VSCode in a non-standard way (say, inside a debugger), you have to be sure to set that correctly.
If this is not set, Bevy will search for assets alongside the executable
binary, in the same folder where it is located. This makes things easy for
distribution. However, during development, since your executable is located
in the target directory where cargo placed it, Bevy will be unable to
find the assets.
Here is a snippet showing how to create a run configuration for debugging Bevy
(with lldb):
{
    "type": "lldb",
    "request": "launch",
    "name": "Debug my game",
    "cargo": {
        "args": [
            "build",
        ],
    },
    "args": [],
    "cwd": "${workspaceFolder}",
    "env": {
        "CARGO_MANIFEST_DIR": "${workspaceFolder}",
    }
}
If you are working on Bevy itself, here is a config for running the breakout example:
{
    "type": "lldb",
    "request": "launch",
    "name": "Debug example 'breakout'",
    "cargo": {
        "args": [
            "build",
            "--example=breakout",
            "--package=bevy"
        ],
        "filter": {
            "name": "breakout",
            "kind": "example"
        }
    },
    "args": [],
    "cwd": "${workspaceFolder}",
    "env": {
        "CARGO_MANIFEST_DIR": "${workspaceFolder}",
    }
}
To support dynamic linking, you should also add the following, inside the "env" section:
Linux:
"LD_LIBRARY_PATH": "${workspaceFolder}/target/debug/deps:${env:HOME}/.rustup/toolchains/stable-x86_64-unknown-linux-gnu/lib",
(replace stable-x86_64-unknown-linux-gnu if you use a different toolchain/architecture)
Windows: I don’t know. If you do, please file an issue!
| Bevy Version: | 0.16 | (outdated!) |
|---|
This entire book is outdated and no longer maintained. I am keeping it online, in case anyone still finds any of the information in it useful. To adapt to newer versions of Bevy, please consult Bevy's migration guides.
JetBrains (RustRover, IntelliJ, CLion)
If you are a JetBrains user and you’d like something to be added to this page, please file a GitHub Issue.
Rust Language Support
When using queries, type information gets lost due to Bevy relying on procedural macros. You can fix this by enabling procedural macro support in the IDE.
- type
Experimental featurein the dialog of theHelp | Find Actionaction - enable the features
org.rust.cargo.evaluate.build.scriptsandorg.rust.macros.proc
| Bevy Version: | 0.16 | (outdated!) |
|---|
This entire book is outdated and no longer maintained. I am keeping it online, in case anyone still finds any of the information in it useful. To adapt to newer versions of Bevy, please consult Bevy's migration guides.
Kakoune
If you are a Kakoune user and you’d like something to be added to this page, please file a GitHub Issue.
Rust Language Support (LSP with Rust Analyzer)
You can use kakoune-lsp with rust-analyzer.
You want to install just the RA server, without the official VSCode plugin.
You can manage it via rustup:
rustup component add rust-analyzer
To set up kak-lsp, add the following to ~/.config/kak/kakrc:
eval %sh{kak-lsp}
lsp-enable
You want to create a keybinding to open the LSP menu, from where you can
access all the various actions/commands that Rust Analyzer can do to assist
you as you code. For example, to bind it to the R key:
map global normal "R" ": enter-user-mode lsp<ret>" -docstring "LSP mode"
There are other options that you might like. For example, to automatically
# automatically highlight the symbol under the cursor to show where it is used
set global lsp_auto_highlight_references true
# automatically show help for function signatures
lsp-auto-signature-help-enable
To find out what else is available, type :lsp-enable and see what shows
up in the list of autocompletions / suggestions. You can run these commands
manually to control the relevant features, or add them to your kakrc,
if you want them to be enabled by default.
General Rust settings
To set various standard Kakoune editor options for Rust:
hook global BufSetOption filetype=rust %{
    set buffer tabstop 4
    set buffer indentwidth 4
    set buffer formatcmd 'rustfmt'
    expandtab
    # etc ...
}
Autoformatting
To manually trigger code formatting, use the keybinding from the LSP menu.
For example, if you bound the LSP menu to R, you can just press Rf.
If you would like to format on save, add the following to your kakrc:
hook global BufSetOption filetype=rust %{
    hook buffer BufWritePre .* lsp-formatting-sync
}
Personally, I prefer to instead create a separate command for formatting and saving, so that it is opt-in and does not happen every time I save a file:
define-command W %{
    lsp-formatting-sync
    w
}
Now I can just type :W to save with formatting and :w to save without formatting.
Configuring Rust Analyzer
You might need to tweak various settings for the RA server itself, similar to how you can do in other editors (like VS Code).
Copy the following default configuration into your kakrc:
hook -group lsp-filetype-rust global BufSetOption filetype=rust %{
    set-option buffer lsp_servers %{
        [rust-analyzer]
        root_globs = ["Cargo.toml"]
        single_instance = true
        [rust-analyzer.experimental]
        commands.commands = ["rust-analyzer.runSingle"]
        hoverActions = true
        [rust-analyzer.settings.rust-analyzer]
        # See https://rust-analyzer.github.io/manual.html#configuration
        # cargo.features = []
        check.command = "clippy"
        [rust-analyzer.symbol_kinds]
        Constant = "const"
        Enum = "enum"
        EnumMember = ""
        Field = ""
        Function = "fn"
        Interface = "trait"
        Method = "fn"
        Module = "mod"
        Object = ""
        Struct = "struct"
        TypeParameter = "type"
        Variable = "let"
    }
}
(this was obtained from the output of the kak-lsp command, which is
evaluated to set up kak-lsp)
You can now customize it to your liking. The various options for RA go under
the [rust-analyzer.settings.rust-analyzer] section.
| Bevy Version: | 0.16 | (outdated!) |
|---|
This entire book is outdated and no longer maintained. I am keeping it online, in case anyone still finds any of the information in it useful. To adapt to newer versions of Bevy, please consult Bevy's migration guides.
Vim
If you are a Vim user and you’d like something to be added to this page, please file a GitHub Issue.
| Bevy Version: | 0.16 | (outdated!) |
|---|
This entire book is outdated and no longer maintained. I am keeping it online, in case anyone still finds any of the information in it useful. To adapt to newer versions of Bevy, please consult Bevy's migration guides.
Emacs
If you are an Emacs user and you’d like something to be added to this page, please file a GitHub Issue.
| Bevy Version: | 0.16 | (outdated!) |
|---|
This entire book is outdated and no longer maintained. I am keeping it online, in case anyone still finds any of the information in it useful. To adapt to newer versions of Bevy, please consult Bevy's migration guides.
Configuring Bevy
Bevy is very modular and configurable. It is implemented as many separate cargo crates, allowing you to remove the parts you don’t need. Higher-level functionality is built on top of lower-level foundational crates, and can be disabled or replaced with alternatives.
The lower-level core crates (like the Bevy ECS) can also be used completely standalone, or integrated into otherwise non-Bevy projects.
Bevy Cargo Features
You can enable/disable various parts of Bevy using cargo features.
Many common features are enabled by default. Unfortunately, Cargo does not let you just disable individual default features. If you want to disable some of them, you need to disable all of them and re-enable the ones you need.
This is highly recommended if you are developing a library crate. It is also a good way to reduce binary sizes, if you care about that.
Here is how you might configure your Bevy:
[dependencies.bevy]
version = "0.12"
# Disable the default features if there are any that you do not want
default-features = false
features = [
  # These are the default features:
  # (re-enable whichever you like)

  # Parts of Bevy:
  "animation",                   # Enable animation for everything that supports it
  "bevy_asset",                  # Asset management
  "bevy_audio",                  # Audio support
  "bevy_color",                  # Color management
  "bevy_core_pipeline",          # Bevy's GPU rendering architecture
  "bevy_gilrs",                  # Gamepad/controller support
  "bevy_gizmos",                 # Gizmos (drawing debug lines and shapes)
  "bevy_image",                  # Image support
  "bevy_input_focus",            # Input focusing system for UI
  "bevy_log",                    # Logging to console
  "bevy_mesh_picking_backend",   # 3D mesh picking (selection by cursor)
  "bevy_pbr",                    # 3D rendering and Physically Based Shading
  "bevy_picking",                # Picking (selection of objects by cursor)
  "bevy_render",                 # GPU support (based on `wgpu`)
  "bevy_scene",                  # ECS Scenes
  "bevy_sprite",                 # 2D rendering (sprites, meshes, text)
  "bevy_sprite_picking_backend", # 2D sprite picking (selection by cursor)
  "bevy_state",                  # App state management
  "bevy_text",                   # Text rendering
  "bevy_ui",                     # UI toolkit
  "bevy_ui_picking_backend",     # UI node picking (selection by cursor)
  "bevy_window",                 # Window management
  "bevy_winit",                  # Cross-platform window management support

  # Low-level tunables
  "std",            # Use the Rust standard library (important!)
  "async_executor", # Enable the Async Executor (Bevy task pools)
  "multi_threaded", # Enable CPU multithreading
  "sysinfo_plugin", # Support CPU and RAM usage diagnostics
  "custom_cursor",  # Support custom cursors

  # Platform-Specific
  "x11",                   # Linux: Support X11 windowing system
  "android_shared_stdcxx", # Android: use shared C++ library
  "android-game-activity", # Android: use GameActivity instead of NativeActivity
  "webgl2",                # Web: use WebGL2 instead of WebGPU

  # Built-in Data
  "default_font",       # Built-in default font for UI (Fira Mono)
  "smaa_luts",          # Support SMAA antialiasing
  "tonemapping_luts",   # Support different camera Tonemapping modes (enables KTX2+zstd)

  # Asset File Format Support
  "bevy_gltf", # GLTF 3D asset support
  "png",       # PNG image format for simple 2D images
  "hdr",       # HDR image format
  "ktx2",      # KTX2 format for GPU texture data
  "zstd",      # ZSTD compression support in KTX2 files
  "vorbis",    # Audio: OGG Vorbis


  # These are other (non-default) features that may be of interest:
  # (add any of these that you need)

  # General Bevy features
  "ghost_nodes", # UI ghost nodes

  # Low level tunables
  "async-io",             # Use `async-io` instead of `futures-lite`
  "serialize",            # Support for `serde` Serialize/Deserialize
  "subpixel_glyph_atlas", # Subpixel antialiasing for text/fonts
  "reflect_documentation", # Documentation reflection support
  "reflect_functions",    # Function reflection support

  # Platform-Specific
  "wayland",                  # Linux: Support Wayland windowing system
  "accesskit_unix",           # UNIX-like: AccessKit Accessibility Framework support
  "android-native-activity",  # Android: Use NativeActivity instead of GameActivity
  "spirv_shader_passthrough", # Vulkan: allow direct loading of SPIR-V shader blobs without validation
  "webgpu",                   # Web: use the faster, modern, experimental WebGPU API instead of WebGL2
  "statically-linked-dxc",    # Windows: embed the DirectX Shader Compiler into your game binary
  "web",                      # Web platform integration
  "libm",                     # Use libm for math on non-std / embedded platforms
  "critical-section",         # For supporting no-std / embedded
  "default_no_std",

  # Graphics/rendering features (may cause issues on old/weak GPUs)
  "experimental_pbr_pcss", # PCSS shadow filtering
  "meshlet",               # Meshlet / virtual geometry rendering (like Unreal's Nanite)
  "pbr_anisotropy_texture", # Support Anisotropy Map texture
  "pbr_multi_layer_material_textures", # Support multi-layer textures
  "pbr_specular_textures",  # Support specular map textures
  "pbr_transmission_textures", # Support textures for light transimssion (translucency)

  # Development features
  "dynamic_linking",     # Dynamic linking for faster compile-times
  "asset_processor",     # Enable asset processing support
  "bevy_debug_stepping", # Enable stepping through ECS systems for debugging
  "bevy_dev_tools",      # Extra dev functionality (like FPS overlay)
  "bevy_remote",         # Enable BRP (Bevy Remote Protocol) for integration with editors and external dev tools
  "file_watcher",        # Asset hot-reloading
  "meshlet_processor",   # Asset processor to convert meshes into meshlet format
  "glam_assert",         # Math validation / debug assertions
  "debug_glam_assert",   # Math validation / debug assertions
  "bevy_ui_debug",       # UI debugging functionality
  "bevy_ci_testing",     # For testing of Bevy itself in CI
  "embedded_watcher",    # Hot-reloading for Bevy's internal/builtin assets
  "configurable_error_handler",
  "trace",               # Enable tracing
  "trace_chrome",        # Enable tracing using the Chrome backend
  "trace_tracy",         # Enable tracing using Tracy
  "trace_tracy_memory",  # Enable memory tracking for Tracy
  "track_location",      # Enable location tracking
  "detailed_trace",      # Extra verbose tracing

  # Asset File Format Support
  "basis-universal", # Basis Universal GPU texture compression format
  "bmp",  # Uncompressed BMP image format
  "dds",  # DDS (DirectX) format for GPU textures, alternative to KTX2
  "exr",  # OpenEXR advanced image format
  "ff",   # FF image support
  "flac", # Audio: FLAC lossless format
  "gif",  # GIF legacy image format
  "ico",  # ICO image format (Windows icons)
  "jpeg", # JPEG lossy format for photos
  "mp3",  # Audio: MP3 format (not recommended)
  "minimp3", # Alternative MP3 decoder
  "pnm",  # PNM (pam, pbm, pgm, ppm) image format
  "qoi",  # QOI image format
  "shader_format_glsl",  # GLSL shader support
  "shader_format_spirv", # SPIR-V shader support
  "shader_format_wesl",  # WESL (Extended WGSL) shader support
  "tga",  # Truevision Targa image format
  "tiff", # TIFF image format
  "wav",  # Audio: Uncompressed WAV
  "webp", # WebP image format
  "zlib", # zlib compression support in KTX2 files
  "symphonia-aac", # AAC audio format (via Symphonia library)
  "symphonia-flac", # Alternative FLAC audio decoder (via Symphonia library)
  "symphonia-isomp4", # MP4 format (via Symphonia library)
  "symphonia-vorbis", # Alternative Ogg Vorbis audio support (via Symphonia library)
  "symphonia-wav", # Alternative WAV audio support (via Symphonia library)
  "symphonia-all", # All Audio formats supported by the Symphonia library
]
(See here for a full list of Bevy’s cargo features.)
Graphics / Rendering
For a graphical application or game (most Bevy projects), you can
include bevy_winit and your selection of Rendering features. For
Linux support, you need at least one of x11 or wayland.
bevy_render and bevy_core_pipeline are required for any application using
Bevy rendering. They are automatically added if you enable higher-level stuff
like bevy_ui, bevy_pbr, bevy_sprite, etc.
If you only need 2D and no 3D, add bevy_sprite.
If you only need 3D and no 2D, add bevy_pbr. If you are loading 3D models
from GLTF files, add bevy_gltf.
If you are using Bevy UI, you need bevy_text and bevy_ui. default_font
embeds a simple font file, which can be useful for prototyping, so you don’t
need to have a font asset in your project. In a real project, you probably
want to use your own fonts, so your text can look good with your game’s art
style. In that case, you can disable the default_font feature.
If you want to draw debug lines and shapes on-screen, add bevy_gizmos.
If you don’t need any graphics (like for a dedicated game server, scientific simulation, etc.), you may remove all of these features.
File Formats
You can use the relevant cargo features to enable/disable support for loading assets with various different file formats.
See here for more information.
Input Devices
If you do not care about gamepad (controller/joystick)
support, you can disable bevy_gilrs.
Platform-specific
Linux Windowing Backend
On Linux, you can choose to support X11, Wayland,
or both. Only x11 is enabled by default, as it is the legacy system
that should be compatible with most/all distributions, to make your builds
smaller and compile faster. You might want to additionally enable wayland,
to fully and natively support modern Linux environments. This will add a few
extra transitive dependencies to your project.
Some Linux distros or platforms might struggle with X11 and work better with Wayland. You should enable both for best compatibility.
WebGPU vs WebGL2
On [Web/WASM][platform::web], you have a choice between these two rendering backends.
WebGPU is the modern experimental solution, offering good performance and full feature support, but browser support for it is limited (only known to work in very recent versions of Chrome and Firefox nightly).
WebGL2 gives the best compatibility with all browsers, but has worse performance and some limitations on what kinds of graphics features you can use in Bevy.
The webgl2 cargo feature selects WebGL2, webgpu selects WebGPU. Also
consider enabling web for general web support.
Development Features
While you are developing your project, these features might be useful:
Asset hot-reloading and processing
The file_watcher feature enables support for hot-reloading of
assets, supported on desktop platforms.
The asset_processor feature enables support for asset
processing, allowing you to automatically convert and
optimize assets during development.
Dynamic Linking
dynamic_linking causes Bevy to be built and linked as a shared/dynamic
library. This will make recompilation much faster during development.
This is only supported on desktop platforms. Known to work very well on Linux. Windows and macOS are also supported, but are less tested and have had issues in the past.
It is not recommended to enable this for release builds you intend to publish to other people, unless you have a very good special reason to and you know what you are doing. It introduces unneeded complexity (you need to bundle extra files) and potential for things to not work correctly. You should only use it during development.
For this reason, it may be convenient to specify the feature as a commandline
option to cargo, instead of putting it in your Cargo.toml. Simply run your
project like this:
cargo run --features bevy/dynamic_linking
You could also add this to your IDE/editor configuration.
Tracing
The trace feature is useful for profiling and diagnosing performance issues.
trace_chrome and trace_tracy choose the backend you want to use to
visualize the traces.
See Bevy’s official docs on profiling to learn more.
| Bevy Version: | (any) |
|---|
This entire book is outdated and no longer maintained. I am keeping it online, in case anyone still finds any of the information in it useful. To adapt to newer versions of Bevy, please consult Bevy's migration guides.
Community Plugins Ecosystem
There is a growing ecosystem of unofficial community-made plugins for Bevy. They provide a lot of functionality that is not officially included with the engine. You might greatly benefit from using some of these in your projects.
To find such plugins, you should search the Bevy Assets page on the official Bevy website. This is the official registry of known community-made things for Bevy. If you publish your own plugins for Bevy, you should contribute a link to be added to that page.
Beware that some 3rd-party plugins may use unusual licenses! Be sure to check the license before using a plugin in your project.
Other pages in this book with valuable information when using 3rd-party plugins:
- Some plugins may require you to configure Bevy in some specific way.
- If you are using bleeding-edge unreleased Bevy (main), you may encounter difficulties with plugin compatibility.
| Bevy Version: | 0.16 | (outdated!) |
|---|
This entire book is outdated and no longer maintained. I am keeping it online, in case anyone still finds any of the information in it useful. To adapt to newer versions of Bevy, please consult Bevy's migration guides.
Dev Tools and Editors for Bevy
Bevy does not yet have an official editor or other such tools. An official editor is planned as a long-term future goal. In the meantime, here are some community-made tools to help you.
Editor
You can use Blender as a level/scene editor, by exporting your scenes to GLTF. The [Blenvy][project::blender_bevy_components_workflow] project provides a nice experience / workflow, by allowing you to setup your Bevy ECS Components in Blender, include them in the exported GLTF, and use them in Bevy.
bevy_inspector_egui gives you a simple
editor-like property inspector window in-game. It lets you modify the values of
your components and resources in real-time as the game is running.
There is a repo for WIP development of Bevy’s official editor:
bevy_editor_prototypes. Not really ready for use yet.
Diagnostics
bevy_mod_debugdump is a tool to help visualize
your App Schedules (all of the registered
systems with their ordering
dependencies), and the Bevy Render Graph.
| Bevy Version: | 0.12 | (outdated!) |
|---|
This entire book is outdated and no longer maintained. I am keeping it online, in case anyone still finds any of the information in it useful. To adapt to newer versions of Bevy, please consult Bevy's migration guides.
Performance Tunables
Bevy offers a lot of features that should improve performance in most cases, and most of them are enabled by default. However, they might be detrimental to some projects.
Luckily, most of them are configurable. Most users should probably not touch these settings, but if your game does not perform well with Bevy’s default configuration, this page will show you some things you can try to change, to see if they help your project.
Bevy’s default configruation is designed with scalability in mind. That is, so that you don’t have to worry too much about performance, as you add more features and complexity to your project. Bevy will automatically take care to distribute the workload as to make good use of the available hardware (GPU, CPU multithreading).
However, it might hurt simpler projects or have undesirable implications in some cases.
This trade-off is good, because small and simple games will probably be fast enough anyway, even with the additional overhead, but large and complex games will benefit from the advanced scheduling to avoid bottlenecks. You can develop your game without performance degrading much as you add more stuff.
Multithreading Overhead
Bevy has a smart multithreaded executor, so that your systems can automatically run in parallel across multiple CPU cores, when they don’t need conflicting access to the same data, while honoring ordering constraints. This is great, because you can just keep adding more systems to do different things and implement more features in your game, and Bevy will make good use of modern multi-core CPUs with no effort from you!
However, the smart scheduling adds some overhead to all common operations (such as every time a system runs). In projects that have little work to do every frame, especially if all of your systems complete very quickly, the overhead can add up to overshadow the actual useful work you are doing!
You might want to try disabling multithreading, to see if your game might perform better without it.
Disabling Multithreading for Update Schedule Only
Multithreading can be disabled per-schedule. This means it
is easy to disable it only for your code / game logic (in the Update schedule),
while still leaving it enabled for all the Bevy engine internal systems.
This could speed up simple games that don’t have much gameplay logic, while still letting the engine run with multithreading.
You can edit the settings of a specific schedule via the app builder:
use bevy::ecs::schedule::ExecutorKind;

App::new()
    .add_plugins(DefaultPlugins)
    .edit_schedule(Update, |schedule| {
        schedule.set_executor_kind(ExecutorKind::SingleThreaded);
    })
    // ...
Disabling Multithreading Completely
If you want to try to completely disable multithreading for everything,
you can do so by removing the multi-threaded default Cargo feature.
In Cargo.toml
[dependencies.bevy]
version = "0.12"
default-features = false
features = [
   # re-enable everything you need, without `multi-threaded`
   # ...
]
(see here for how to configure Bevy’s cargo features)
This is generally not recommended. Bevy is designed to work with multithreading. Only consider it if you really need it (like if you are making a special build of your project to run on a system where it makes sense, like WASM or old hardware).
Multithreading Configuration
You can configure how many CPU threads Bevy uses.
Bevy creates threads for 3 different purposes:
- Compute: where all your systems and all per-frame work is run
- AsyncCompute: for background processing independent from framerate
- I/O: for loading of assets and other disk/network activity
By default, Bevy splits/partitions the available CPU threads as follows:
- I/O: 25% of the available CPU threads, minimum 1, maximum 4
- AsyncCompute: 25% of the available CPU threads, minimum 1, maximum 4
- Compute: all remaining threads
This means no overprovisioning. Every hardware CPU thread is used for one specific purpose.
This provides a good balance for mixed CPU workloads. Particularly for games that load a lot of assets (especially if assets are loaded dynamically during gameplay), the dedicated I/O threads will reduce stuttering and load times. Background computation will not affect your framerate. Etc.
Examples:
| CPU Cores/Threads | # I/O | # AsyncCompute | # Compute |
|---|---|---|---|
| 1-3 | 1 | 1 | 1 |
| 4 | 1 | 1 | 2 |
| 6 | 2 | 2 | 2 |
| 8 | 2 | 2 | 4 |
| 10 | 3 | 3 | 4 |
| 12 | 3 | 3 | 6 |
| 16 | 4 | 4 | 8 |
| 24 | 4 | 4 | 16 |
| 32 | 4 | 4 | 24 |
Note: Bevy does not currently have any special handling for asymmetric (big.LITTLE or Intel P/E cores) CPUs. In an ideal world, maybe it would be nice to use the number of big/P cores for Compute and little/E cores for I/O.
Overprovisioning
However, if your game does very little I/O (asset loading) or background computation, this default configuration might be sub-optimal. Those threads will be sitting idle a lot of the time. Meanwhile, Compute, which is your frame update loop and is important to your game’s overall framerate, is limited to fewer threads. This can be especially bad on CPUs with few cores (less than 4 total threads).
For example, in my projects, I usually load all my assets during a loading screen, so the I/O threads are unused during normal gameplay. I rarely use AsyncCompute.
If your game is like that, you might want to make all CPU threads available for Compute. This could boost your framerate, especially on CPUs with few cores. However, any AsyncCompute or I/O workloads during gameplay could impact your game’s performance / framerate consistency.
Here is how to do that:
use bevy::core::TaskPoolThreadAssignmentPolicy;
use bevy::tasks::available_parallelism;

App::new()
    .add_plugins(DefaultPlugins.set(TaskPoolPlugin {
        task_pool_options: TaskPoolOptions {
            compute: TaskPoolThreadAssignmentPolicy {
                // set the minimum # of compute threads
                // to the total number of available threads
                min_threads: available_parallelism(),
                max_threads: std::usize::MAX, // unlimited max threads
                percent: 1.0, // this value is irrelevant in this case
            },
            // keep the defaults for everything else
            ..default()
        }
    }))
    // ...
And here is an example of an entirely custom configuration:
App::new()
    .add_plugins(DefaultPlugins.set(TaskPoolPlugin {
        task_pool_options: TaskPoolOptions {
            min_total_threads: 1,
            max_total_threads: std::usize::MAX, // unlimited threads
            io: TaskPoolThreadAssignmentPolicy {
                // say we know our app is i/o intensive (asset streaming?)
                // so maybe we want lots of i/o threads
                min_threads: 4,
                max_threads: std::usize::MAX,
                percent: 0.5, // use 50% of available threads for I/O
            },
            async_compute: TaskPoolThreadAssignmentPolicy {
                // say our app never does any background compute,
                // so we don't care, but keep one thread just in case
                min_threads: 1,
                max_threads: 1,
                percent: 0.0,
            },
            compute: TaskPoolThreadAssignmentPolicy {
                // say we want to use at least half the CPU for compute
                // (maybe over-provisioning if there are very few cores)
                min_threads: available_parallelism() / 2,
                // but limit it to a maximum of 8 threads
                max_threads: 8,
                // 1.0 in this case means "use all remaining threads"
                // (that were not assigned to io/async_compute)
                // (clamped to min_threads..=max_threads)
                percent: 1.0,
            },
        }
    }))
    // ...
Pipelined Rendering
Bevy has a pipelined rendering architecture. This means Bevy’s GPU-related systems (that run on the CPU to prepare work for the GPU every frame) will run in parallel with all the normal systems for the next frame. Bevy will render the previous frame in parallel with the next frame update.
This will improve GPU utilization (make it less likely the GPU will sit idle waiting for the CPU to give it work to do), by making better use of CPU multithreading. Typically, it can result in 10-30% higher framerate, sometimes more.
However, it can also affect perceived input latency (“click-to-photon” latency), often for the worse. The effects of the player’s input might be shown on screen delayed by one frame. It might be compensated by the faster framerate, or it might not be. Here is a diagram to visualize what happens:
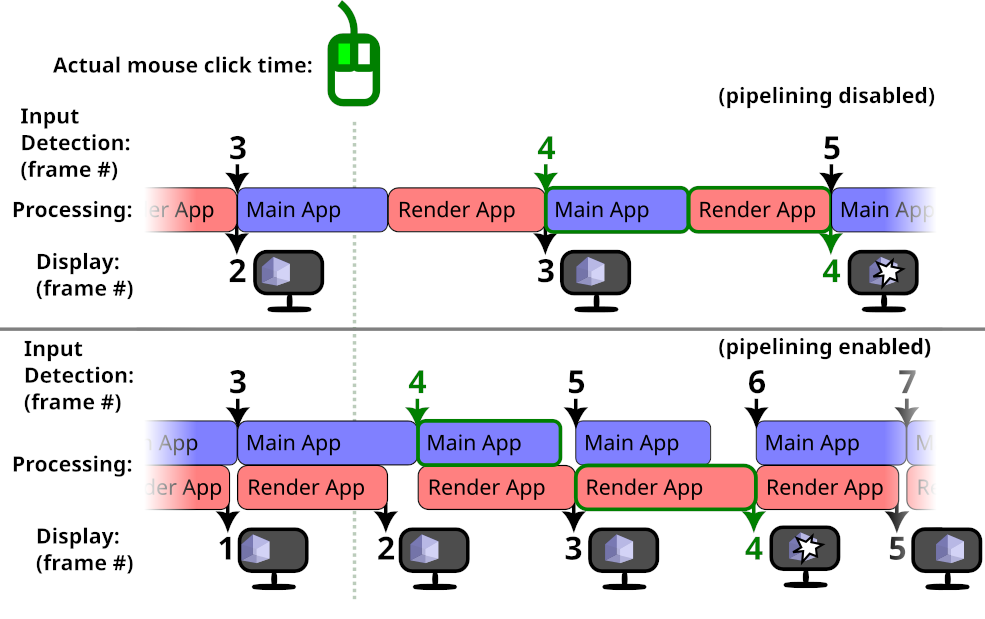
The actual mouse click happens in-between frames. In both cases, frame #4 is when the input is detected by Bevy. In the pipelined case, rendering of the previous frame is done in parallel, so an additional frame without the input appears on-screen.
Without pipelining, the user will see their input delayed by 1 frame. With pipelining, it will be delayed by 2 frames.
However, in the diagram above, the frame rate increase from pipelining is big enough that overall the input is processed and displayed sooner. Your application might not be so lucky.
If you care more about latency than framerate, you might want to disable pipelined rendering. For the best latency, you probably also want to disable VSync.
Here is how to disable pipelined rendering:
use bevy::render::pipelined_rendering::PipelinedRenderingPlugin;

App::new()
    .add_plugins(DefaultPlugins.build().disable::<PipelinedRenderingPlugin>())
    // ...
    .run();
Clustered Forward Rendering
By default, Bevy uses a Clustered Forward Rendering architecture for 3D. The viewport (on-screen area where the game is displayed) is split into rectangles/voxels, so that the lighting can be handled separately for each small portion of the scene. This allows you to use many lights in your 3D scenes, without destroying performance.
The dimensions of these clusters can affect rendering performance. The default settings are good for most 3D games, but fine-tuning them could improve performance, depending on your game.
In games with a top-down-view camera (such as many strategy and simulation games), most of the lights tend to be a similar distance away from the camera. In such cases, you might want to reduce the number of Z slices (so that the screen is split into smaller X/Y rectangles, but each one covering more distance/depth):
use bevy::pbr::ClusterConfig;

commands.spawn((
    Camera3dBundle {
        // ... your 3D camera configruation
        ..Default::default()
    },
    ClusterConfig::FixedZ {
        // 4096 clusters is the Bevy default
        // if you don't have many lights, you can reduce this value
        total: 4096,
        // Bevy default is 24 Z-slices
        // For a top-down-view game, 1 is probably optimal.
        z_slices: 1,
        dynamic_resizing: true,
        z_config: Default::default(),
    }
));
For games that use very few lights, or where lights affect the entire scene ( such as inside a small room / indoor area), you might want to try disabling clustering:
commands.spawn((
    Camera3dBundle {
        // ... your 3D camera configruation
        ..Default::default()
    },
    ClusterConfig::Single,
));
Changing these settings will probably result in bad performance for many games, outside of the specific scenarios described above.
| Bevy Version: | (any) |
|---|
This entire book is outdated and no longer maintained. I am keeping it online, in case anyone still finds any of the information in it useful. To adapt to newer versions of Bevy, please consult Bevy's migration guides.
Using bleeding-edge Bevy (bevy main)
Bevy development moves very fast, and there are often exciting new things that are yet unreleased. This page will give you advice about using development versions of bevy.
Quick Start
If you are not using any 3rd-party plugins and just want to use the bevy main development branch:
[dependencies]
bevy = { git = "https://github.com/bevyengine/bevy" }
However, if you are working with external plugins, you should read the rest of this page. You will likely need to do more to make everything compatible.
Should you use bleeding-edge Bevy? What version of Bevy should you use?
Bevy follows a very loose “train release” model. Every 3 months, a new major release is prepared, which will contain all new developments (features, fixes, etc.) since the last release. This begins the Release Candidate (RC) process. RC releases are done frequently over the subsequent weeks / months, while the final release is prepared.
Further, Bevy usually follows up every major release with a patch release or several, as needed, to fix any bugs discovered after release. It will not contain all fixes, just small non-breaking things that are considered critical enough.
Most Bevy projects should use the latest release on crates.io. If you want
to play it safe, you can wait until the first patch release (0.*.1),
before upgrading to a new major version. You might also want to wait for
any 3rd-party plugins you are using to support the new Bevy version.
On the other hand, before an upcoming release, you are highly encouraged to try the Release Candidate and provide feedback and bug reports before the final release.
The latest in-development code from git is only really useful for experimentation and Bevy development during each dev cycle. If you want to join in on the action, feel free to give it a try!
If you are new to Bevy, this might not be for you. You will be more comfortable using the released version. It will have the best compatibility with community plugins and documentation.
The in-development version of Bevy has frequent and reckless breaking changes. Therefore, it can be very annoying to use for real projects. Also, 3rd-party plugin authors often don’t bother to stay compatible. You will face breakage often and probably have to fix it yourself.
Though, there are ways you can manage the breakage and make it less of a problem. Thanks to cargo, you can update bevy at your convenience, whenever you feel ready to handle any possible breaking changes.
You may want to consider forking the repositories of Bevy and any plugins you
use. Using your own forks allows you to easily apply fixes if needed, or edit
their Cargo.toml for any special configuration to make your project work.
It also makes it easy to contribute your fixes upstream.
If you choose to use Bevy main, you are highly encouraged to interact with the Bevy community on Discord and GitHub, so you can keep track of what’s going on, get help, or participate in discussions.
Common pitfall: mysterious compile errors
When changing between different versions of Bevy (say, transitioning an existing project from the released version to the git version), you might get lots of strange unexpected build errors.
You can typically fix them by removing Cargo.lock and the target directory:
rm -rf Cargo.lock target
See this page for more info.
If you are still getting errors, it is probably because cargo is trying to use multiple different versions of bevy in your dependency tree simultaneously. This can happen if some of the plugins you use have specified a different Bevy version/commit from your project.
If you are using any 3rd-party plugins, please consider forking them, so you can
edit their Cargo.toml and have control over how everything is configured.
Cargo Patches
In some cases, you might be able to use “cargo patches” to locally override
dependencies. For example, you might be able to point plugins to use your
fork of bevy, without forking and editing the plugin’s Cargo.toml, by
doing something like this:
# replace the bevy git URL source with ours
[patch."https://github.com/bevyengine/bevy"]
# if we have our own fork
bevy = { git = "https://github.com/me/bevy" }
# if we want to use a local path
bevy = { path = "../bevy" }
# some plugins might depend on individual bevy crates,
# instead of all of bevy, which means we need to patch
# every individual bevy crate specifically:
bevy_ecs = { path = "../bevy/crates/bevy_ecs" }
bevy_app = { path = "../bevy/crates/bevy_app" }
# ...

# replace released versions of crates (crates.io source) with ours
[patch.crates-io]
bevy_some_plugin = { git = "https://github.com/me/bevy_some_plugin", branch = "bevy_main" }
# also replace bevy itself
bevy = { path = "../bevy" }
# ...
Updating Bevy
It is recommended that you specify a known-good Bevy commit in your
Cargo.toml, so that you can be sure that you only update it when you
actually want to do so, avoiding unwanted breakage.
bevy = { git = "https://github.com/bevyengine/bevy", rev = "7a1bd34e" }
When you change anything, be sure to run:
cargo update
(or delete Cargo.lock)
Otherwise you risk errors from cargo not resolving dependencies correctly.
Advice for plugin authors
If you are publishing a plugin crate, here are some recommendations:
- Use the main branch in your repository for targeting the released version of Bevy
- Have a separate branch in your repository, to keep support for bevy main separate from your version for the released version of bevy
- Put information in your README to tell people how to find it
- Set up CI to notify you if your plugin is broken by new changes in bevy
Feel free to follow all the advice from this page, including cargo patches
as needed. Cargo patches only apply when you build your project directly,
not as a dependency, so they do not affect your users and can be safely kept
in your Cargo.toml.
CI Setup
Here is an example for GitHub Actions. This will run at 8:00 AM (UTC) every day to verify that your code still compiles. GitHub will notify you when it fails.
name: check if code still compiles

on:
  schedule:
    - cron: '0 8 * * *'

env:
  CARGO_TERM_COLOR: always

jobs:
  build:
    runs-on: ubuntu-latest

    steps:
      - uses: actions/checkout@v4
        with:
          ref: 'my-bevy-main-support-branch'

      - name: Install Dependencies
        run: sudo apt-get update && sudo apt-get install g++ pkg-config libx11-dev libasound2-dev libudev-dev

      - uses: actions-rs/toolchain@v1
        with:
          toolchain: stable
          override: true

      - name: Check code
        run: cargo update && cargo check --lib --examples
| Bevy Version: | (any) |
|---|
This entire book is outdated and no longer maintained. I am keeping it online, in case anyone still finds any of the information in it useful. To adapt to newer versions of Bevy, please consult Bevy's migration guides.
Common Pitfalls
This chapter covers some common issues or surprises that you might be likely to encounter when working with Bevy, with specific advice about how to address them.
| Bevy Version: | 0.14 | (outdated!) |
|---|
This entire book is outdated and no longer maintained. I am keeping it online, in case anyone still finds any of the information in it useful. To adapt to newer versions of Bevy, please consult Bevy's migration guides.
Strange Build Errors
Sometimes, you can get strange and confusing build errors when trying to compile your project.
If none of the advice on this page helps you, your issue might require further investigation. Reach out to the Bevy community via GitHub or Discord, and ask for help.
If you are using bleeding-edge Bevy (“main”), also see this page for advice.
Update your Rust
First, make sure your Rust is up-to-date. Bevy only officially supports the latest stable version of Rust at the time the Bevy version you are using was released, or nightly.
If you are using rustup to manage your Rust installation, you
can run:
rustup update
Clear the cargo state
Many kinds of build errors can often be fixed by forcing cargo to regenerate
its internal state (recompute dependencies, etc.). You can do this by deleting
the Cargo.lock file and the target directory.
rm -rf target Cargo.lock
Try building your project again after doing this. It is likely that the mysterious errors will go away.
Multiple versions of dependencies
If not, another reason might be that you have multiple versions of Bevy (or other dependencies) in your dependency tree. Rust/cargo allows multiple versions of the same crate to be linked at the same time into the same executable.
If you are using 3rd-party plugins, make sure you have specified the correct versions of all the plugins you use and that they are compatible with the Bevy version you are using. If you depend on a plugin that uses a different version of Bevy from the one you are using, they will not be interoperable.
You will get compiler errors like:
error[E0308]: mismatched types
  --> src/main.rs:12:20
   |
12 |         transform: Transform::from_xyz(1.0, 2.0, 3.0),
   |                    ^^^^^^^^^^^^^^^^^^^^^^^^^^^^^^^^^^ expected `Transform`, found a different `Transform`
   |
   = note: `Transform` and `Transform` have similar names, but are actually distinct types
note: `Transform` is defined in crate `bevy_transform`
  --> /home/iyes/.cargo/registry/src/index.crates.io-6f17d22bba15001f/bevy_transform-0.14.0-rc.2/src/components/transform.rs:43:1
   |
43 | pub struct Transform {
   | ^^^^^^^^^^^^^^^^^^^^
note: `Transform` is defined in crate `bevy_transform`
  --> /home/iyes/.cargo/registry/src/index.crates.io-6f17d22bba15001f/bevy_transform-0.12.1/src/components/transform.rs:41:1
   |
41 | pub struct Transform {
   | ^^^^^^^^^^^^^^^^^^^^
   = note: perhaps two different versions of crate `bevy_transform` are being used?
Or perhaps errors about common Bevy traits like Component, Bundle, or Plugins
not being implemented on types that clearly should have them.
New Cargo Resolver
Cargo recently added a new dependency resolver algorithm, that is incompatible with the old one. Bevy requires the new resolver.
If you are just creating a new blank Cargo project, don’t worry. This should
already be setup correctly by cargo new.
If you are getting weird compiler errors from Bevy dependencies, read on. Make sure you have the correct configuration, and then clear the cargo state.
Single-Crate Projects
In a single-crate project (if you only have one Cargo.toml file in your project),
if you are using the latest Rust2021 Edition, the new resolver is automatically
enabled.
So, you need either one of these settings in your Cargo.toml:
[package]
edition = "2021"
or
[package]
resolver = "2"
Multi-Crate Workspaces
In a multi-crate Cargo workspace, the resolver is a global setting for the whole workspace. It will not be enabled by default.
This can bite you if you are transitioning a single-crate project into a workspace.
You must add it manually to the top-level Cargo.toml for your Cargo Workspace:
[workspace]
resolver = "2"
| Bevy Version: | (any) |
|---|
This entire book is outdated and no longer maintained. I am keeping it online, in case anyone still finds any of the information in it useful. To adapt to newer versions of Bevy, please consult Bevy's migration guides.
Performance
Unoptimized debug builds
You can partially enable compiler optimizations in debug/dev mode!
You can enable higher optimizations for dependencies (incl. Bevy), but not your own code, to keep recompilations fast!
In Cargo.toml or .cargo/config.toml:
# Enable max optimizations for dependencies, but not for our code:
[profile.dev.package."*"]
opt-level = 3
The above is enough to make Bevy run fast. It will only slow down clean builds, without affecting recompilation times for your project.
If your own code does CPU-intensive work, you might want to also enable some optimization for it.
# Enable only a small amount of optimization in debug mode
[profile.dev]
opt-level = 1
Warning! If you are using a debugger (like gdb or lldb) to step through
your code, any amount of compiler optimization can mess with the experience.
Your breakpoints might be skipped, and the code flow might jump around in
unexpected ways. If you want to debug / step through your code, you might want
opt-level = 0.
Why is this necessary?
Rust without compiler optimizations is very slow. With Bevy in particular, the default cargo build debug settings will lead to awful runtime performance. Assets are slow to load and FPS is low.
Common symptoms:
- Loading high-res 3D models with a lot of large textures, from GLTF files, can take minutes! This can trick you into thinking that your code is not working, because you will not see anything on the screen until it is ready.
- After spawning even a few 2D sprites or 3D models, framerate may drop to unplayable levels.
Why not use --release?
You may have heard the advice: just run with --release! However, this is
bad advice. Don’t do it.
Release mode also disables “debug assertions”: extra checks useful during development. Many libraries also include additional stuff under that setting. In Bevy and WGPU that includes validation for shaders and GPU API usage. Release mode disables these checks, causing less-informative crashes, issues with hot-reloading, or potentially buggy/invalid logic going unnoticed.
Release mode also makes incremental recompilation slow. That negates Bevy’s fast compile times, and can be very annoying while you develop.
With the advice at the top of this page, you don’t need to build with
--release, just to test your game with adequate performance. You can use
it for actual release builds that you send to your users.
If you want, you can also enable LTO (Link-Time-Optimization) for the actual release builds, to squeeze out even more performance at the cost of very slow compile times.
Here is a configuration for the most aggressive optimizations possible:
[profile.release]
lto = true
opt-level = 3
codegen-units = 1
incremental = false
debug = false
| Bevy Version: | 0.14 | (outdated!) |
|---|
This entire book is outdated and no longer maintained. I am keeping it online, in case anyone still finds any of the information in it useful. To adapt to newer versions of Bevy, please consult Bevy's migration guides.
Obscure Rust compiler errors
You can get scary-looking compiler errors when you try to add systems to your Bevy app.
Common beginner mistakes
- Using
commands: &mut Commandsinstead ofmut commands: Commands. - Using
Query<MyStuff>instead ofQuery<&MyStuff>orQuery<&mut MyStuff>. - Using
Query<&ComponentA, &ComponentB>instead ofQuery<(&ComponentA, &ComponentB)>(forgetting the tuple) - Using your resource types directly without
ResorResMut. - Using your component types directly without putting them in a
Query. - Using a bundle type in a query. You want individual components.
- Using other arbitrary types in your function.
Note that Query<Entity> is correct, because the Entity ID is special;
it is not a component.
Error adding function as system
The errors can look like this:
error[E0277]: `for<'a, 'b, 'c> fn(…) {my_system}` does not describe a valid system configuration
   --> src/main.rs:11:30
    |
11  |         .add_systems(Update, my_system)
    |          -----------         ^^^^^^^^^ invalid system configuration
    |          |
    |          required by a bound introduced by this call
    |
    = help: the trait `IntoSystem<(), (), _>` is not implemented for fn item `for<'a, 'b, 'c> fn(…) {my_system}`, which is required by `for<'a, 'b, 'c> fn(…) {my_system}: IntoSystemConfigs<_>`
    = help: the following other types implement trait `IntoSystemConfigs<Marker>`:
              <(S0, S1) as IntoSystemConfigs<(SystemConfigTupleMarker, P0, P1)>>
              <(S0, S1, S2) as IntoSystemConfigs<(SystemConfigTupleMarker, P0, P1, P2)>>
              <(S0, S1, S2, S3) as IntoSystemConfigs<(SystemConfigTupleMarker, P0, P1, P2, P3)>>
              <(S0, S1, S2, S3, S4) as IntoSystemConfigs<(SystemConfigTupleMarker, P0, P1, P2, P3, P4)>>
              <(S0, S1, S2, S3, S4, S5) as IntoSystemConfigs<(SystemConfigTupleMarker, P0, P1, P2, P3, P4, P5)>>
              <(S0, S1, S2, S3, S4, S5, S6) as IntoSystemConfigs<(SystemConfigTupleMarker, P0, P1, P2, P3, P4, P5, P6)>>
              <(S0, S1, S2, S3, S4, S5, S6, S7) as IntoSystemConfigs<(SystemConfigTupleMarker, P0, P1, P2, P3, P4, P5, P6, P7)>>
              <(S0, S1, S2, S3, S4, S5, S6, S7, S8) as IntoSystemConfigs<(SystemConfigTupleMarker, P0, P1, P2, P3, P4, P5, P6, P7, P8)>>
            and 14 others
    = note: required for `for<'a, 'b, 'c> fn(…) {my_system}` to implement `IntoSystemConfigs<_>`
note: required by a bound in `bevy::prelude::App::add_systems`
   --> /home/iyes/.cargo/registry/src/index.crates.io-6f17d22bba15001f/bevy_app-0.14.0-rc.2/src/app.rs:287:23
    |
284 |     pub fn add_systems<M>(
    |            ----------- required by a bound in this associated function
...
287 |         systems: impl IntoSystemConfigs<M>,
    |                       ^^^^^^^^^^^^^^^^^^^^ required by this bound in `App::add_systems`
The error (confusingly) points to the place in your code where you try to add the system,
but in reality, the problem is actually in the fn function definition!
This is caused by your function having invalid parameters. Bevy can only accept special types as system parameters!
Error on malformed queries
You might also errors that look like this:
error[E0277]: `bevy::prelude::AnimationPlayer` is not valid to request as data in a `Query`
   --> src/main.rs:60:18
    |
60  |     mut players: Query<AnimationPlayer, &Transform>,
    |                  ^^^^^^^^^^^^^^^^^^^^^^^^^^^^^^^^^^ invalid `Query` data
    |
    = help: the trait `QueryData` is not implemented for `bevy::prelude::AnimationPlayer`
    = help: the following other types implement trait `QueryData`:
              &'__w mut T
              &Archetype
              &T
              ()
              (F0, F1)
              (F0, F1, F2)
              (F0, F1, F2, F3)
              (F0, F1, F2, F3, F4)
            and 41 others
note: required by a bound in `bevy::prelude::Query`
   --> /home/iyes/.cargo/registry/src/index.crates.io-6f17d22bba15001f/bevy_ecs-0.14.0-rc.2/src/system/query.rs:349:37
    |
349 | pub struct Query<'world, 'state, D: QueryData, F: QueryFilter = ()> {
    |                                     ^^^^^^^^^ required by this bound in `Query`

error[E0277]: `&bevy::prelude::Transform` is not a valid `Query` filter
   --> src/main.rs:60:18
    |
60  |     mut query: Query<AnimationPlayer, &Transform>,
    |                ^^^^^^^^^^^^^^^^^^^^^^^^^^^^^^^^^^ invalid `Query` filter
    |
    = help: the trait `QueryFilter` is not implemented for `&bevy::prelude::Transform`
    = note: a `QueryFilter` typically uses a combination of `With<T>` and `Without<T>` statements
    = help: the following other types implement trait `QueryFilter`:
              ()
              (F0, F1)
              (F0, F1, F2)
              (F0, F1, F2, F3)
              (F0, F1, F2, F3, F4)
              (F0, F1, F2, F3, F4, F5)
              (F0, F1, F2, F3, F4, F5, F6)
              (F0, F1, F2, F3, F4, F5, F6, F7)
            and 28 others
note: required by a bound in `bevy::prelude::Query`
   --> /home/iyes/.cargo/registry/src/index.crates.io-6f17d22bba15001f/bevy_ecs-0.14.0-rc.2/src/system/query.rs:349:51
    |
349 | pub struct Query<'world, 'state, D: QueryData, F: QueryFilter = ()> {
    |                                                   ^^^^^^^^^^^ required by this bound in `Query`

error[E0107]: struct takes at most 2 generic arguments but 3 generic arguments were supplied
   --> src/main.rs:60:18
    |
60  |     mut query: Query<AnimationPlayer, &Transform, &mut GlobalTransform>,
    |                ^^^^^                              -------------------- help: remove this generic argument
    |                |
    |                expected at most 2 generic arguments
    |
note: struct defined here, with at most 2 generic parameters: `D`, `F`
   --> /home/iyes/.cargo/registry/src/index.crates.io-6f17d22bba15001f/bevy_ecs-0.14.0-rc.2/src/system/query.rs:349:12
    |
349 | pub struct Query<'world, 'state, D: QueryData, F: QueryFilter = ()> {
    |            ^^^^^                 -             -------------------
To access your components, you need to use reference syntax (& or &mut).
When you want to query for multiple components, you need to put them in a tuple:
Query<(&mut Transform, &Camera, &MyComponent)>.
| Bevy Version: | 0.11 | (outdated!) |
|---|
This entire book is outdated and no longer maintained. I am keeping it online, in case anyone still finds any of the information in it useful. To adapt to newer versions of Bevy, please consult Bevy's migration guides.
3D objects not displaying
This page will list some common issues that you may encounter, if you are trying to spawn a 3D object, but cannot see it on the screen.
Missing visibility components on parent
If your entity is in a hierarchy, all its parents need to have visibility components. It is required even if those parent entities are not supposed to render anything.
Fix it by inserting a VisibilityBundle:
#![allow(unused)]
fn main() {
commands.entity(parent)
    .insert(VisibilityBundle::default());
}
Or better, make sure to spawn the parent entities correctly in the first place.
You can use a VisibilityBundle or
SpatialBundle (with transforms) if you
are not using a bundle that already includes these components.
Too far from camera
If something is further away than a certain distance from the camera, it will be
culled (not rendered). The default value is 1000.0 units.
You can control this using the far field of
PerspectiveProjection:
#![allow(unused)]
fn main() {
commands.spawn(Camera3dBundle {
    projection: Projection::Perspective(PerspectiveProjection {
        far: 10000.0, // change the maximum render distance
        ..default()
    }),
    ..default()
});
}
Missing Vertex Attributes
Make sure your Mesh includes all vertex attributes required
by your shader/material.
Bevy’s default PBR StandardMaterial
requires all meshes to have:
- Positions
- Normals
Some others that may be required:
- UVs (if using textures in the material)
- Tangents (only if using normal maps, otherwise not required)
If you are generating your own mesh data, make sure to provide everything you need.
If you are loading meshes from asset files, make sure they include everything that is needed (check your export settings).
If you need Tangents for normal maps, it is recommended that you include them in your GLTF files. This avoids Bevy having to autogenerate them at runtime. Many 3D editors (like Blender) do not enable this option by default.
Incorrect usage of Bevy GLTF assets
Refer to the GLTF page to learn how to correctly use GLTF with Bevy.
GLTF files are complex. They contain many sub-assets, represented by different Bevy types. Make sure you are using the correct thing.
Make sure you are spawning a GLTF Scene, or using the correct
Mesh and StandardMaterial
associated with the correct GLTF Primitive.
If you are using an asset path, be sure to include a label for the sub-asset you want:
let handle_scene: Handle<Scene> = asset_server.load("my.gltf#Scene0");If you are spawning the top-level Gltf master asset, it won’t work.
If you are spawning a GLTF Mesh, it won’t work.
Unsupported GLTF
Bevy does not fully support all features of the GLTF format and has some specific requirements about the data. Not all GLTF files can be loaded and rendered in Bevy. Unfortunately, in many of these cases, you will not get any error or diagnostic message.
Commonly-encountered limitations:
- Textures embedded in ascii (
*.gltf) files (base64 encoding) cannot be loaded. Put your textures in external files, or use the binary (*.glb) format. - Mipmaps are only supported if the texture files (in KTX2 or DDS format) contain them. The GLTF spec requires missing mipmap data to be generated by the game engine, but Bevy does not support this yet. If your assets are missing mipmaps, textures will look grainy/noisy.
This list is not exhaustive. There may be other unsupported scenarios that I did not know of or forgot to include here. :)
Vertex Order and Culling
By default, the Bevy renderer assumes Counter-Clockwise vertex order and has back-face culling enabled.
If you are generating your Mesh from code, make sure your
vertices are in the correct order.
Unoptimized / Debug builds
Maybe your asset just takes a while to load? Bevy is very slow without compiler optimizations. It’s actually possible that complex GLTF files with big textures can take over a minute to load and show up on the screen. It would be almost instant in optimized builds. See here.
| Bevy Version: | 0.14 | (outdated!) |
|---|
This entire book is outdated and no longer maintained. I am keeping it online, in case anyone still finds any of the information in it useful. To adapt to newer versions of Bevy, please consult Bevy's migration guides.
Borrow multiple fields from struct
When you have a component or resource, that is larger struct with multiple fields, sometimes you want to borrow several of the fields at the same time, possibly mutably.
struct MyThing {
    a: Foo,
    b: Bar,
}

fn my_system(mut q: Query<&mut MyThing>) {
    for thing in q.iter_mut() {
        helper_func(&thing.a, &mut thing.b); // ERROR!
    }
}

fn helper_func(foo: &Foo, bar: &mut Bar) {
    // do something
}
This can result in a compiler error about conflicting borrows:
error[E0502]: cannot borrow `thing` as mutable because it is also borrowed as immutable
    |
    |         helper_func(&thing.a, &mut thing.b); // ERROR!
    |         -----------  -----         ^^^^^ mutable borrow occurs here
    |         |            |
    |         |            immutable borrow occurs here
    |         immutable borrow later used by call
The solution is to use the “reborrow” idiom, a common but non-obvious trick in Rust programming:
// add this at the start of the for loop, before using `thing`:
let thing = &mut *thing;

// or, alternatively, Bevy provides a method, which does the same:
let thing = thing.into_inner();
Note that this line triggers change detection. Even if you don’t modify the data afterwards, the component gets marked as changed.
Explanation
Bevy typically gives you access to your data via special wrapper types (like
Res<T>, ResMut<T>, and Mut<T> (when querying for
components mutably)). This lets Bevy track access to the data.
These are “smart pointer” types that use the Rust Deref trait to dereference
to your data. They usually work seamlessly and you don’t even notice them.
However, in a sense, they are opaque to the compiler. The Rust language normally allows fields of a struct to be borrowed individually, when you have direct access to the struct, but this does not work when it is wrapped in another type.
The “reborrow” trick shown above, effectively converts the wrapper into a
regular Rust reference. *thing dereferences the wrapper via DerefMut, and
then &mut borrows it mutably. You now have &mut MyStuff instead of
Mut<MyStuff>/ResMut<MyStuff>.
As it is now a regular Rust &mut reference, instead of a special type,
the Rust compiler can allow access to the individual fields of your struct.
| Bevy Version: | 0.14 | (outdated!) |
|---|
This entire book is outdated and no longer maintained. I am keeping it online, in case anyone still finds any of the information in it useful. To adapt to newer versions of Bevy, please consult Bevy's migration guides.
Jittering Time, Choppy Movement/Animation
Fixed Timestep
Gameplay movement/simulation code is typically run on a fixed
timestep (in the FixedUpdate schedule).
This is important to make sure these computations happen consistently and
correctly, regardless of display framerate.
However, obviously, that means they do not follow the display’s frame rate. This causes movement to look choppy on-screen.
The solution to this problem is transform interpolation/extrapolation.
Bevy Time vs. Rust/OS time
Do not use std::time::Instant::now() to get the
current time. Get your timing information from Bevy, using
Res<Time>.
Rust (and the OS) give you the precise time of the moment you call that function. However, that’s not what you want.
Your game systems are run by Bevy’s parallel scheduler, which means that they could be called at vastly different instants every frame! This will result in inconsistent / jittery timings and make your game misbehave or look stuttery.
Bevy’s Time gives you timing information that is consistent throughout the
frame update cycle. It is intended to be used for game logic.
This is not Bevy-specific, but applies to game development in general. Always get your time from your game engine, not from your programming language or operating system.
Imprecise Frame Delta Time
That said, it is actually often impossible for any game engine (not just Bevy) to give precise values for the frame delta time.
The time when the final rendered frame is actually displayed on-screen is called “presentation time”. On most OSs, there is no API to measure that. The game engine does not know when the user can actually see the rendered frame produced by the GPU.
Therefore, the frame time must be measured differently. Typically, what is measured is the time between runs of the game engine’s main frame update loop on the CPU. Bevy measures its timings at the point when GPU work is submitted to the GPU for processing.
This is a good approximation, but it will never perfectly match reality.
If you run with VSync on a 60Hz display, you would expect every frame delta
to be exactly 16.667ms. But if you log the delta time values from Bevy,
you will see that they vary. They are close, but never exactly that value.
There is no known complete solution to this. Bevy developers are investigating ways to improve the quality of Bevy’s time measurements.
| Bevy Version: | 0.13 | (outdated!) |
|---|
This entire book is outdated and no longer maintained. I am keeping it online, in case anyone still finds any of the information in it useful. To adapt to newer versions of Bevy, please consult Bevy's migration guides.
UV coordinates in Bevy
In Bevy, the vertical axis for the pixels of textures / images, and when sampling textures in a shader, points downwards, from top to bottom. The origin is at the top left.
This is inconsistent with the World-coordinate system used everywhere else in Bevy, where the Y axis points up.
It is, however, consistent with how most image file formats store pixel data, and with how most graphics APIs work (including DirectX, Vulkan, Metal, WebGPU, but not OpenGL).
OpenGL (and frameworks based on it) is different. If your prior experience is with that, you may find that your textures appear flipped vertically.
If you are using a mesh, make sure it has the correct UV values. If it was created with other software, be sure to select the correct settings.
If you are writing a custom shader, make sure your UV arithmetic is correct.
Sprites
If the images of your 2D sprites are flipped (for whatever reason), you can correct that using Bevy’s sprite-flipping feature:
commands.spawn(SpriteBundle {
    sprite: Sprite {
        flip_y: true,
        flip_x: false,
        ..Default::default()
    },
    ..Default::default()
});| Bevy Version: | (any) |
|---|
This entire book is outdated and no longer maintained. I am keeping it online, in case anyone still finds any of the information in it useful. To adapt to newer versions of Bevy, please consult Bevy's migration guides.
Game Engine Fundamentals
This chapter covers the fundamentals of using Bevy as a game engine.
You are expected to be familiar with Bevy programming in general. For that, see the Bevy Programming Framework chapter.
The topics covered in this chapter are applicable to all projects that want to use Bevy as more than just an ECS library. If you are making a game or other app using Bevy, this is for you.
This chapter only covers the general fundamentals. Complex topics that deserve more extensive coverage have their own chapters in the book:
- Input Handling
- Window Management
- Asset Management
- General Graphics Features
- 2D Graphics
- 3D Graphics
- Audio
- Bevy UI Framework
| Bevy Version: | 0.13 | (outdated!) |
|---|
This entire book is outdated and no longer maintained. I am keeping it online, in case anyone still finds any of the information in it useful. To adapt to newer versions of Bevy, please consult Bevy's migration guides.
Coordinate System
2D and 3D scenes and cameras
Bevy uses a right-handed Y-up coordinate system for the game world. The coordinate system is the same for 3D and 2D, for consistency.
It is easiest to explain in terms of 2D:
- The X axis goes from left to right (+X points right).
- The Y axis goes from bottom to top (+Y points up).
- The Z axis goes from far to near (+Z points towards you, out of the screen).
- For 2D, the origin (X=0.0; Y=0.0) is at the center of the screen by default.
When you are working with 2D sprites, you can put the background on Z=0.0, and place other sprites at increasing positive Z coordinates to layer them on top.
In 3D, the axes are oriented the same way:
- Y points up
- The forward direction is -Z
This is a right-handed coordinate system. You can use the fingers of your right hand to visualize the 3 axes: thumb=X, index=Y, middle=Z.
It is the same as Godot, Maya, and OpenGL. Compared to Unity, the Z axis is inverted.
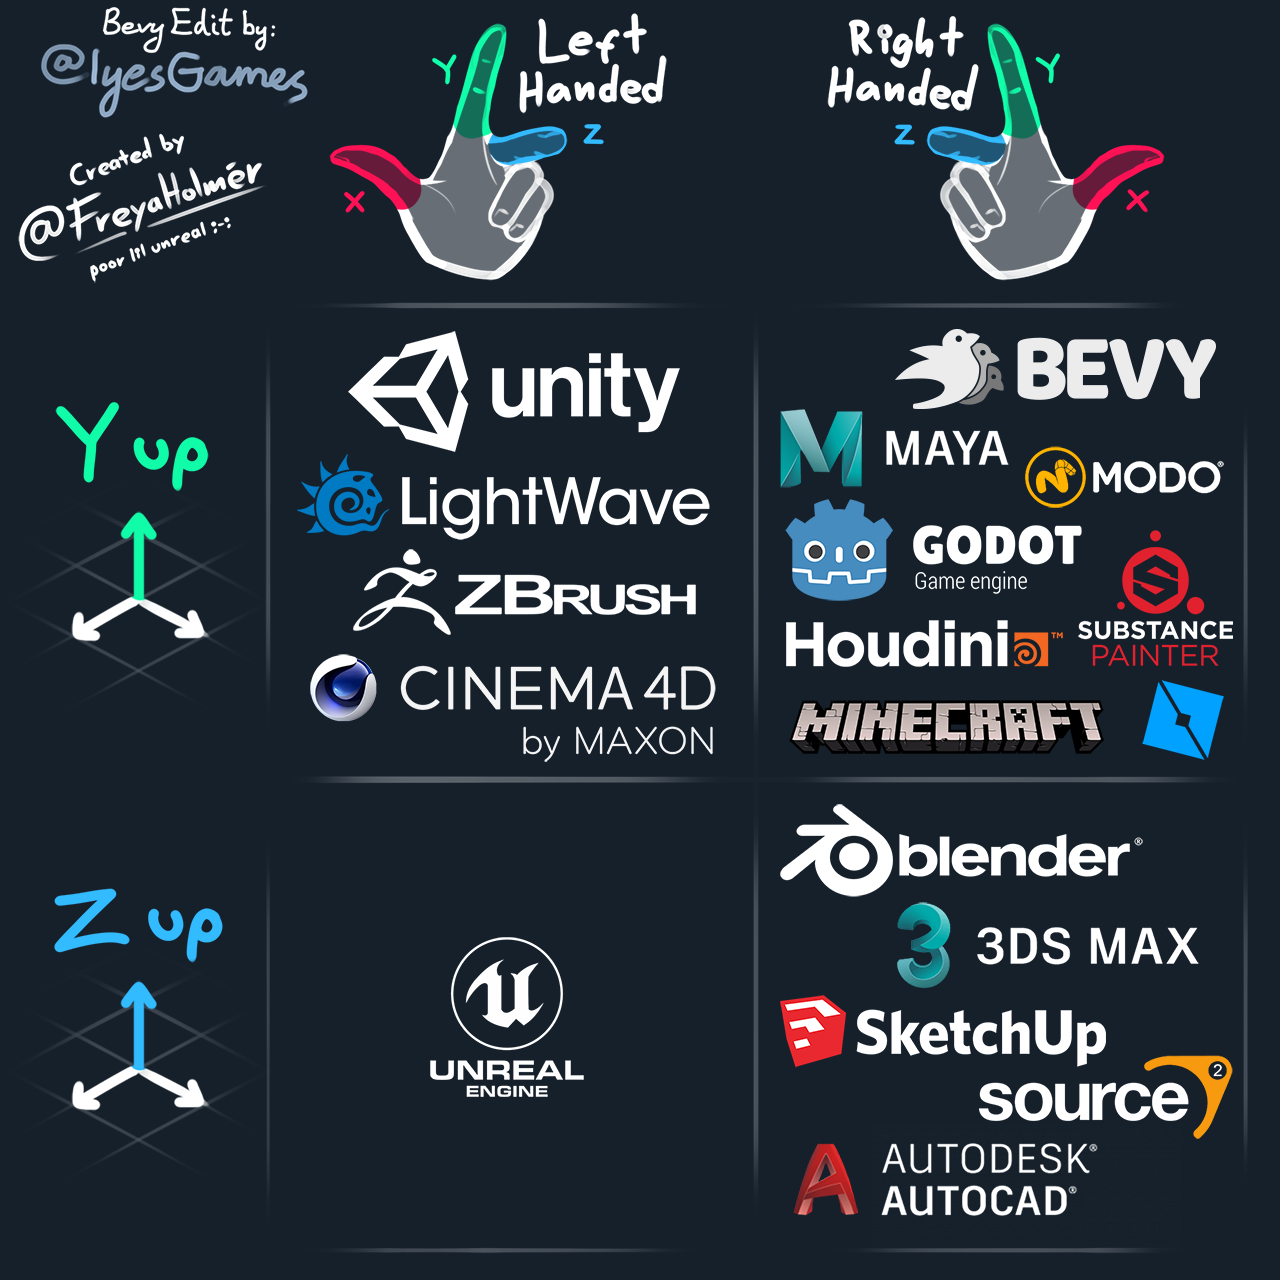
(graphic modifed and used with permission; original by @FreyaHolmer)
UI
For UI, Bevy follows the same convention as most other UI toolkits, the Web, etc.
- The origin is at the top left corner of the screen
- The Y axis points downwards
- X goes from 0.0 (left screen edge) to the number of screen pixels (right screen edge)
- Y goes from 0.0 (top screen edge) to the number of screen pixels (bottom screen edge)
The units represent logical (compensated for DPI scaling) screen pixels.
UI layout flows from top to bottom, similar to a web page.
Cursor and Screen
The cursor position and any other window (screen-space) coordinates follow the same conventions as UI, as described above.
| Bevy Version: | 0.13 | (outdated!) |
|---|
This entire book is outdated and no longer maintained. I am keeping it online, in case anyone still finds any of the information in it useful. To adapt to newer versions of Bevy, please consult Bevy's migration guides.
Transforms
Relevant official examples:
transform,
translation,
rotation,
3d_rotation,
scale,
move_sprite,
parenting,
anything that spawns 2D or 3D objects.
First, a quick definition, if you are new to game development:
A Transform is what allows you to place an object in the game world. It is a combination of the object’s “translation” (position/coordinates), “rotation”, and “scale” (size adjustment).
You move objects around by modifying the translation, rotate them by modifying the rotation, and make them larger or smaller by modifying the scale.
// To simply position something at specific coordinates
let xf_pos567 = Transform::from_xyz(5.0, 6.0, 7.0);

// To scale an object, making it twice as big in all dimensions
let xf_scale = Transform::from_scale(Vec3::splat(2.0));

// To rotate an object in 2D (Z-axis rotation) by 30°
// (angles are in radians! must convert from degrees!)
let xf_rot2d = Transform::from_rotation(Quat::from_rotation_z((30.0_f32).to_radians()));

// 3D rotations can be complicated; explore the methods available on `Quat`

// Simple 3D rotation by Euler-angles (X, Y, Z)
let xf_rot2d = Transform::from_rotation(Quat::from_euler(
    // YXZ order corresponds to the common
    // "yaw"/"pitch"/"roll" convention
    EulerRot::YXZ,
    (20.0_f32).to_radians(),
    (10.0_f32).to_radians(),
    (30.0_f32).to_radians(),
));

// Everything:
let xf = Transform::from_xyz(1.0, 2.0, 3.0)
    .with_scale(Vec3::new(0.5, 0.5, 1.0))
    .with_rotation(Quat::from_rotation_y(0.125 * std::f32::consts::PI));
Transform Components
In Bevy, transforms are represented by two components:
Transform and GlobalTransform.
Any Entity that represents an object in the game world needs to have both. All of Bevy’s built-in bundle types include them.
If you are creating a custom entity without using those bundles, you can use one of the following to ensure you don’t miss them:
SpatialBundlefor transforms + visibilityTransformBundlefor just the transforms
fn spawn_special_entity(
    mut commands: Commands,
) {
    // create an entity that does not use one of the common Bevy bundles,
    // but still needs transforms and visibility
    commands.spawn((
        ComponentA,
        ComponentB,
        SpatialBundle {
            transform: Transform::from_scale(Vec3::splat(3.0)),
            visibility: Visibility::Hidden,
            ..Default::default()
        },
    ));
}
Transform
Transform is what you typically work with. It is a struct containing the
translation, rotation, and scale. To read or manipulate these values, access it
from your systems using a query.
If the entity has a parent, the Transform component is
relative to the parent. This means that the child object will move/rotate/scale
along with the parent.
fn inflate_balloons(
    mut query: Query<&mut Transform, With<Balloon>>,
    keyboard: Res<ButtonInput<KeyCode>>,
) {
    // every time the Spacebar is pressed,
    // make all the balloons in the game bigger by 25%
    if keyboard.just_pressed(KeyCode::Space) {
        for mut transform in &mut query {
            transform.scale *= 1.25;
        }
    }
}

fn throwable_fly(
    time: Res<Time>,
    mut query: Query<&mut Transform, With<ThrowableProjectile>>,
) {
    // every frame, make our projectiles fly across the screen and spin
    for mut transform in &mut query {
        // do not forget to multiply by the time delta!
        // this is required to move at the same speed regardless of frame rate!
        transform.translation.x += 100.0 * time.delta_seconds();
        transform.rotate_z(2.0 * time.delta_seconds());
    }
}
GlobalTransform
GlobalTransform represents the absolute global position in the world.
If the entity does not have a parent, then this will match the
Transform.
The value of GlobalTransform is calculated/managed internally by Bevy
(“transform propagation”).
Unlike Transform, the translation/rotation/scale are not accessible
directly. The data is stored in an optimized way (using Affine3A) and it is
possible to have complex transformations in a hierarchy that cannot be
represented as a simple transform. For example, a combination of rotation and
scale across multiple parents, resulting in shearing.
If you want to try to convert a GlobalTransform back into a workable
translation/rotation/scale representation, you can try the methods:
.translation().to_scale_rotation_translation()(may be invalid).compute_transform()(may be invalid)
Transform Propagation
The two components are synchronized by a bevy-internal system (the “transform
propagation system”), which runs in the PostUpdate schedule.
Beware: When you mutate the Transform, the GlobalTransform is not
updated immediately. They will be out-of-sync until the transform propagation
system runs.
If you need to work with GlobalTransform directly, you should add
your system to the PostUpdate schedule and
order it after TransformSystem::TransformPropagate.
/// Print the up-to-date global coordinates of the player
fn debug_globaltransform(
    query: Query<&GlobalTransform, With<Player>>,
) {
    let gxf = query.single();
    debug!("Player at: {:?}", gxf.translation());
}
// the label to use for ordering
use bevy::transform::TransformSystem;
app.add_systems(PostUpdate,
debug_globaltransform
// we want to read the GlobalTransform after
// it has been updated by Bevy for this frame
.after(TransformSystem::TransformPropagate)
);TransformHelper
If you need to get an up-to-date GlobalTransform in a system
that has to run before transform propagation, you can use the special
TransformHelper system parameter.
It allows you to compute a specific entity’s GlobalTransform immediately, on
demand.
An example of where this could be useful might be a system to make a camera
follow an entity on-screen. You need to update the camera’s Transform (which
means you have to do it before Bevy’s transform propagation, so it can account
for the camera’s new transform), but you also need to know the current
up-to-date position of the entity you are following.
fn camera_look_follow(
    q_target: Query<Entity, With<MySpecialMarker>>,
    mut transform_params: ParamSet<(
        TransformHelper,
        Query<&mut Transform, With<MyGameCamera>>,
    )>,
) {
    // get the Entity ID we want to target
    let e_target = q_target.single();
    // compute its actual current GlobalTransform
    // (could be Err if entity doesn't have transforms)
    let Ok(global) = transform_params.p0().compute_global_transform(e_target) else {
        return;
    };
    // get camera transform and make it look at the global translation
    transform_params.p1().single_mut().look_at(global.translation(), Vec3::Y);
}
Internally, TransformHelper behaves like two read-only queries.
It needs access to the Parent and Transform components to do its job. It
would conflict with our other &mut Transform query. That’s why we have to use
a param set in the example above.
Note: if you over-use TransformHelper, it could become a performance issue.
It calculates the global transform for you, but it does not update the data
stored in the entity’s GlobalTransform. Bevy will still do the same
computation again later, during transform propagation. It leads to repetitive
work. If your system can run after transform propagation, so it can just read
the value after Bevy updates it, you should prefer to do that instead of using
TransformHelper.
| Bevy Version: | 0.13 | (outdated!) |
|---|
This entire book is outdated and no longer maintained. I am keeping it online, in case anyone still finds any of the information in it useful. To adapt to newer versions of Bevy, please consult Bevy's migration guides.
Visibility
Relevant official examples:
parenting.
Visibility is used to control if something is to be rendered or not. If you want an entity to exist in the world, just not be displayed, you can hide it.
/// Prepare the game map, but do not display it until later
fn setup_map_hidden(
    mut commands: Commands,
) {
    commands.spawn((
        GameMapEntity,
        SceneBundle {
            scene: todo!(),
            visibility: Visibility::Hidden,
            ..Default::default()
        },
    ));
}

/// When everything is ready, un-hide the game map
fn reveal_map(
    mut query: Query<&mut Visibility, With<GameMapEntity>>,
) {
    let mut vis_map = query.single_mut();
    *vis_map = Visibility::Visible;
}
Visibility Components
In Bevy, visibility is represented by multiple components:
Visibility: the user-facing toggle (here is where you set what you want)InheritedVisibility: used by Bevy to keep track of the state from any parent entitiesViewVisibility: used by Bevy to track if the entity should actually be displayed
Any Entity that represents a renderable object in the game world needs to have them all. All of Bevy’s built-in bundle types include them.
If you are creating a custom entity without using those bundles, you can use one of the following to ensure you don’t miss them:
SpatialBundlefor transforms + visibilityVisibilityBundlefor just visibility
fn spawn_special_entity(
    mut commands: Commands,
) {
    // create an entity that does not use one of the common Bevy bundles,
    // but still needs transforms and visibility
    commands.spawn((
        ComponentA,
        ComponentB,
        SpatialBundle {
            transform: Transform::from_scale(Vec3::splat(3.0)),
            visibility: Visibility::Hidden,
            ..Default::default()
        },
    ));
}
If you don’t do this correctly (say, you manually add just the Visibility
component and forget the others, because you don’t use a bundle), your entities
will not render!
Visibility
Visibility is the “user-facing toggle”. This is where you specify what you
want for the current entity:
Inherited(default): show/hide depending on parentVisible: always show the entity, regardless of parentHidden: always hide the entity, regardless of parent
If the current entity has any children that have Inherited,
their visibility will be affected if you set the current entity to Visible
or Hidden.
If an entity has a parent, but the parent entity is missing the visibility-related components, things will behave as if there was no parent.
InheritedVisibility
InheritedVisibility represents the state the current entity would have based
on its parent’s visibility.
The value of InheritedVisibility should be considered read-only. It is
managed internally by Bevy, in a manner similar to transform
propagation. A “visibility propagation”
system runs in the PostUpdate schedule.
If you want to read the up-to-date value for the current frame, you should
add your system to the PostUpdate
schedule and order it after
VisibilitySystems::VisibilityPropagate.
/// Check if a specific UI button is visible
/// (could be hidden if the whole menu is hidden?)
fn debug_player_visibility(
    query: Query<&InheritedVisibility, With<MyAcceptButton>>,
) {
    let vis = query.single();

    debug!("Button visibility: {:?}", vis.get());
}
use bevy::render::view::VisibilitySystems;
app.add_systems(PostUpdate,
debug_player_visibility
.after(VisibilitySystems::VisibilityPropagate)
);ViewVisibility
ViewVisibility represents the actual final decision made by Bevy about
whether this entity needs to be rendered.
The value of ViewVisibility is read-only. It is managed internally by Bevy.
It is used for “culling”: if the entity is not in the range of any Camera or Light, it does not need to be rendered, so Bevy will hide it to improve performance.
Every frame, after “visibility propagation”, Bevy will check what entities can be seen by what view (camera or light), and store the outcome in these components.
If you want to read the up-to-date value for the current frame, you should
add your system to the PostUpdate
schedule and order it after
VisibilitySystems::CheckVisibility.
/// Check if balloons are seen by any Camera, Light, etc… (not culled)
fn debug_balloon_visibility(
    query: Query<&ViewVisibility, With<Balloon>>,
) {
    for vis in query.iter() {
        if vis.get() {
            debug!("Balloon will be rendered.");
        }
    }
}
use bevy::render::view::VisibilitySystems;
app.add_systems(PostUpdate,
debug_balloon_visibility
.after(VisibilitySystems::CheckVisibility)
);| Bevy Version: | 0.9 | (outdated!) |
|---|
This entire book is outdated and no longer maintained. I am keeping it online, in case anyone still finds any of the information in it useful. To adapt to newer versions of Bevy, please consult Bevy's migration guides.
Time and Timers
Relevant official examples:
timers,
move_sprite.
Time
The Time resource is your main global source
of timing information, that you can access from any system
that does anything that needs time. You should derive all timings from
it.
Bevy updates these values at the beginning of every frame.
Delta Time
The most common use case is “delta time” – how much time passed between the previous frame update and the current one. This tells you how fast the game is running, so you can scale things like movement and animations. This way everything can happen smoothly and run at the same speed, regardless of the game’s frame rate.
fn asteroids_fly(
    time: Res<Time>,
    mut q: Query<&mut Transform, With<Asteroid>>,
) {
    for mut transform in q.iter_mut() {
        // move our asteroids along the X axis
        // at a speed of 10.0 units per second
        transform.translation.x += 10.0 * time.delta_seconds();
    }
}
Ongoing Time
Time can also give you the total running time since startup.
Use this if you need a cumulative, increasing, measurement of time.
use std::time::Instant;

/// Say, for whatever reason, we want to keep track
/// of when exactly some specific entities were spawned.
#[derive(Component)]
struct SpawnedTime(Instant);

fn spawn_my_stuff(
    mut commands: Commands,
    time: Res<Time>,
) {
    commands.spawn((/* ... */))
        // we can use startup time and elapsed duration
        .insert(SpawnedTime(time.startup() + time.elapsed()))
        // or just the time of last update
        .insert(SpawnedTime(time.last_update().unwrap()));
}
Timers and Stopwatches
There are also facilities to help you track specific intervals or timings:
Timer and Stopwatch. You can create
many instances of these, to track whatever you want. You can use them in
your own component or resource types.
Timers and Stopwatches need to be ticked. You need to have some system
calling .tick(delta), for it to make progress, or it will be inactive.
The delta should come from the Time resource.
Timer
Timer allows you to detect when a certain interval of time
has elapsed. Timers have a set duration. They can be “repeating” or
“non-repeating”.
Both kinds can be manually “reset” (start counting the time interval from the beginning) and “paused” (they will not progress even if you keep ticking them).
Repeating timers will automatically reset themselves after they reach their set duration.
Use .finished() to detect when a timer has reached its set duration. Use
.just_finished(), if you need to detect only on the exact tick when the
duration was reached.
use std::time::Duration;

#[derive(Component)]
struct FuseTime {
    /// track when the bomb should explode (non-repeating timer)
    timer: Timer,
}

fn explode_bombs(
    mut commands: Commands,
    mut q: Query<(Entity, &mut FuseTime)>,
    time: Res<Time>,
) {
    for (entity, mut fuse_timer) in q.iter_mut() {
        // timers gotta be ticked, to work
        fuse_timer.timer.tick(time.delta());

        // if it finished, despawn the bomb
        if fuse_timer.timer.finished() {
            commands.entity(entity).despawn();
        }
    }
}

#[derive(Resource)]
struct BombsSpawnConfig {
    /// How often to spawn a new bomb? (repeating timer)
    timer: Timer,
}

/// Spawn a new bomb in set intervals of time
fn spawn_bombs(
    mut commands: Commands,
    time: Res<Time>,
    mut config: ResMut<BombsSpawnConfig>,
) {
    // tick the timer
    config.timer.tick(time.delta());

    if config.timer.finished() {
        commands.spawn((
            FuseTime {
                // create the non-repeating fuse timer
                timer: Timer::new(Duration::from_secs(5), TimerMode::Once),
            },
            // ... other components ...
        ));
    }
}

/// Configure our bomb spawning algorithm
fn setup_bomb_spawning(
    mut commands: Commands,
) {
    commands.insert_resource(BombsSpawnConfig {
        // create the repeating timer
        timer: Timer::new(Duration::from_secs(10), TimerMode::Repeating),
    })
}
Note that Bevy’s timers do not work like typical real-life timers (which count downwards toward zero). Bevy’s timers start from zero and count up towards their set duration. They are basically like stopwatches with extra features: a maximum duration and optional auto-reset.
Stopwatch
Stopwatch allow you to track how much time has passed
since a certain point.
It will just keep accumulating time, which you can check with
.elapsed()/.elapsed_secs(). You can manually reset it at any time.
use bevy::time::Stopwatch;

#[derive(Component)]
struct JumpDuration {
    time: Stopwatch,
}

fn jump_duration(
    time: Res<Time>,
    mut q_player: Query<&mut JumpDuration, With<Player>>,
    kbd: Res<Input<KeyCode>>,
) {
    // assume we have exactly one player that jumps with Spacebar
    let mut jump = q_player.single_mut();

    if kbd.just_pressed(KeyCode::Space) {
        jump.time.reset();
    }

    if kbd.pressed(KeyCode::Space) {
        println!("Jumping for {} seconds.", jump.time.elapsed_secs());
        // stopwatch has to be ticked to progress
        jump.time.tick(time.delta());
    }
}| Bevy Version: | 0.12 | (outdated!) |
|---|
This entire book is outdated and no longer maintained. I am keeping it online, in case anyone still finds any of the information in it useful. To adapt to newer versions of Bevy, please consult Bevy's migration guides.
Logging, Console Messages
Relevant official examples:
logs.
You may have noticed how, when you run your Bevy project, you get messages in your console window. For example:
2022-06-12T13:28:25.445644Z  WARN wgpu_hal::vulkan::instance: Unable to find layer: VK_LAYER_KHRONOS_validation
2022-06-12T13:28:25.565795Z  INFO bevy_render::renderer: AdapterInfo { name: "AMD Radeon RX 6600 XT", vendor: 4098, device: 29695, device_type: DiscreteGpu, backend: Vulkan }
2022-06-12T13:28:25.565795Z  INFO mygame: Entered new map area.
Log messages like this can come from Bevy, dependencies (like wgpu), and also from your own code.
Bevy offers a logging framework that is much more advanced than simply using
println/eprintln from Rust. Log messages can have metadata, like the
level, timestamp, and Rust module where it came from. You can see that this
metadata is printed alongside the contents of the message.
This is set up by Bevy’s LogPlugin. It is part of the
DefaultPlugins plugin group, so most Bevy users
will have it automatically in every typical Bevy project.
Levels
Levels determine how important a message is, and allow messages to be filtered.
The available levels are: off, error, warn, info, debug, trace.
A rough guideline for when to use each level, could be:
off: disable all log messageserror: something happened that prevents things from working correctlywarn: something unusual happened, but things can continue to workinfo: general informational messagesdebug: for development, messages about what your code is doingtrace: for very verbose debug data, like dumping values
Printing your own log messages
To display a message, just use the macro named after the level of the
message. The syntax is exactly the same as with Rust’s println. See the
std::fmt documentation for more details.
#![allow(unused)]
fn main() {
error!("Unknown condition!");
warn!("Something unusual happened!");
info!("Entered game level: {}", level_id);
debug!("x: {}, state: {:?}", x, state);
trace!("entity transform: {:?}", transform);
}
Filtering messages
To control what messages you would like to see, you can configure Bevy’s
LogPlugin:
#![allow(unused)]
fn main() {
use bevy::log::LogPlugin;

app.add_plugins(DefaultPlugins.set(LogPlugin {
    filter: "info,wgpu_core=warn,wgpu_hal=warn,mygame=debug".into(),
    level: bevy::log::Level::DEBUG,
}));
}
The filter field is a string specifying a list of rules for what level to
enable for different Rust modules/crates. In the example above, the string
means: show up to info by default, limit wgpu_core and wgpu_hal
to warn level, for mygame show debug.
All levels higher than the one specified are also enabled. All levels lower than the one specified are disabled, and those messages will not be displayed.
The level filter is a global limit on the lowest level to use. Messages
below that level will be ignored and most of the performance overhead avoided.
Environment Variable
You can override the filter string when running your app, using the RUST_LOG
environment variable.
RUST_LOG="warn,mygame=debug" ./mygame
Note that other Rust projects, such as cargo, also use the same
environment variable to control their logging. This can lead to unexpected
consequences. For example, doing:
RUST_LOG="debug" cargo run
will cause your console to also be filled with debug messages from cargo.
Different settings for debug and release builds
If you want to do different things in your Rust code for debug/release builds, an easy way to achieve it is using conditional compilation on “debug assertions”.
#![allow(unused)]
fn main() {
use bevy::log::LogPlugin;

// this code is compiled only if debug assertions are enabled (debug mode)
#[cfg(debug_assertions)]
app.add_plugins(DefaultPlugins.set(LogPlugin {
    level: bevy::log::Level::DEBUG,
    filter: "debug,wgpu_core=warn,wgpu_hal=warn,mygame=debug".into(),
}));

// this code is compiled only if debug assertions are disabled (release mode)
#[cfg(not(debug_assertions))]
app.add_plugins(DefaultPlugins.set(LogPlugin {
    level: bevy::log::Level::INFO,
    filter: "info,wgpu_core=warn,wgpu_hal=warn".into(),
}));
}
This is a good reason why you should not use release mode during development just for performance reasons.
On Microsoft Windows, your game EXE will also launch with a console window for displaying log messages by default. You might not want that in release builds. See here.
Performance Implications
Printing messages to the console is a relatively slow operation.
However, if you are not printing a large volume of messages, don’t worry about it. Just avoid spamming lots of messages from performance-sensitive parts of your code like inner loops.
You can disable log levels like trace and debug in release builds.
| Bevy Version: | 0.9 | (outdated!) |
|---|
This entire book is outdated and no longer maintained. I am keeping it online, in case anyone still finds any of the information in it useful. To adapt to newer versions of Bevy, please consult Bevy's migration guides.
Hierarchical (Parent/Child) Entities
Relevant official examples:
hierarchy,
parenting.
Technically, the Entities/Components themselves cannot form a hierarchy (the ECS is a flat data structure). However, logical hierarchies are a common pattern in games.
Bevy supports creating such a logical link between entities, to form
a virtual “hierarchy”, by simply adding Parent and
Children components on the respective entities.
When using Commands to spawn entities,
Commands has methods for adding children to entities,
which automatically add the correct components:
// spawn the parent and get its Entity id
let parent = commands.spawn(MyParentBundle::default()).id();

// do the same for the child
let child = commands.spawn(MyChildBundle::default()).id();

// add the child to the parent
commands.entity(parent).push_children(&[child]);

// you can also use `with_children`:
commands.spawn(MyParentBundle::default())
    .with_children(|parent| {
        parent.spawn(MyChildBundle::default());
    });
Note that this only sets up the Parent and
Children components, and nothing else. Notably, it does not
add transforms or visibility for you. If you
need that functionality, you need to add those components yourself, using
something like SpatialBundle.
You can despawn an entire hierarchy with a single command:
fn close_menu(
    mut commands: Commands,
    query: Query<Entity, With<MainMenuUI>>,
) {
    for entity in query.iter() {
        // despawn the entity and its children
        commands.entity(entity).despawn_recursive();
    }
}
Accessing the Parent or Children
To make a system that works with the hierarchy, you typically need two queries:
- one with the components you need from the child entities
- one with the components you need from the parent entities
One of the two queries should include the appropriate component, to obtain the entity ids to use with the other one:
Parentin the child query, if you want to iterate entities and look up their parents, orChildrenin the parent query, if you want to iterate entities and look up their children
For example, if we want to get the Transform
of cameras (Camera) that have a parent, and the
GlobalTransform of their parent:
fn camera_with_parent(
    q_child: Query<(&Parent, &Transform), With<Camera>>,
    q_parent: Query<&GlobalTransform>,
) {
    for (parent, child_transform) in q_child.iter() {
        // `parent` contains the Entity ID we can use
        // to query components from the parent:
        let parent_global_transform = q_parent.get(parent.get());

        // do something with the components
    }
}
As another example, say we are making a strategy game, and we have Units that are children of a Squad. Say we need to make a system that works on each Squad, and it needs some information about the children:
fn process_squad_damage(
    q_parent: Query<(&MySquadDamage, &Children)>,
    q_child: Query<&MyUnitHealth>,
) {
    // get the properties of each squad
    for (squad_dmg, children) in q_parent.iter() {
        // `children` is a collection of Entity IDs
        for &child in children.iter() {
            // get the health of each child unit
            let health = q_child.get(child);

            // do something
        }
    }
}
Transform and Visibility Propagation
If your entities represent “objects in the game world”, you probably expect the children to be affected by the parent.
Transform propagation allows children to be positioned relative to their parent and move with it.
Visibility propagation allows children to be hidden if you manually hide their parent.
Most Bundles that come with Bevy provide these behaviors automatically. Check the docs for the bundles you are using. Camera bundles, for example, have transforms, but not visibility.
Otherwise, you can use SpatialBundle to make sure
your entities have all the necessary components.
Known Pitfalls
Despawning Child Entities
If you despawn an entity that has a parent, Bevy does not remove it from the
parent’s Children.
If you then query for that parent entity’s children, you will get an invaild entity, and any attempt to manipulate it will likely lead to this error:
thread 'main' panicked at 'Attempting to create an EntityCommands for entity 7v0, which doesn't exist.'
The workaround is to manually call remove_children alongside the despawn:
    commands.entity(parent_entity).remove_children(&[child_entity]);
commands.entity(child_entity).despawn();| Bevy Version: | 0.14 | (outdated!) |
|---|
This entire book is outdated and no longer maintained. I am keeping it online, in case anyone still finds any of the information in it useful. To adapt to newer versions of Bevy, please consult Bevy's migration guides.
Fixed Timestep
Relevant official examples:
fixed_timestep.
If you need to run some systems at a fixed rate, independent of the display frame rate, Bevy provides a solution.
// These systems will run every frame
// (at the framerate being rendered to your screen)
app.add_systems(Update, (
    camera_movement,
    animation,
    juicy_explosions,
));

// These systems will run as many times as needed
// as to maintain a fixed rate on average
app.add_systems(FixedUpdate, (
    physics_collisions,
    enemy_ai,
    gameplay_simulation,
));
Every frame update, Bevy will run the FixedUpdate schedule as many times as
needed to catch up. If the game is running slow, it might run multiple times. If
the game is running fast, it might be skipped.
This happens before the regular Update schedule runs for that frame, but
after state transitions.
The default fixed timestep interval is 64 Hz. If you want something else, you can configure it as follows:
// Set the Fixed Timestep interval to 96 Hz
app.insert_resource(Time::<Fixed>::from_hz(96.0));

// Set the Fixed Timestep interval to 250 milliseconds
app.insert_resource(Time::<Fixed>::from_seconds(0.25));
Checking the Time
Just use Res<Time> as normal. When your system is running in
FixedUpdate, Bevy will automatically detect that, and all the timing
information (such as delta) will represent the fixed timestep instead of the
display frame rate.
fn print_time_delta(time: Res<Time>) {
    // If we add this system to `Update`, this will print the time delta
    // between subsequent frames (the display frame rate)

    // If we add this system to `FixedUpdate`, this will always print the
    // same value (equal to the fixed timestep interval).

    println!("Elapsed seconds: {}", time.delta_seconds());
}

// This system will access the Fixed time
// regardless of what schedule it runs in
fn print_fixed_time_info(time_fixed: Res<Time<Fixed>>) {
    // `Time<Fixed>` gives us some additional methods, such as checking
    // the overstep (partial timestep / amount of extra time accumulated)
    println!(
        "Time remaining until the next fixed update run: {}",
        time_fixed.delta_seconds() - time_fixed.overstep().as_secs_f32()
    );
}

// This system will access the regular frame time regardless
// of what schedule it runs in
fn check_virtual_time(time_fixed: Res<Time<Virtual>>) {
    // ...
}
If you need to access the fixed-timestep-time from a system running outside
of fixed timestep, you can use Res<Time<Fixed>> instead.
If you need to access the regular frame-time from a system running under
fixed timestep, you can use Res<Time<Virtual>> instead. Res<Time<Real>>
gives you the real (wall-clock) time, without pausing or scaling.
Should I put my systems in Update or FixedUpdate?
The purpose of fixed timestep is to make gameplay code behave predictably and reliably. Things such as physics and simulation work best if they are computed with fixed time intervals, as that avoids floating point errors from accumulating and glitchy behavior from variable framerate.
The following things should probably be done in FixedUpdate:
- Physics and collision detection
- Networking / netcode
- AI for enemies and NPCs (pathfinding, decisions, etc.)
- Spawning/despawning gameplay-related entities
- Other simulation and decision-making
However, anything that directly affects what is displayed on-screen should run per-frame, in order to look smooth. If you do movement or animation under fixed timestep, it will look choppy, especially on high-refresh-rate screens.
The following things should probably be done in Update:
- Camera movement and controls
- Animations
- UI
- Visual effects
- Anything that is part of your game’s graphics/visuals or interactivity
- App state transitions
Player movement and other movement that is part of gameplay
should be done in FixedUpdate, so it works reliably and
consistently. To also make it look smooth on-screen, see transform
interpolation/extrapolation.
Input Handling
If you use Res<ButtonInput<...>> and
.just_pressed/.just_released to check for key/button presses, beware that
the state is updated once per frame. This API is not reliable inside
FixedUpdate. Use events for input handling instead, or roll
your own abstractions.
One way to do this is to put your input handling systems in PreUpdate, order
them after Bevy’s InputSystem set, and do your input
handling there. Convert it into your own custom event types or some
other useful representation, which you can then handle from your gameplay code
in FixedUpdate.
// TODO show how to do thisTiming Caveats
Fixed timestep does not run in real-world time! You cannot rely on it for timing!
For example, if you try to play audio from it, or send network packets, you will notice that they don’t actually occur at the fixed timestep interval. They will not be evenly spaced!
Your systems are still called as part of the regular frame-update
cycle. Every frame update, Bevy will run the FixedMain
schedule as many times as needed to catch up.
This means if you specify, for example, a 60 Hz fixed timestep interval, your systems will not actually run in 1/60 second intervals in real time.
What will happen is the following:
- If the display frame rate is faster than the timestep, some frame update cycles
will skip the
FixedMainschedule entirely. - If the display frame rate is slower than the timestep, some frame update cycles
will run the
FixedMainmultiple times.
In any case, FixedMain will run right before
Update, where your per-frame systems live.
Additional Schedules
FixedUpdate is actually part of a larger FixedMain
schedule, which also contains other schedules:
They are analogous to the schedules in Main, that run every
frame update. They can be used for analogous purposes (to contain “engine
systems” from Bevy and plugins).
| Bevy Version: | 0.14 | (outdated!) |
|---|
This entire book is outdated and no longer maintained. I am keeping it online, in case anyone still finds any of the information in it useful. To adapt to newer versions of Bevy, please consult Bevy's migration guides.
Background Computation
Relevant official examples:
async_compute,
external_source_external_thread.
Sometimes you need to perform long-running background computations. You want to do that in a way that does not hold up Bevy’s main frame update loop, so that your game can keep refreshing and feeling responsive with no lag spikes.
To do this, Bevy offers a special AsyncComputeTaskPool. You can spawn
tasks there, and Bevy will run them on special CPU threads dedicated for
the purpose of running background computations.
When you initiate the task, you get a Task handle, which you can use
to check for completion.
It is common to write two separate systems, one for initiating tasks and storing the handles, and one for handling the finished work when the tasks complete.
use bevy::tasks::futures_lite::future;
use bevy::tasks::{block_on, AsyncComputeTaskPool, Task};

#[derive(Resource)]
struct MyMapGenTasks {
    generating_chunks: HashMap<UVec2, Task<MyMapChunkData>>,
}

fn begin_generating_map_chunks(
    mut my_tasks: ResMut<MyMapGenTasks>,
) {
    let task_pool = AsyncComputeTaskPool::get();
    for chunk_coord in decide_what_chunks_to_generate(/* ... */) {
        // we might have already spawned a task for this `chunk_coord`
        if my_tasks.generating_chunks.contains_key(&chunk_coord) {
            continue;
        }
        let task = task_pool.spawn(async move {
            // TODO: do whatever you want here!
            generate_map_chunk(chunk_coord)
        });
        my_tasks.generating_chunks.insert(chunk_coord, task);
    }
}

fn receive_generated_map_chunks(
    mut my_tasks: ResMut<MyMapGenTasks>
) {
    my_tasks.generating_chunks.retain(|chunk_coord, task| {
        // check on our task to see how it's doing :)
        let status = block_on(future::poll_once(task));

        // keep the entry in our HashMap only if the task is not done yet
        let retain = status.is_none();

        // if this task is done, handle the data it returned!
        if let Some(mut chunk_data) = status {
            // TODO: do something with the returned `chunk_data`
        }

        retain
    });
}
// every frame, we might have some new chunks that are ready,
// or the need to start generating some new ones. :)
app.add_systems(Update, (
begin_generating_map_chunks, receive_generated_map_chunks
));Internal Parallelism
Your tasks can also spawn additional independent tasks themselves, for extra parallelism, using the same API as shown above, from within the closure.
If you’d like your background computation tasks to process data in parallel, you can use scoped tasks. This allows you to create tasks that borrow data from the function that spawns them.
Using the scoped API can also be easier, even if you don’t need to borrow data,
because you don’t have to worry about storing and awaiting the Task handles.
A common pattern is to have your main task (the one you initiate from your systems, as shown earlier) act as a “dispacher”, spawning a bunch of scoped tasks to do the actual work.
I/O-heavy Workloads
If your intention is to do background I/O (such as networking or accessing
files) instead of heavy CPU work, you can use IoTaskPool instead of
AsyncComputeTaskPool. The APIs are the same as shown above. The choice
of task pool just helps Bevy schedule and manage your tasks appropriately.
For example, you could spawn tasks to run your game’s multiplayer
netcode, save/load game save files, etc. Bevy’s asset loading
infrastructure also makes use of the IoTaskPool.
Passing Data Around
The previous examples showcased a “spawn-join” programming pattern, where you start tasks to perform some work and then consume the values they return after they complete.
If you’d like to have some long-running tasks that send values
back to you, instead of returning, you can use channels (from the
async-channel crate). Channels can also be used to
send data to your long-running background tasks.
Set up some channels and put the side you want to access from Bevy in a
resource. To receive data from Bevy systems,
you should poll the channels using a non-blocking method, like try_recv,
to check if data is available.
use bevy::tasks::IoTaskPool;
use async_channel::{Sender, Receiver};

/// Messages we send to our netcode task
enum MyNetControlMsg {
    DoSomething,
    // ...
}

/// Messages we receive from our netcode task
enum MyNetUpdateMsg {
    SomethingHappened,
    // ...
}

/// Channels used for communicating with our game's netcode task.
/// (The side used from our Bevy systems)
#[derive(Resource)]
struct MyNetChannels {
    tx_control: Sender<MyNetControlMsg>,
    rx_updates: Receiver<MyNetUpdateMsg>,
}

fn setup_net_session(
    mut commands: Commands,
) {
    // create our channels:
    let (tx_control, rx_control) = async_channel::unbounded();
    let (tx_updates, rx_updates) = async_channel::unbounded();

    // spawn our background i/o task for networking
    // and give it its side of the channels:
    IoTaskPool::get().spawn(async move {
        my_netcode(rx_control, tx_updates).await
    }).detach();

    // NOTE: `.detach()` to let the task run
    // without us storing the `Task` handle.
    // Otherwise, the task will get canceled!

    // (though in a real application, you probably want to
    // store the `Task` handle and have a system to monitor
    // your task and recreate it if necessary)

    // put our side of the channels in a resource for later
    commands.insert_resource(MyNetChannels {
        tx_control, rx_updates,
    });
}

fn handle_net_updates(
    my_channels: Res<MyNetChannels>,
) {
    // Non-blocking check for any new messages on the channel
    while let Ok(msg) = my_channels.rx_updates.try_recv() {
        // TODO: do something with `msg`
    }
}

fn tell_the_net_task_what_to_do(
    my_channels: Res<MyNetChannels>,
) {
    if let Err(e) = my_channels.tx_control.try_send(MyNetControlMsg::DoSomething) {
        // TODO: handle errors. Maybe our task has
        // returned or panicked, and closed the channel?
    }
}

/// This runs in the background I/O task
async fn my_netcode(
    rx_control: Receiver<MyNetControlMsg>,
    tx_updates: Sender<MyNetUpdateMsg>,
) {
    // TODO: Here we can connect and talk to our multiplayer server,
    // handle incoming `MyNetControlMsg`s, send `MyNetUpdateMsg`s, etc.

    while let Ok(msg) = rx_control.recv().await {
        // TODO: do something with `msg`

        // Send data back, to be handled from Bevy systems:
        tx_updates.send(MyNetUpdateMsg::SomethingHappened).await
            .expect("Error sending updates over channel");

        // We can also spawn additional parallel tasks
        IoTaskPool::get().spawn(async move {
            // ... some other I/O work ...
        }).detach();
        AsyncComputeTaskPool::get().spawn(async move {
            // ... some heavy CPU work ...
        }).detach();
    }
}
app.add_systems(Startup, setup_net_session);
app.add_systems(FixedUpdate, (
tell_the_net_task_what_to_do,
handle_net_updates,
));Make sure to add async_channel to your Cargo.toml:
[dependencies]
async-channel = "2.3.1"
Wider Async Ecosystem
Bevy’s task pools are built on top of the smol runtime.
Feel free to use anything from its ecosystem of compatible crates:
async-channel- Multi-producer multi-consumer channelsasync-fs- Async filesystem primitivesasync-net- Async networking primitives (TCP/UDP/Unix)async-process- Async interface for working with processesasync-lock- Async locks (barrier, mutex, reader-writer lock, semaphore)async-io- Async adapter for I/O types, also timersfutures-lite- Misc helper and extension APIsfutures- More helper and extension APIs (notably the powerfulselect!andjoin!macros)- Any Rust async library that supports
smol.
Using Your Own Threads
While not typically recommended, sometimes you might want to manage an
actual dedicated CPU thread of your own. For example, if you also want to run
another framework’s runtime (such as tokio) in parallel
with Bevy. You might have to do this if you have to use crates built for
another async ecosystem, that are not compatible with smol.
To interoperate with your non-Bevy thread, you can move data between
it and Bevy using channels. Do the equivalent of what was shown in
the example earlier on this page, but instead of
async-channel, use the channel types provided
by your alternative runtime (such as tokio), or
std/crossbeam for raw OS threads.
| Bevy Version: | 0.13 | (outdated!) |
|---|
This entire book is outdated and no longer maintained. I am keeping it online, in case anyone still finds any of the information in it useful. To adapt to newer versions of Bevy, please consult Bevy's migration guides.
Gizmos
// TODO
| Bevy Version: | (any) |
|---|
This entire book is outdated and no longer maintained. I am keeping it online, in case anyone still finds any of the information in it useful. To adapt to newer versions of Bevy, please consult Bevy's migration guides.
General Graphics Features
This chapter covers general graphics-related features in Bevy, that are relevant to both 2D and 3D games.
Bevy’s rendering is driven by / configured via cameras. Each camera entity will cause Bevy to render your game world, as configured via the various components on the camera. You can enable all kinds of different workflows, as well as optional effects, by adding the relevant components to your camera and configuring them.
| Bevy Version: | 0.12 | (outdated!) |
|---|
This entire book is outdated and no longer maintained. I am keeping it online, in case anyone still finds any of the information in it useful. To adapt to newer versions of Bevy, please consult Bevy's migration guides.
Cameras
Cameras drive all rendering in Bevy. They are responsible for configuring what to draw, how to draw it, and where to draw it.
You must have at least one camera entity, in order for anything to be displayed at all! If you forget to spawn a camera, you will get an empty black screen.
In the simplest case, you can create a camera with the default settings. Just
spawn an entity using Camera2dBundle or
Camera3dBundle. It will simply draw all renderable
entities that are visible.
This page gives a general overview of cameras in Bevy. Also see the dedicated pages for 2D cameras and 3D cameras.
Practical advice: always create marker components for your camera entities, so that you can query your cameras easily!
#[derive(Component)]
struct MyGameCamera;

fn setup(mut commands: Commands) {
    commands.spawn((
        Camera3dBundle::default(),
        MyGameCamera,
    ));
}
The Camera Transform
Cameras have transforms, which can be used to position or rotate the camera. This is how you move the camera around.
For examples, see these cookbook pages:
- 3D pan-orbit camera, like in 3D editor apps
If you are making a game, you should implement your own custom camera controls that feel appropriate to your game’s genre and gameplay.
Zooming the camera
Do not use the transform scale to “zoom” a camera! It just stretches the image, which is not “zooming”. It might also cause other issues and incompatibilities. Use the projection to zoom.
For an orthographic projection, change the scale. For a perspective projection, change the FOV. The FOV mimics the effect of zooming with a lens.
Learn more about how to do this in 2D or 3D.
Projection
The camera projection is responsible for mapping the coordinate system to the viewport (commonly, the screen/window). It is what configures the coordinate space, as well as any scaling/stretching of the image.
Bevy provides two kinds of projections:
OrthographicProjection and
PerspectiveProjection. They are configurable,
to be able to serve a variety of different use cases.
Orthographic means that everything always appears the same size, regardless of how far away it is from the camera.
Perspective means that things appear smaller the further away they are from the camera. This is the effect that gives 3D graphics a sense of depth and distance.
2D cameras are always orthographic.
3D cameras can use either kind of projection. Perspective is the most common (and default) choice. Orthographic is useful for applications such as CAD and engineering, where you want to accurately represent the dimensions of an object, instead of creating a realistic sense of 3D space. Some games (notably simulation games) use orthographic as an artistic choice.
It is possible to implement your own custom camera projections. This can give you full control over the coordinate system. However, beware that things might behave in unexpected ways if you violate Bevy’s coordinate system conventions!
HDR and Tonemapping
Render Target
The render target of a camera determines where the GPU will draw things to. It
could be a window (for outputting directly to the screen) or an
Image asset (render-to-texture).
By default, cameras output to the primary window.
use bevy::render::camera::RenderTarget;

fn debug_render_targets(
    q: Query<&Camera>,
) {
    for camera in &q {
        match &camera.target {
            RenderTarget::Window(wid) => {
                eprintln!("Camera renders to window with id: {:?}", wid);
            }
            RenderTarget::Image(handle) => {
                eprintln!("Camera renders to image asset with id: {:?}", handle);
            }
            RenderTarget::TextureView(_) => {
                eprintln!("This is a special camera that outputs to something outside of Bevy.");
            }
        }
    }
}
Viewport
The viewport is an (optional) way to restrict a camera to a sub-area of its render target, defined as a rectangle. That rectangle is effectively treated as the “window” to draw in.
An obvious use-case are split-screen games, where you want a camera to only draw to one half of the screen.
use bevy::render::camera::Viewport;

fn setup_minimap(mut commands: Commands) {
    commands.spawn((
        Camera2dBundle {
            camera: Camera {
                // renders after / on top of other cameras
                order: 2,
                // set the viewport to a 256x256 square in the top left corner
                viewport: Some(Viewport {
                    physical_position: UVec2::new(0, 0),
                    physical_size: UVec2::new(256, 256),
                    ..default()
                }),
                ..default()
            },
            ..default()
        },
        MyMinimapCamera,
    ));
}
If you need to find out the area a camera renders to (the viewport, if configured, or the entire window, if not):
fn debug_viewports(
    q: Query<&Camera, With<MyExtraCamera>>,
) {
    let camera = q.single();

    // the size of the area being rendered to
    let view_dimensions = camera.logical_viewport_size().unwrap();

    // the coordinates of the rectangle covered by the viewport
    let rect = camera.logical_viewport_rect().unwrap();
}
Coordinate Conversion
Camera provides methods to help with coordinate conversion
between on-screen coordinates and world-space coordinates. For an example, see
the “cursor to world” cookbook page.
Clear Color
This is the “background color” that the whole viewport will be cleared to, before a camera renders anything.
You can also disable clearing on a camera, if you want to preserve all the pixels as they were before.
Render Layers
RenderLayers is a way to filter what entities should be
drawn by what cameras. Insert this component onto your entities
to place them in specific “layers”. The layers are integers from 0 to 31 (32
total available).
Inserting this component onto a camera entity selects what layers that camera should render. Inserting this component onto renderable entities selects what cameras should render those entities. An entity will be rendered if there is any overlap between the camera’s layers and the entity’s layers (they have at least one layer in common).
If an entity does not have the RenderLayers component,
it is assumed to belong to layer 0 (only).
use bevy::render::view::visibility::RenderLayers;
// This camera renders everything in layers 0, 1
commands.spawn((
    Camera2dBundle::default(),
    RenderLayers::from_layers(&[0, 1])
));
// This camera renders everything in layers 1, 2
commands.spawn((
    Camera2dBundle::default(),
    RenderLayers::from_layers(&[1, 2])
));
// This sprite will only be seen by the first camera
commands.spawn((
    SpriteBundle::default(),
    RenderLayers::layer(0),
));
// This sprite will be seen by both cameras
commands.spawn((
    SpriteBundle::default(),
    RenderLayers::layer(1),
));
// This sprite will only be seen by the second camera
commands.spawn((
    SpriteBundle::default(),
    RenderLayers::layer(2),
));
// This sprite will also be seen by both cameras
commands.spawn((
    SpriteBundle::default(),
    RenderLayers::from_layers(&[0, 2]),
));
You can also modify the render layers of entities after they are spawned.
Camera Ordering
A camera’s order is a simple integer value that controls the order relative
to any other cameras with the same render target.
For example, if you have multiple cameras that all render to the primary window,
they will behave as multiple “layers”. Cameras with a higher order value will render
“on top of” cameras with a lower value. 0 is the default.
use bevy::core_pipeline::clear_color::ClearColorConfig;

commands.spawn((
    Camera2dBundle {
        camera_2d: Camera2d {
            // no "background color", we need to see the main camera's output
            clear_color: ClearColorConfig::None,
            ..default()
        },
        camera: Camera {
            // renders after / on top of the main camera
            order: 1,
            ..default()
        },
        ..default()
    },
    MyOverlayCamera,
));
UI Rendering
Bevy UI rendering is integrated into the cameras! Every camera will, by default, also draw UI.
However, if you are working with multiple cameras, you probably only want your UI to be drawn once (probably by the main camera). You can disable UI rendering on your other cameras.
Also, UI on multiple cameras is currently broken in Bevy. Even if you want multiple UI cameras (say, to display UI in an app with multiple windows), it does not work correctly.
commands.spawn((
    Camera3dBundle::default(),
    // UI config is a separate component
    UiCameraConfig {
        show_ui: false,
    },
    MyExtraCamera,
));
Disabling Cameras
You can deactivate a camera without despawning it. This is useful when you want to preserve the camera entity and all the configuration it carries, so you can easily re-enable it later.
Some example use cases: toggling an overlay, switching between a 2D and 3D view.
fn toggle_overlay(
    mut q: Query<&mut Camera, With<MyOverlayCamera>>,
) {
    let mut camera = q.single_mut();
    camera.is_active = !camera.is_active;
}
Multiple Cameras
This is an overview of different scenarios where you would need more than one camera entity.
Multiple Windows
Official example: multiple_windows.
If you want to create a Bevy app with multiple windows, you need to spawn multiple cameras, one for each window, and set their render targets respectively. Then, you can use your cameras to control what to display in each window.
Split-Screen
Official example: split_screen.
You can set the camera viewport to only render to a part of the render target. This way, a camera can be made to render one half of the screen (or any other area). Use a separate camera for each view in a split-screen game.
Overlays
Official example: two_passes.
You might want to render multiple “layers” (passes) to the same render target. An example of this might be an overlay/HUD to be displayed on top of the main game.
The overlay camera could be completely different from the main camera. For example, the main camera might draw a 3D scene, and the overlay camera might draw 2D shapes. Such use cases are possible!
Use a separate camera to create the overlay. Set the priority higher, to tell Bevy to render it after (on top of) the main camera. Make sure to disable clearing!
Think about which camera you want to be responsible for rendering the UI. Use the overlay camera if you want it to be unaffected, or use the main camera if you want the overlay to be on top of the UI. Disable it on the other camera.
Use Render Layers to control what entities should be rendered by each camera.
Render to Image
(aka Render to Texture)
Official example: render_to_texture.
If you want to generate an image in memory, you can output to an Image asset.
This is useful for intermediate steps in games, such as rendering a minimap or the gun in a shooter game. You can then use that image as part of the final scene to render to the screen. Item previews are a similar use case.
Another use case is window-less applications that want to generate image files. For example, you could use Bevy to render something, and then export it to a PNG file.
| Bevy Version: | 0.12 | (outdated!) |
|---|
This entire book is outdated and no longer maintained. I am keeping it online, in case anyone still finds any of the information in it useful. To adapt to newer versions of Bevy, please consult Bevy's migration guides.
HDR
HDR (High Dynamic Range) refers to the ability of the game engine to handle
very bright lights or colors. Bevy’s rendering is HDR internally. This means
you can have objects with colors that go above 1.0, very bright lights,
or bright emissive materials. All of this is supported for both 3D and 2D.
This is not to be confused with HDR display output, which is the ability to produce a HDR image to be displayed by a modern monitor or TV with HDR capabilities. Bevy has no support for this yet.
The internal HDR image has to be converted down to SDR (Standard Dynamic Range) before it can be displayed on the screen. This process is called Tonemapping. Bevy supports different algorithms that can result in a different look. It is an artistic choice what tonemapping algorithm to use for your game.
Camera HDR configuration
There is a per-camera toggle that lets you decide whether you want Bevy to preserve the HDR data internally, to make it possible for subsequent passes (such as postprocessing effects) to use it.
commands.spawn((
    Camera3dBundle {
        camera: Camera {
            hdr: true,
            ..default()
        },
        ..default()
    },
));
If it is enabled, Bevy’s intermediate textures will be in HDR format. The shaders output HDR values and Bevy will store them, so they can be used in later rendering passes. This allows you to enable effects like Bloom, that make use of the HDR data. Tonemapping will happen as a post-processing step, after the HDR data is no longer needed for anything.
If it is disabled, the shaders are expected to output standard RGB colors in the 0.0 to 1.0 range. Tonemapping happens in the shader. The HDR information is not preserved. Effects that require HDR data, like Bloom, will not work.
It is disabled by default, because this results in better performance and reduced VRAM usage for applications with simple graphics that do not need it.
If you have both HDR and MSAA enabled, it is possible you might encounter issues. There might be visual artifacts in some cases. It is also unsupported on Web/WASM, crashing at runtime. Disable MSAA if you experience any such issues.
Tonemapping
Tonemapping is the step of the rendering process where the colors of pixels are converted from their in-engine intermediate repesentation into the final values as they should be displayed on-screen.
This is very important with HDR applications, as in that case the image can contain very bright pixels (above 1.0) which need to be remapped into a range that can be displayed.
Tonemapping is enabled by default. Bevy allows you to configure it via the
(Tonemapping) component, per-camera. Disabling it is not
recommended, unless you know you only have very simple graphics that don’t need
it. It can make your graphics look incorrect.
use bevy::core_pipeline::tonemapping::Tonemapping;

commands.spawn((
    Camera3dBundle {
        // no tonemapping
        tonemapping: Tonemapping::None,
        ..default()
    },
));
commands.spawn((
    Camera3dBundle {
        // this is the default:
        tonemapping: Tonemapping::TonyMcMapface,
        ..default()
    },
));
commands.spawn((
    Camera3dBundle {
        // another common choice:
        tonemapping: Tonemapping::ReinhardLuminance,
        ..default()
    },
));
Bevy supports many different tonemapping algorithms. Each of them results in a
different look, affecting colors and brightness. It can be an artistic choice. You
can decide what algorithm looks best for your game. Bevy’s default is TonyMcMapface,
which, despite the silly name, provides very good results for a wide variety of
graphics styles. See the (Tonemapping) documentation for
an explanation of each of the available choices.
Some tonemapping algorithms (incl. the default TonyMcMapface) require the
tonemapping_luts cargo feature. It is enabled by default. Be
sure to re-enable it if you disable default features and you need it. Enabling
it also enables the ktx2 and zstd features, because it works by embedding
special data in KTX2 format into your game, which is used during tonemapping.
The following tonemapping algorithms DO NOT require the special data from
tonemapping_luts:
- Reinhard
- ReinhardLuminance
- AcesFitted
- SomewhatBoringDisplayTransform
The following tonemapping algorithms require the special data from tonemapping_luts:
- AgX
- TonyMcMapface
- BlenderFilmic
If you want to make a smaller game binary (might be important for Web games), you could reduce bloat by changing the default tonemapping to something simpler and disabling the cargo features.
Color Grading
Color Grading is a manipulation of the overall look of the image.
Together with tonemapping, this affects the “tone”/“mood” of the final image.
This is also how you can implement a “retina” effect, where the camera dynamically adapts to very dark (such as inside a cave) and very bright (such as in daylight) scenes, by adjusting exposure/gamma.
You can also adjust color saturation. Heavily desaturating the image can result in a greyscale or muted appearance, which can be a great artistic choice for apocalyptic or horror games.
You can configure these parameters via the ColorGrading
component:
use bevy::render::view::ColorGrading;

commands.spawn((
    Camera3dBundle {
        color_grading: ColorGrading {
            exposure: 0.0,
            gamma: 1.0,
            pre_saturation: 1.0,
            post_saturation: 1.0,
        },
        ..default()
    },
));
Deband Dithering
Deband dithering helps color gradients or other areas with subtle changes in color to appear higher-quality, without a “color banding” effect.
It is enabled by default, and can be disabled per-camera.
use bevy::core_pipeline::tonemapping::DebandDither;

commands.spawn((
    Camera3dBundle {
        dither: DebandDither::Disabled,
        ..default()
    },
));
Here is an example image without dithering (top) and with dithering (bottom). Pay attention to the quality/smoothness of the green color gradient on the ground plane. In games with photorealistic graphics, similar situations can arise in the sky, in dark rooms, or lights glowing with a bloom effect.
| Bevy Version: | 0.12 | (outdated!) |
|---|
This entire book is outdated and no longer maintained. I am keeping it online, in case anyone still finds any of the information in it useful. To adapt to newer versions of Bevy, please consult Bevy's migration guides.
Bloom
The “Bloom” effect creates a glow around bright lights. It is not a physically-accurate effect, though it is inspired by how light looks through a dirty or imperfect lens.
Bloom does a good job of helping the perception of very bright light, especially when outputting HDR to the display hardware is not supported. Your monitor can only display a certain maximum brightness, so Bloom is a common artistic choice to try to convey light intensity brighter than can be displayed.
Bloom looks best with a Tonemapping algorithm that desaturates very bright colors. Bevy’s default is a good choice.
Bloom requires HDR mode to be enabled on your camera. Add the
BloomSettings component to the camera to enable
bloom and configure the effect.
use bevy::core_pipeline::bloom::BloomSettings;

commands.spawn((
    Camera3dBundle {
        camera: Camera {
            hdr: true,
            ..default()
        },
        ..default()
    },
    BloomSettings::NATURAL,
));
Bloom Settings
Bevy offers many parameters to tweak the look of the bloom effect.
The default mode is “energy-conserving”, which is closer to how real light physics might behave. It tries to mimic the effect of light scattering, without brightening the image artificially. The effect is more subtle and “natural”.
There is also an “additive” mode, which will brighten everything and make it feel like bright lights are “glowing” unnaturally. This sort of effect is quite common in many games, especially older games from the 2000s.
Bevy offers three bloom “presets”:
NATURAL: energy-conerving, subtle, natural look.OLD_SCHOOL: “glowy” effect, similar to how older games looked.SCREEN_BLUR: very intense bloom that makes everything look blurred.
You can also create an entirely custom configuration by tweaking all the
parameters in BloomSettings to your taste. Use the
presets for inspiration.
Here are the settings for the Bevy presets:
// NATURAL
BloomSettings {
    intensity: 0.15,
    low_frequency_boost: 0.7,
    low_frequency_boost_curvature: 0.95,
    high_pass_frequency: 1.0,
    prefilter_settings: BloomPrefilterSettings {
        threshold: 0.0,
        threshold_softness: 0.0,
    },
    composite_mode: BloomCompositeMode::EnergyConserving,
};

// OLD_SCHOOL
BloomSettings {
    intensity: 0.05,
    low_frequency_boost: 0.7,
    low_frequency_boost_curvature: 0.95,
    high_pass_frequency: 1.0,
    prefilter_settings: BloomPrefilterSettings {
        threshold: 0.6,
        threshold_softness: 0.2,
    },
    composite_mode: BloomCompositeMode::Additive,
};

// SCREEN_BLUR
BloomSettings {
    intensity: 1.0,
    low_frequency_boost: 0.0,
    low_frequency_boost_curvature: 0.0,
    high_pass_frequency: 1.0 / 3.0,
    prefilter_settings: BloomPrefilterSettings {
        threshold: 0.0,
        threshold_softness: 0.0,
    },
    composite_mode: BloomCompositeMode::EnergyConserving,
};
Visualization
Here is an example of Bloom in 3D:

And here is a 2D example:

| Bevy Version: | (any) |
|---|
This entire book is outdated and no longer maintained. I am keeping it online, in case anyone still finds any of the information in it useful. To adapt to newer versions of Bevy, please consult Bevy's migration guides.
Bevy 2D
This chapter covers topics relevant to making 2D games with Bevy.
| Bevy Version: | 0.12 | (outdated!) |
|---|
This entire book is outdated and no longer maintained. I am keeping it online, in case anyone still finds any of the information in it useful. To adapt to newer versions of Bevy, please consult Bevy's migration guides.
2D Camera Setup
Cameras in Bevy are mandatory to see anything: they configure the rendering.
This page will teach you about the specifics of 2D cameras. If you want to learn about general non-2D specific functionality, see the general page on cameras.
Creating a 2D Camera
Bevy provides a bundle (Camera2dBundle)
that you can use to spawn a camera entity. It
has reasonable defaults to set up everything correctly.
You might want to set the transform, to position the camera.
#[derive(Component)]
struct MyCameraMarker;

fn setup_camera(mut commands: Commands) {
    commands.spawn((
        Camera2dBundle {
            transform: Transform::from_xyz(100.0, 200.0, 0.0),
            ..default()
        },
        MyCameraMarker,
    ));
}

fn main() {
    App::new()
        .add_plugins(DefaultPlugins)
        .add_systems(Startup, setup_camera)
        .run();
}
Projection
The projection is what determines how coordinates map to the viewport (commonly, the screen/window).
2D cameras always use an Orthographic projection.
When you spawn a 2D camera using Camera2dBundle,
it adds the OrthographicProjection
component to your entity. When
you are working with 2D cameras and you want to access
the projection, you should query for
OrthographicProjection.
fn debug_projection(
    query_camera: Query<&OrthographicProjection, With<MyCameraMarker>>,
) {
    let projection = query_camera.single();
    // ... do something with the projection
}
Note that this is different from 3D. If you are making a library or some other code that should be able to handle both 2D and 3D, you cannot make a single query to access both 2D and 3D cameras. You should create separate systems, or at least two separate queries, to handle each kind of camera. This makes sense, as you will likely need different logic for 2D vs. 3D anyway.
Caveat: near/far values
The projection contains the near and far values, which indicate the minimum
and maximum Z coordinate (depth) that can be rendered, relative to the position
(transform) of the camera.
Camera2dBundle sets them appropriately for 2D:
-1000.0 to 1000.0, allowing entities to be displayed on both positive and
negative Z coordinates. However, if you create the
OrthographicProjection yourself, to change any
other settings, you need to set these values yourself. The default value of the
OrthographicProjection struct is designed for
3D and has a near value of 0.0, which means you might not be able to see
your 2D entities.
commands.spawn((
    Camera2dBundle {
        projection: OrthographicProjection {
            // don't forget to set `near` and `far`
            near: -1000.0,
            far: 1000.0,
            // ... any other settings you want to change ...
            ..default()
        },
        ..default()
    },
    MyCameraMarker,
));
A more foolproof way to go about this is to use a temporary variable, to let the bundle do its thing, and then mutate whatever you want. This way, you don’t have to worry about the exact values or getting anything wrong:
let mut camera_bundle = Camera2dBundle::default();
// change the settings we want to change:
camera_bundle.projection.scale = 2.0;
camera_bundle.transform.rotate_z(30f32.to_radians());
// ...

commands.spawn((
    camera_bundle,
    MyCameraMarker,
));
Scaling Mode
You can set the ScalingMode according to how you want to
handle window size / resolution.
The default for Bevy 2D cameras is to have 1 screen pixel correspond to 1 world unit, thus allowing you to think of everything in “pixels”. When the window is resized, that causes more or less content to be seen.
If you want to keep this window resizing behavior, but change the mapping of screen
pixels to world units, use ScalingMode::WindowSize(x) with a value other than 1.0.
The value represents the number of screen pixels for one world unit.
If, instead, you want to always fit the same amount of content
on-screen, regardless of resolution, you should use something like
ScalingMode::FixedVertical or ScalingMode::AutoMax. Then, you can directly
specify how many units you want to display on-screen, and your content will
be upscaled/downscaled as appropriate to fit the window size.
use bevy::render::camera::ScalingMode;

let mut my_2d_camera_bundle = Camera2dBundle::default();
// For this example, let's make the screen/window height correspond to
// 1600.0 world units. The width will depend on the aspect ratio.
my_2d_camera_bundle.projection.scaling_mode = ScalingMode::FixedVertical(1600.0);
my_2d_camera_bundle.transform = Transform::from_xyz(100.0, 200.0, 0.0);

commands.spawn((
    my_2d_camera_bundle,
    MyCameraMarker,
));
Zooming
To “zoom” in 2D, you can change the orthographic projection’s scale. This
allows you to just scale everything by some factor, regardless of the
ScalingMode behavior.
fn zoom_scale(
    mut query_camera: Query<&mut OrthographicProjection, With<MyCameraMarker>>,
) {
    let mut projection = query_camera.single_mut();
    // zoom in
    projection.scale /= 1.25;
    // zoom out
    projection.scale *= 1.25;
}
Alternatively, you can reconfigure the ScalingMode. This
way you can be confident about how exactly coordinates/units map to the
screen. This also helps avoid scaling artifacts with 2D assets, especially
pixel art.
fn zoom_scalingmode(
    mut query_camera: Query<&mut OrthographicProjection, With<MyCameraMarker>>,
) {
    use bevy::render::camera::ScalingMode;

    let mut projection = query_camera.single_mut();
    // 4 screen pixels to world/game pixel
    projection.scaling_mode = ScalingMode::WindowSize(4.0);
    // 6 screen pixels to world/game pixel
    projection.scaling_mode = ScalingMode::WindowSize(6.0);
}
Consider having a list of predefined “zoom levels” / scale values, so that you can make sure your game always looks good.
If you are making a pixel-art game, you want to make sure the default texture filtering mode is set to Nearest (and not Linear), if you want your pixels to appear crisp instead of blurry:
fn main() {
    App::new()
        .add_plugins(
            DefaultPlugins
                .set(ImagePlugin::default_nearest())
        )
        // ...
        .run();
}
However, when downscaling, Linear (the default) filtering is preferred for higher quality. So, for games with high-res assets, you want to leave it unchanged.
| Bevy Version: | 0.14 | (outdated!) |
|---|
This entire book is outdated and no longer maintained. I am keeping it online, in case anyone still finds any of the information in it useful. To adapt to newer versions of Bevy, please consult Bevy's migration guides.
Sprites and Atlases
Page coming soon…
In the meantime, you can learn from Bevy’s examples.
| Bevy Version: | (any) |
|---|
This entire book is outdated and no longer maintained. I am keeping it online, in case anyone still finds any of the information in it useful. To adapt to newer versions of Bevy, please consult Bevy's migration guides.
Bevy 3D
This chapter covers topics relevant to making 3D games with Bevy.
| Bevy Version: | 0.12 | (outdated!) |
|---|
This entire book is outdated and no longer maintained. I am keeping it online, in case anyone still finds any of the information in it useful. To adapt to newer versions of Bevy, please consult Bevy's migration guides.
3D Camera Setup
Cameras in Bevy are mandatory to see anything: they configure the rendering.
This page will teach you about the specifics of 3D cameras. If you want to learn about general non-3D specific functionality, see the general page on cameras.
Creating a 3D Camera
Bevy provides a bundle that you can use to spawn a camera entity. It has reasonable defaults to set up everything correctly.
You might want to set the transform, to position the camera.
#[derive(Component)]
struct MyCameraMarker;

fn setup_camera(mut commands: Commands) {
    commands.spawn((
        Camera3dBundle {
            transform: Transform::from_xyz(10.0, 12.0, 16.0)
                .looking_at(Vec3::ZERO, Vec3::Y),
            ..default()
        },
        MyCameraMarker,
    ));
}

fn main() {
    App::new()
        .add_plugins(DefaultPlugins)
        .add_systems(Startup, setup_camera)
        .run();
}
The “looking at” function is an easy way to orient a 3D camera. The second
parameter (which we provide as Y) is the “up” direction. If you want the camera
to be tilted sideways, you can use something else there. If you want to make a
top-down camera, looking straight down, you need to use something other than Y.
Projection
The projection is what determines how coordinates map to the viewport (commonly, the screen/window).
3D cameras can use either a Perspective or an Orthographic projection. Perspective is the default, and most common, choice.
When you spawn a 3D camera using Bevy’s bundle
(Camera3dBundle), it adds the
Projection component to your
entity, which is an enum, allowing either projection kind to be
used.
When you are working with 3D cameras and you want to access the projection, you
should query for the Projection
component type. You can then match on the enum, to handle each
case appropriately.
fn debug_projection(
    query_camera: Query<&Projection, With<MyCameraMarker>>,
) {
    let projection = query_camera.single();
    match projection {
        Projection::Perspective(persp) => {
            // we have a perspective projection
        }
        Projection::Orthographic(ortho) => {
            // we have an orthographic projection
        }
    }
}
Note that this is different from 2D. If you are making a library or some other code that should be able to handle both 2D and 3D, you cannot make a single query to access both 2D and 3D cameras. You should create separate systems, or at least two separate queries, to handle each kind of camera. This makes sense, as you will likely need different logic for 2D vs. 3D anyway.
Perspective Projections
Perspective creates a realistic sense of 3D space. Things appear smaller the further away they are from the camera. This is how things appear to the human eye, and to real-life cameras.
The most important variable here is the FOV (Field-of-View). The FOV determines the strength of the perspective effect. The FOV is the angle covered by the height of the screen/image.
A larger FOV is like a wide-angle camera lens. It makes everything appear more distant, stretched, “zoomed out”. You can see more on-screen.
A smaller FOV is like a telephoto camera lens. It makes everything appear closer and flatter, “zoomed in”. You can see less on-screen.
For reference, a good neutral value is 45° (narrower, Bevy default) or 60° (wider). 90° is very wide. 30° is very narrow.
commands.spawn((
    Camera3dBundle {
        projection: PerspectiveProjection {
            // We must specify the FOV in radians.
            // Rust can convert degrees to radians for us.
            fov: 60.0_f32.to_radians(),
            ..default()
        }.into(),
        transform: Transform::from_xyz(10.0, 12.0, 16.0)
            .looking_at(Vec3::ZERO, Vec3::Y),
        ..default()
    },
    MyCameraMarker,
));
In the above image, we are halving/doubling the FOV and doubling/halving how far away the camera is positioned, to compensate. Note how you can see pretty much the same 3D content, but the higher FOV looks more stretched and has a stronger 3D perspective effect.
Internally, Bevy’s perspective projection uses an infinite reversed Z configuration. This allows for good numeric precision for both nearby and far away objects, avoiding visual artifacts.
Zooming
To “zoom”, change the perspective projection’s FOV.
fn zoom_perspective(
    mut query_camera: Query<&mut Projection, With<MyCameraMarker>>,
) {
    // assume perspective. do nothing if orthographic.
    let Projection::Perspective(persp) = query_camera.single_mut().into_inner() else {
        return;
    };
    // zoom in
    persp.fov /= 1.25;
    // zoom out
    persp.fov *= 1.25;
}
If the camera does not move, decreasing the FOV makes everything appear closer and increasing it makes everything appear more distant:

Contrast this with moving the camera itself (using the transform) closer or further away, while keeping the FOV the same:

In some applications (such as 3D editors), moving the camera might be preferable, instead of changing the FOV.
Orthographic Projections
An Orthographic projection makes everything always look the same size, regardless of the distance from the camera. It can feel like if 3D was squashed down into 2D.
Orthographic is useful for applications such as CAD and engineering, where you want to accurately represent the dimensions of an object. Some games (notably simulation games) might use orthographic as an artistic choice.
Orthographic can feel confusing and unintuitive to some people, because it does not create any sense of 3D space. You cannot tell how far away anything is. It creates a perfectly “flat” look. When displayed from a top-down diagonal angle, this artistic style is sometimes referred to as “isometric”.
You should set the ScalingMode according to how you want
to handle window size / resolution.
use bevy::render::camera::ScalingMode;

commands.spawn((
    Camera3dBundle {
        projection: OrthographicProjection {
            // For this example, let's make the screen/window height
            // correspond to 16.0 world units.
            scaling_mode: ScalingMode::FixedVertical(16.0),
            ..default()
        }.into(),
        // the distance doesn't really matter for orthographic,
        // it should look the same (though it might affect
        // shadows and clipping / culling)
        transform: Transform::from_xyz(10.0, 12.0, 16.0)
            .looking_at(Vec3::ZERO, Vec3::Y),
        ..default()
    },
    MyCameraMarker,
));
Zooming
To “zoom”, change the orthographic projection’s scale. The scale determines how much of the scene is visible.
fn zoom_orthographic(
    mut query_camera: Query<&mut Projection, With<MyCameraMarker>>,
) {
    // assume orthographic. do nothing if perspective.
    let Projection::Orthographic(ortho) = query_camera.single_mut().into_inner() else {
        return;
    };
    // zoom in
    ortho.scale /= 1.25;
    // zoom out
    ortho.scale *= 1.25;
}
| Bevy Version: | 0.9 | (outdated!) |
|---|
This entire book is outdated and no longer maintained. I am keeping it online, in case anyone still finds any of the information in it useful. To adapt to newer versions of Bevy, please consult Bevy's migration guides.
3D Models and Scenes (GLTF)
Relevant official examples:
load_gltf,
update_gltf_scene.
Bevy uses the GLTF 2.0 file format for 3D assets.
(other formats may be unofficially available via 3rd-party plugins)
Quick-Start: Spawning 3D Models into your World
The simplest use case is to just load a “3D model” and spawn it into the game world.
“3D models” can often be complex, consisting of multiple parts. Think of a house: the windows, roof, doors, etc., are separate pieces, that are likely made of multiple meshes, materials, and textures. Bevy would technically need multiple ECS Entities to represent and render the whole thing.
This is why your GLTF “model” is represented by Bevy as a Scene. This way, you can easily spawn it, and Bevy will create all the relevant child entities and configure them correctly.
fn spawn_gltf(
    mut commands: Commands,
    ass: Res<AssetServer>,
) {
    // note that we have to include the `Scene0` label
    let my_gltf = ass.load("my.glb#Scene0");

    // to position our 3d model, simply use the Transform
    // in the SceneBundle
    commands.spawn(SceneBundle {
        scene: my_gltf,
        transform: Transform::from_xyz(2.0, 0.0, -5.0),
        ..Default::default()
    });
}
You could also use GLTF files to load an entire map/level. It works the same way.
The above example assumes that you have a simple GLTF file containing only one “default scene”. GLTF is a very flexible file format. A single file can contain many “models” or more complex “scenes”. To get a better understanding of GLTF and possible workflows, read the rest of this page. :)
Introduction to GLTF
GLTF is a modern open standard for exchanging 3D assets between different 3D software applications, like game engines and 3D modeling software.
The GLTF file format has two variants: human-readable ascii/text (*.gltf)
and binary (*.glb). The binary format is more compact and preferable
for packaging the assets with your game. The text format may be useful for
development, as it can be easier to manually inspect using a text editor.
A GLTF file can contain many objects (sub-assets): meshes, materials, textures, scenes, animation clips. When loading a GLTF file, Bevy will load all of the assets contained inside. They will be mapped to the appropriate Bevy-internal asset types.
The GLTF sub-assets
GLTF terminology can be confusing, as it sometimes uses the same words to refer to different things, compared to Bevy. This section will try explain the various GLTF terms.
To understand everything, it helps to mentally consider how these concepts are represented in different places: in your 3D modeling software (like Blender), in the GLTF file itself, and in Bevy.
GLTF Scenes are what you spawn into your game world. This is typically what you see on the screen in your 3D modeling software. Scenes combine all of the data needed for the game engine to create all the needed entities to represent what you want. Conceptually, think of a scene as one “unit”. Depending on your use case, this could be one “3d model”, or even a whole map or game level. In Bevy, these are represented as Bevy Scenes with all the child ECS entities.
GLTF Scenes are composed of GLTF Nodes. These describe the “objects”
in the scene, typically GLTF Meshes, but can also be other things like
Cameras and Lights. Each GLTF Node has a transform for positioning it in
the scene. GLTF Nodes do not have a core Bevy equivalent; Bevy just uses
this data to create the ECS Entities inside of a Scene. Bevy has a special
GltfNode asset type, if you need access to this data.
GLTF Meshes represent one conceptual “3D object”. These correspond
to the “objects” in your 3D modeling software. GLTF Meshes may be complex
and composed of multiple smaller pieces, called GLTF Primitives, each of
which may use a different Material. GLTF Meshes do not have a core Bevy
equivalent, but there is a special GltfMesh asset type,
which describes the primitives.
GLTF Primitives are individual “units of 3D geometry”, for the purposes of
rendering. They contain the actual geometry / vertex data, and reference the
Material to be used when drawing. In Bevy, each GLTF Primitive is represented
as a Bevy Mesh asset, and must be spawned as a separate ECS
Entity to be rendered.
GLTF Materials describe the shading parameters for the surfaces of
your 3D models. They have full support for Physically-Based Rendering
(PBR). They also reference the textures to use. In Bevy, they are represented
as StandardMaterial assets, as used by the Bevy
PBR 3D renderer.
GLTF Textures (images) can be embedded inside the GLTF file, or stored
externally in separate image files alongside it. For example, you can have
your textures as separate PNG/JPEG/KTX2 files for ease of development, or
package them all inside the GLTF file for ease of distribution. In Bevy,
GLTF textures are loaded as Bevy Image assets.
GLTF Samplers describe the settings for how the GPU should use a
given Texture. Bevy does not keep these separate; this data is stored
inside the Bevy Image asset (the sampler field of type
SamplerDescriptor).
GLTF Animations describe animations that interpolate various values,
such as transforms or mesh skeletons, over time. In Bevy, these are loaded
as AnimationClip assets.
GLTF Usage Patterns
A single GLTF file can contain any number of sub-assets of any of the above types, referring to each other however they like.
Because GLTF is so flexible, it is up to you how to structure your assets.
A single GLTF file might be used:
- To represent a single “3D model”, containing a single GLTF Scene with the model, so you can spawn it into your game.
- To represent a whole level, as a GLTF Scene, possibly also including the camera. This lets you load and spawn a whole level/map at once.
- To represent sections of a level/map, such as a rooms, as separate GLTF Scenes. They can share meshes and textures if needed.
- To contain a set of many different “3D models”, each as a separate GLTF Scene. This lets you load and manage the whole collection at once and spawn them individually as needed.
- … others?
Tools for Creating GLTF Assets
If you are using a recent version of Blender (2.8+) for 3D modeling, GLTF is supported out of the box. Just export and choose GLTF as the format.
For other tools, you can try these exporter plugins:
- Old Blender (2.79)
- 3DSMax
- Autodesk Maya
- (or this alternative)
Be sure to check your export settings to make sure the GLTF file contains everything you expect.
If you need Tangents for normal maps, it is recommended that you include them in your GLTF files. This avoids Bevy having to autogenerate them at runtime. Many 3D editors do not enable this option by default.
Textures
For your Textures / image data, the GLTF format specification officially limits the supported formats to just PNG, JPEG, or Basis. However, Bevy does not enforce such “artificial limitations”. You can use any image format supported by Bevy.
Your 3D editor will likely export your GLTF with PNG textures. This will “just work” and is nice for simple use cases.
However, mipmaps and compressed textures are very important to get good GPU performance, memory (VRAM) usage, and visual quality. You will only get these benefits if you use a format like KTX2 or DDS, that supports these features.
We recommend that you use KTX2, which natively supports all GPU texture
functionality + additional zstd compression on top, to reduce file size.
If you do this, don’t forget to enable the ktx2 and zstd cargo
features for Bevy.
You can use the klafsa tool to convert all the textures
used in your GLTF files from PNG/JPEG into KTX2, with mipmaps and GPU texture
compression of your choice.
TODO: show an example workflow for converting textures into the "optimal" format
Using GLTF Sub-Assets in Bevy
The various sub-assets contained in a GLTF file can be addressed in two ways:
- by index (integer id, in the order they appear in the file)
- by name (text string, the names you set in your 3D modeling software when creating the asset, which can be exported into the GLTF)
To get handles to the respective assets in Bevy, you can use the
Gltf “master asset”, or alternatively,
AssetPath with Labels.
Gltf master asset
If you have a complex GLTF file, this is likely the most flexible and useful way of navigating its contents and using the different things inside.
You have to wait for the GLTF file to load, and then use the Gltf asset.
use bevy::gltf::Gltf;

/// Helper resource for tracking our asset
#[derive(Resource)]
struct MyAssetPack(Handle<Gltf>);

fn load_gltf(
    mut commands: Commands,
    ass: Res<AssetServer>,
) {
    let gltf = ass.load("my_asset_pack.glb");
    commands.insert_resource(MyAssetPack(gltf));
}

fn spawn_gltf_objects(
    mut commands: Commands,
    my: Res<MyAssetPack>,
    assets_gltf: Res<Assets<Gltf>>,
) {
    // if the GLTF has loaded, we can navigate its contents
    if let Some(gltf) = assets_gltf.get(&my.0) {
        // spawn the first scene in the file
        commands.spawn(SceneBundle {
            scene: gltf.scenes[0].clone(),
            ..Default::default()
        });

        // spawn the scene named "YellowCar"
        commands.spawn(SceneBundle {
            scene: gltf.named_scenes["YellowCar"].clone(),
            transform: Transform::from_xyz(1.0, 2.0, 3.0),
            ..Default::default()
        });

        // PERF: the `.clone()`s are just for asset handles, don't worry :)
    }
}
For a more convoluted example, say we want to directly create a 3D PBR entity, for whatever reason. (This is not recommended; you should probably just use scenes)
use bevy::gltf::GltfMesh;

fn gltf_manual_entity(
    mut commands: Commands,
    my: Res<MyAssetPack>,
    assets_gltf: Res<Assets<Gltf>>,
    assets_gltfmesh: Res<Assets<GltfMesh>>,
) {
    if let Some(gltf) = assets_gltf.get(&my.0) {
        // Get the GLTF Mesh named "CarWheel"
        // (unwrap safety: we know the GLTF has loaded already)
        let carwheel = assets_gltfmesh.get(&gltf.named_meshes["CarWheel"]).unwrap();

        // Spawn a PBR entity with the mesh and material of the first GLTF Primitive
        commands.spawn(PbrBundle {
            mesh: carwheel.primitives[0].mesh.clone(),
            // (unwrap: material is optional, we assume this primitive has one)
            material: carwheel.primitives[0].material.clone().unwrap(),
            ..Default::default()
        });
    }
}
AssetPath with Labels
This is another way to access specific sub-assets. It is less reliable, but may be easier to use in some cases.
Use the AssetServer to convert a path string into a
Handle.
The advantage is that you can get handles to your sub-assets immediately, even if your GLTF file hasn’t loaded yet.
The disadvantage is that it is more error-prone. If you specify a sub-asset that doesn’t actually exist in the file, or mis-type the label, or use the wrong label, it will just silently not work. Also, currently only using a numerial index is supported. You cannot address sub-assets by name.
fn use_gltf_things(
    mut commands: Commands,
    ass: Res<AssetServer>,
) {
    // spawn the first scene in the file
    let scene0 = ass.load("my_asset_pack.glb#Scene0");
    commands.spawn(SceneBundle {
        scene: scene0,
        ..Default::default()
    });

    // spawn the second scene
    let scene1 = ass.load("my_asset_pack.glb#Scene1");
    commands.spawn(SceneBundle {
        scene: scene1,
        transform: Transform::from_xyz(1.0, 2.0, 3.0),
        ..Default::default()
    });
}
The following asset labels are supported ({} is the numerical index):
Scene{}: GLTF Scene as BevySceneNode{}: GLTF Node asGltfNodeMesh{}: GLTF Mesh asGltfMeshMesh{}/Primitive{}: GLTF Primitive as BevyMeshMesh{}/Primitive{}/MorphTargets: Morph target animation data for a GLTF PrimitiveTexture{}: GLTF Texture as BevyImageMaterial{}: GLTF Material as BevyStandardMaterialDefaultMaterial: as above, if the GLTF file contains a default material with no indexAnimation{}: GLTF Animation as BevyAnimationClipSkin{}: GLTF mesh skin as BevySkinnedMeshInverseBindposes
The GltfNode and GltfMesh
asset types are only useful to help you navigate the contents of
your GLTF file. They are not core Bevy renderer types, and not used
by Bevy in any other way. The Bevy renderer expects Entities with
MaterialMeshBundle; for that you need the
Mesh and StandardMaterial.
Bevy Limitations
Bevy does not fully support all features of the GLTF format and has some specific requirements about the data. Not all GLTF files can be loaded and rendered in Bevy. Unfortunately, in many of these cases, you will not get any error or diagnostic message.
Commonly-encountered limitations:
- Textures embedded in ascii (
*.gltf) files (base64 encoding) cannot be loaded. Put your textures in external files, or use the binary (*.glb) format. - Mipmaps are only supported if the texture files (in KTX2 or DDS format) contain them. The GLTF spec requires missing mipmap data to be generated by the game engine, but Bevy does not support this yet. If your assets are missing mipmaps, textures will look grainy/noisy.
This list is not exhaustive. There may be other unsupported scenarios that I did not know of or forgot to include here. :)
| Bevy Version: | 0.14 | (outdated!) |
|---|
This entire book is outdated and no longer maintained. I am keeping it online, in case anyone still finds any of the information in it useful. To adapt to newer versions of Bevy, please consult Bevy's migration guides.
Input Handling
Bevy supports the following inputs:
- Keyboard (detect when keys are pressed or released, or for text input)
- Mouse:
- Motion (moving the mouse, not tied to OS cursor)
- Cursor (absolute pointer position)
- Buttons
- Scrolling (mouse wheel or touchpad gesture)
- Touchpad Gestures (only macOS/iOS supported)
- Touchscreen (with multi-touch)
- Gamepad (Controller, Joystick) (via the gilrs library)
- Drag-and-Drop (only for files)
- IME (for advanced text input, to support multilingual users)
The following notable input devices are not supported:
- Accelerometers and gyroscopes for device tilt
- Other sensors, like temperature sensors
- Tracking individual fingers on a multi-touch trackpad, like on a touchscreen
- Microphones and other audio input devices
- MIDI (musical instruments), but there is an unofficial plugin:
bevy_midi.
For most input types (where it makes sense), Bevy provides two ways of dealing with them:
- by checking the current state via resources (input resources),
- or via events (input events).
Some inputs are only provided as events.
Checking state is done using resources such as ButtonInput (for
binary inputs like keys or buttons), Axis (for analog inputs), Touches
(for fingers on a touchscreen), etc. This way of handling input is very
convenient for implementing game logic. In these scenarios, you typically
only care about the specific inputs mapped to actions in your game. You can
check specific buttons/keys to see when they get pressed/released, or what
their current state is.
Events (input events) are a lower-level, more all-encompassing approach. Use them if you want to get all activity from that class of input device, rather than only checking for specific inputs.
Input Mapping
Bevy does not yet offer a built-in way to do input mapping (configure key bindings, etc). You need to come up with your own way of translating the inputs into logical actions in your game/app.
There are some community-made plugins that may help with that: see the input-section on bevy-assets. My personal recommendation: Input Manager plugin by Leafwing Studios. It is opinionated and unlikely to suit all games, but if it works for you, it is very high quality.
It may be a good idea to build your own abstractions specific to your game. For example, if you need to handle player movement, you might want to have a system for reading inputs and converting them to your own internal “movement intent/action events”, and then another system acting on those custom events, to actually move the player. Make sure to use explicit system ordering to avoid lag / frame delays.
Run Conditions
Bevy also provides run conditions (see all of them here) that you can attach to your systems, if you want a specific system to only run when a specific key or button is pressed.
This way, you can do input handling as part of the scheduling/configuration of your systems, and avoid running unnecessary code on the CPU.
Using these in real games is not recommended, because you have to hard-code the keys, which makes it impossible to make user-configurable keybindings.
To support configurable keybindings, you can implement your own run conditions that check your keybindings from your user preferences.
If you are using the LWIM plugin, it also provides support for a similar run-condition-based workflow.
| Bevy Version: | 0.16 | (outdated!) |
|---|
This entire book is outdated and no longer maintained. I am keeping it online, in case anyone still finds any of the information in it useful. To adapt to newer versions of Bevy, please consult Bevy's migration guides.
Keyboard Input
Relevant official examples:
keyboard_input,
keyboard_input_events.
This page shows how to handle keyboard keys being pressed and released.
Note: Command Key on Mac corresponds to the Super/Windows Key on PC.
Similar to mouse buttons, keyboard input is available
as a ButtonInput resource, events, and run
conditions (see list). Use
whichever pattern feels most appropriate to your use case.
Checking Key State
Most commonly for games, you might be interested in specific known keys and
detecting when they are pressed or released. You can check specific keys
using the ButtonInput<KeyCode> resource.
- Use
.pressed(…)/.released(…)to check if a key is being held down- These return
trueevery frame, for as long as the key is in the respective state.
- These return
- Use
.just_pressed(…)/.just_released(…)to detect the actual press/release- These return
trueonly on the frame update when the press/release happened.
- These return
fn keyboard_input(
    keys: Res<ButtonInput<KeyCode>>,
) {
    if keys.just_pressed(KeyCode::Space) {
        // Space was pressed
    }
    if keys.just_released(KeyCode::ControlLeft) {
        // Left Ctrl was released
    }
    if keys.pressed(KeyCode::KeyW) {
        // W is being held down
    }
    // we can check multiple at once with `.any_*`
    if keys.any_pressed([KeyCode::ShiftLeft, KeyCode::ShiftRight]) {
        // Either the left or right shift are being held down
    }
    if keys.any_just_pressed([KeyCode::Delete, KeyCode::Backspace]) {
        // Either delete or backspace was just pressed
    }
}
To iterate over any keys that are currently held, or that have been pressed/released:
fn keyboard_iter(
    keys: Res<ButtonInput<KeyCode>>,
) {
    for key in keys.get_pressed() {
        println!("{:?} is currently held down", key);
    }
    for key in keys.get_just_pressed() {
        println!("{:?} was pressed", key);
    }
    for key in keys.get_just_released() {
        println!("{:?} was released", key);
    }
}
Run Conditions
Another workflow is to add run conditions to your systems, so that they only run when the appropriate inputs happen.
It is highly recommended you write your own run conditions, so that you can check for whatever you want, support configurable bindings, etc…
For prototyping, Bevy offers some built-in run conditions:
use bevy::input::common_conditions::*;

app.add_systems(Update, (
    handle_jump
        .run_if(input_just_pressed(KeyCode::Space)),
    handle_shooting
        .run_if(input_pressed(KeyCode::Enter)),
));
Keyboard Events
To get all keyboard activity, you can use KeyboardInput events:
fn keyboard_events(
    mut evr_kbd: EventReader<KeyboardInput>,
) {
    for ev in evr_kbd.read() {
        match ev.state {
            ButtonState::Pressed => {
                println!("Key press: {:?} ({:?})", ev.key_code, ev.logical_key);
            }
            ButtonState::Released => {
                println!("Key release: {:?} ({:?})", ev.key_code, ev.logical_key);
            }
        }
    }
}
Physical KeyCode vs. Logical Key
When a key is pressed, the event contains two important pieces of information:
- The
KeyCode, which always represents a specific key on the keyboard, regardless of the OS layout or language settings. - The
Key, which contains the logical meaning of the key as interpreted by the OS.
When you want to implement gameplay mechanics, you want to use the KeyCode.
This will give you reliable keybindings that always work, including for multilingual
users with multiple keyboard layouts configured in their OS.
When you want to implement text/character input, you want to use the Key.
This can give you Unicode characters that you can append to your text string and
will allow your users to type just like they do in other applications.
If you’d like to handle special function keys or media keys on keyboards that
have them, that can also be done via the logical Key.
Text Input
Here is a simple example of how to implement text input into a string (here stored as a local).
use bevy::input::ButtonState;
use bevy::input::keyboard::{Key, KeyboardInput};

fn text_input(
    mut evr_kbd: EventReader<KeyboardInput>,
    mut string: Local<String>,
) {
    for ev in evr_kbd.read() {
        // We don't care about key releases, only key presses
        if ev.state == ButtonState::Released {
            continue;
        }
        match &ev.logical_key {
            // Handle pressing Enter to finish the input
            Key::Enter => {
                println!("Text input: {}", &*string);
                string.clear();
            }
            // Handle pressing Backspace to delete last char
            Key::Backspace => {
                string.pop();
            }
            // Handle key presses that produce text characters
            Key::Character(input) => {
                // Ignore any input that contains control (special) characters
                if input.chars().any(|c| c.is_control()) {
                    continue;
                }
                string.push_str(&input);
            }
            _ => {}
        }
    }
}
Note how we implement special handling for keys like Backspace and Enter.
You can easily add special handling for other keys that make sense in your
application, like arrow keys or the Escape key.
Keys that produce useful characters for our text come in as small Unicode
strings. It is possible that there might be more than one char per keypress
in some languages.
Note: To support text input for international users who use languages with complex scripts (such as East Asian languages), or users who use assistive methods like handwriting recognition, you also need to support IME input, in addition to keyboard input.
Keyboard Focus
If you are doing advanced things like caching state to detect multi-key sequences or combinations of keys, you might end up in an inconsistent state if the Bevy OS window loses focus in the middle of keyboard input, such as with Alt-Tab or similar OS window switching mechanisms.
If you are doing such things and you think your algorithm might be getting
stuck, Bevy offers a KeyboardFocusLost event to let you
know when you should reset your state.
use bevy::input::keyboard::KeyboardFocusLost;

fn detect_special_sequence(
    mut evr_focus_lost: EventReader<KeyboardFocusLost>,
    mut remembered_keys: Local<Vec<KeyCode>>,
) {
    // Imagine we need to remeber a sequence of keypresses
    // for some special gameplay reason.
    // TODO: implement that; store state in `remembered_keys`

    // But it might go wrong if the user Alt-Tabs, we need to reset
    if !evr_focus_lost.is_empty() {
        remembered_keys.clear();
        evr_focus_lost.clear();
    }
}| Bevy Version: | 0.16 | (outdated!) |
|---|
This entire book is outdated and no longer maintained. I am keeping it online, in case anyone still finds any of the information in it useful. To adapt to newer versions of Bevy, please consult Bevy's migration guides.
Mouse
Relevant official examples:
mouse_input,
mouse_input_events.
Mouse Buttons
Similar to keyboard input, mouse buttons are available as a
ButtonInput resource, events, and run
conditions (see list). Use whichever
pattern feels most appropriate to your use case.
Checking Button State
You can check the state of specific mouse buttons using the
ButtonInput<MouseButton> resource:
- Use
.pressed(…)/.released(…)to check if a button is being held down- These return
trueevery frame, for as long as the button is in the respective state.
- These return
- Use
.just_pressed(…)/.just_released(…)to detect the actual press/release- These return
trueonly on the frame update when the press/release happened.
- These return
fn mouse_button_input(
    buttons: Res<ButtonInput<MouseButton>>,
) {
    if buttons.just_pressed(MouseButton::Left) {
        // Left button was pressed
    }
    if buttons.just_released(MouseButton::Left) {
        // Left Button was released
    }
    if buttons.pressed(MouseButton::Right) {
        // Right Button is being held down
    }
    // we can check multiple at once with `.any_*`
    if buttons.any_just_pressed([MouseButton::Left, MouseButton::Middle]) {
        // Either the left or the middle (wheel) button was just pressed
    }
}
You can also iterate over any buttons that have been pressed or released:
fn mouse_button_iter(
    buttons: Res<ButtonInput<MouseButton>>,
) {
    for button in buttons.get_pressed() {
        println!("{:?} is currently held down", button);
    }
    for button in buttons.get_just_pressed() {
        println!("{:?} was pressed", button);
    }
    for button in buttons.get_just_released() {
        println!("{:?} was released", button);
    }
}
Run Conditions
Another workflow is to add run conditions to your systems, so that they only run when the appropriate inputs happen.
It is highly recommended you write your own run conditions, so that you can check for whatever you want, support configurable bindings, etc…
For prototyping, Bevy offers some built-in run conditions:
use bevy::input::common_conditions::*;

app.add_systems(Update, (
    handle_middleclick
        .run_if(input_just_pressed(MouseButton::Middle)),
    handle_drag
        .run_if(input_pressed(MouseButton::Left)),
));
Mouse Button Events
Alternatively, you can use MouseButtonInput events to get
all activity:
use bevy::input::mouse::MouseButtonInput;

fn mouse_button_events(
    mut mousebtn_evr: EventReader<MouseButtonInput>,
) {
    use bevy::input::ButtonState;

    for ev in mousebtn_evr.read() {
        match ev.state {
            ButtonState::Pressed => {
                println!("Mouse button press: {:?}", ev.button);
            }
            ButtonState::Released => {
                println!("Mouse button release: {:?}", ev.button);
            }
        }
    }
}
Mouse Scrolling / Wheel
To detect scrolling input, use MouseWheel events:
use bevy::input::mouse::MouseWheel;

fn scroll_events(
    mut evr_scroll: EventReader<MouseWheel>,
) {
    use bevy::input::mouse::MouseScrollUnit;
    for ev in evr_scroll.read() {
        match ev.unit {
            MouseScrollUnit::Line => {
                println!("Scroll (line units): vertical: {}, horizontal: {}", ev.y, ev.x);
            }
            MouseScrollUnit::Pixel => {
                println!("Scroll (pixel units): vertical: {}, horizontal: {}", ev.y, ev.x);
            }
        }
    }
}
The MouseScrollUnit enum is important: it tells you the type of scroll
input. Line is for hardware with fixed steps, like the wheel on desktop
mice. Pixel is for hardware with smooth (fine-grained) scrolling, like
laptop touchpads.
You should probably handle each of these differently (with different sensitivity settings), to provide a good experience on both types of hardware.
Note: the Line unit is not guaranteed to have whole number values/steps!
At least macOS does non-linear scaling / acceleration of
scrolling at the OS level, meaning your app will get weird values for the number
of lines, even when using a regular PC mouse with a fixed-stepping scroll wheel.
Mouse Motion
Use this if you don’t care about the exact position of the mouse cursor, but rather you just want to see how much the mouse moved from frame to frame. This is useful for things like controlling a 3D camera.
Use MouseMotion events. Whenever the mouse is moved, you
will get an event with the delta.
use bevy::input::mouse::MouseMotion;

fn mouse_motion(
    mut evr_motion: EventReader<MouseMotion>,
) {
    for ev in evr_motion.read() {
        println!("Mouse moved: X: {} px, Y: {} px", ev.delta.x, ev.delta.y);
    }
}
You might want to grab/lock the mouse inside the game window.
Mouse Cursor Position
Use this if you want to accurately track the position of the pointer / cursor. This is useful for things like clicking and hovering over objects in your game or UI.
You can get the current coordinates of the mouse pointer, from the respective
Window (if the mouse is currently inside that window):
use bevy::window::PrimaryWindow;

fn cursor_position(
    // Games typically only have one window (the primary window)
    window: Single<&Window, With<PrimaryWindow>>,
) {
    if let Some(position) = window.cursor_position() {
        println!("Cursor is inside the primary window, at {:?}", position);
    } else {
        println!("Cursor is not in the game window.");
    }
}
To detect when the pointer is moved, use CursorMoved events
to get the updated coordinates:
fn cursor_events(
    mut evr_cursor: EventReader<CursorMoved>,
) {
    for ev in evr_cursor.read() {
        println!(
            "New cursor position: X: {}, Y: {}, in Window ID: {:?}",
            ev.position.x, ev.position.y, ev.window
        );
    }
}
Note that you can only get the position of the mouse inside a window; you cannot get the global position of the mouse in the whole OS Desktop / on the screen as a whole.
The coordinates you get are in “window space”. They represent window pixels, and the origin is the top left corner of the window.
They do not relate to your camera or in-game coordinates in any way. See this cookbook example for converting these window cursor coordinates into world-space coordinates.
To track when the mouse cursor enters and leaves your window(s), use
CursorEntered and CursorLeft events.
// Check if cursor enters / leaves primary window
fn enter_leave_primary(
    mut evr_leave: EventReader<CursorLeft>,
    mut evr_enter: EventReader<CursorEntered>,
    // To obtain the Entity id of the primary window:
    e_window: Single<Entity, With<PrimaryWindow>>,
) {
    if evr_leave.read().any(|ev| ev.window == *e_window) {
        // cursor left primary window
    }
    if evr_enter.read().any(|ev| ev.window == *e_window) {
        // cursor entered primary window
    }
}

// Track which window (in a multi-window app) the cursor is in
fn current_cursor_window(
    mut evr_leave: EventReader<CursorLeft>,
    mut evr_enter: EventReader<CursorEntered>,
    // Here we can keep track which window the cursor is currently in.
    mut current_window: Local<Option<Entity>>,
) {
    if !evr_leave.is_empty() {
        evr_leave.clear();
        *current_window = None;
    }
    if let Some(ev) = evr_enter.read().last() {
        *current_window = Some(ev.window);
    }
}
Note: to detect whether the cursor is inside a specific window, it is often more
convenient to just check the cursor position by querying the window (see earlier
code snippet), instead of using these events. You probably want to know the
cursor coordinates anyway. If you get None, you know the cursor is not inside
that window.
| Bevy Version: | 0.14 | (outdated!) |
|---|
This entire book is outdated and no longer maintained. I am keeping it online, in case anyone still finds any of the information in it useful. To adapt to newer versions of Bevy, please consult Bevy's migration guides.
Gamepad (Controller, Joystick)
Relevant official examples:
gamepad_input,
gamepad_input_events.
Bevy has support for gamepad input hardware, using gilrs: console controllers, joysticks, etc. Many different kinds of hardware should work, but if your device is not supported, you should file an issue with the gilrs project.
Gamepad IDs
Bevy assigns a unique ID (Gamepad) to each connected gamepad. For local
multiplayer, this lets you associate each device with a specific player and
distinguish which one your inputs are coming from.
You can use the Gamepads resource to list the IDs of all the
currently connected gamepad devices, or to check the status of a specific one.
fn list_gamepads(
    gamepads: Res<Gamepads>,
) {
    println!("Currently connected gamepads:");
    for gamepad in gamepads.iter() {
        println!(
            "ID: {:?}; Name: {}",
            gamepad, gamepads.name(gamepad).unwrap_or("unknown")
        );
    }
}
Handling Connections / Disconnections
To detect when gamepads are connected or disconnected, you can use
GamepadEvent events.
Example showing how to remember the first connected gamepad ID:
use bevy::input::gamepad::{GamepadConnection, GamepadEvent};

/// Simple resource to store the ID of the first connected gamepad.
/// We can use it to know which gamepad to use for player input.
#[derive(Resource)]
struct MyGamepad(Gamepad);

fn gamepad_connections(
    mut commands: Commands,
    my_gamepad: Option<Res<MyGamepad>>,
    mut evr_gamepad: EventReader<GamepadEvent>,
) {
    for ev in evr_gamepad.read() {
        // we only care about connection events
        let GamepadEvent::Connection(ev_conn) = ev else {
            continue;
        };
        match &ev_conn.connection {
            GamepadConnection::Connected(info) => {
                debug!(
                    "New gamepad connected: {:?}, name: {}",
                    ev_conn.gamepad, info.name,
                );
                // if we don't have any gamepad yet, use this one
                if my_gamepad.is_none() {
                    commands.insert_resource(MyGamepad(ev_conn.gamepad));
                }
            }
            GamepadConnection::Disconnected => {
                debug!("Lost connection with gamepad: {:?}", ev_conn.gamepad);
                // if it's the one we previously used for the player, remove it:
                if let Some(MyGamepad(old_id)) = my_gamepad.as_deref() {
                    if *old_id == ev_conn.gamepad {
                        commands.remove_resource::<MyGamepad>();
                    }
                }
            }
        }
    }
}
Handling Gamepad Inputs
The Axis<GamepadAxis> (Axis, GamepadAxis) resource
keeps track of the current value of the different axes: X/Y for each thumb
stick, and the Z axes (the analog triggers).
Buttons can be handled with the ButtonInput<GamepadButton>
(ButtonInput, GamepadButton) resource, similar to mouse
buttons or keyboard keys.
fn gamepad_input(
    axes: Res<Axis<GamepadAxis>>,
    buttons: Res<ButtonInput<GamepadButton>>,
    my_gamepad: Option<Res<MyGamepad>>,
) {
    let Some(&MyGamepad(gamepad)) = my_gamepad.as_deref() else {
        // no gamepad is connected
        return;
    };

    // The joysticks are represented using a separate axis for X and Y
    let axis_lx = GamepadAxis {
        gamepad, axis_type: GamepadAxisType::LeftStickX
    };
    let axis_ly = GamepadAxis {
        gamepad, axis_type: GamepadAxisType::LeftStickY
    };

    if let (Some(x), Some(y)) = (axes.get(axis_lx), axes.get(axis_ly)) {
        // combine X and Y into one vector
        let left_stick = Vec2::new(x, y);

        // Example: check if the stick is pushed up
        if left_stick.length() > 0.9 && left_stick.y > 0.5 {
            // do something
        }
    }

    // In a real game, the buttons would be configurable, but here we hardcode them
    let jump_button = GamepadButton {
        gamepad, button_type: GamepadButtonType::South
    };
    let heal_button = GamepadButton {
        gamepad, button_type: GamepadButtonType::East
    };

    if buttons.just_pressed(jump_button) {
        // button just pressed: make the player jump
    }

    if buttons.pressed(heal_button) {
        // button being held down: heal the player
    }
}
Notice that the names of buttons in the GamepadButton enum are
vendor-neutral (like South and East instead of X/O or A/B).
Some game controllers have additional buttons and axes beyond what is available on a standard controller, for example:
- HOTAS (stick for flight sim)
- steering wheel + pedals (for car driving games)
These are represented by the Other(u8) variant in GamepadButton/GamepadAxis.
The u8 value is hardware-specific, so if you want to support such devices,
your game needs to have a way for your users to configure their input bindings.
Events
Alternatively, if you want to detect all activity as it comes in, you
can also handle gamepad inputs using GamepadEvent events:
fn gamepad_input_events(
    mut evr_gamepad: EventReader<GamepadEvent>,
) {
    for ev in evr_gamepad.read() {
        match ev {
            GamepadEvent::Axis(ev_axis) => {
                println!(
                    "Axis {:?} on gamepad {:?} is now at {:?}",
                    ev_axis.axis_type, ev_axis.gamepad, ev_axis.value
                );
            }
            GamepadEvent::Button(ev_button) => {
                // The "value" of a button is typically `0.0` or `1.0`, but it
                // is a `f32` because some gamepads may have buttons that are
                // pressure-sensitive or otherwise analog somehow.
                println!(
                    "Button {:?} on gamepad {:?} is now at {:?}",
                    ev_button.button_type, ev_button.gamepad, ev_button.value
                );
            }
            _ => {
                // we don't care about other events here (connect/disconnect)
            }
        }
    }
}
Gamepad Settings
You can use the GamepadSettings resource to configure dead-zones
and other parameters of the various axes and buttons. You can set the global
defaults, as well as individually per-axis/button.
Here is an example showing how to configure gamepads with custom settings (not necessarily good settings, please don’t copy these blindly):
use bevy::input::gamepad::{AxisSettings, ButtonSettings, GamepadSettings};

fn configure_gamepads(
    my_gamepad: Option<Res<MyGamepad>>,
    mut settings: ResMut<GamepadSettings>,
) {
    let Some(&MyGamepad(gamepad)) = my_gamepad.as_deref() else {
        // no gamepad is connected
        return;
    };

    // add a larger default dead-zone to all axes (ignore small inputs, round to zero)
    settings.default_axis_settings.set_deadzone_lowerbound(-0.1);
    settings.default_axis_settings.set_deadzone_upperbound(0.1);

    // make the right stick "binary", squash higher values to 1.0 and lower values to 0.0
    let mut right_stick_settings = AxisSettings::default();
    right_stick_settings.set_deadzone_lowerbound(-0.5);
    right_stick_settings.set_deadzone_upperbound(0.5);
    right_stick_settings.set_livezone_lowerbound(-0.5);
    right_stick_settings.set_livezone_upperbound(0.5);
    // the raw value should change by at least this much,
    // for Bevy to register an input event:
    right_stick_settings.set_threshold(0.01);

    // make the triggers work in big/coarse steps, to get fewer events
    // reduces noise and precision
    let mut trigger_settings = AxisSettings::default();
    trigger_settings.set_threshold(0.25);

    // set these settings for the gamepad we use for our player
    settings.axis_settings.insert(
        GamepadAxis { gamepad, axis_type: GamepadAxisType::RightStickX },
        right_stick_settings.clone()
    );
    settings.axis_settings.insert(
        GamepadAxis { gamepad, axis_type: GamepadAxisType::RightStickY },
        right_stick_settings.clone()
    );
    settings.axis_settings.insert(
        GamepadAxis { gamepad, axis_type: GamepadAxisType::LeftZ },
        trigger_settings.clone()
    );
    settings.axis_settings.insert(
        GamepadAxis { gamepad, axis_type: GamepadAxisType::RightZ },
        trigger_settings.clone()
    );

    // for buttons (or axes treated as buttons):
    let mut button_settings = ButtonSettings::default();
    // require them to be pressed almost all the way, to count
    button_settings.set_press_threshold(0.9);
    // require them to be released almost all the way, to count
    button_settings.set_release_threshold(0.1);

    settings.default_button_settings = button_settings;
}
To tie the examples together: if you have the system from the
connect/disconnect example earlier
above on this page, to update our MyGamepad resource, we can configure
the system from the above example with a run condition, so that
the gamepad settings are updated whenever a new gamepad is connected and
selected to be used:
app.add_systems(Update,
    configure_gamepads
        .run_if(resource_exists_and_changed::<MyGamepad>)
);
Gamepad Rumble
To cause rumble/vibration, use the GamepadRumbleRequest event. Every
event you send will add a “rumble” with a given intensity that lasts for
a given duration of time. As you send multiple events, each requested rumble
will be tracked independently, and the actual hardware vibration intensity
will be the sum of all the rumbles currently in progress.
You can also send a Stop event to immediately cancel any ongoing rumbling.
The intensity of each rumble is represented as two values: the “strong” motor and the “weak” motor. These might produce different-feeling vibrations on different hardware.
use bevy::input::gamepad::{GamepadRumbleIntensity, GamepadRumbleRequest};

fn gamepad_rumble(
    mut evw_rumble: EventWriter<GamepadRumbleRequest>,
    my_gamepad: Option<Res<MyGamepad>>,
) {
    let Some(&MyGamepad(gamepad)) = my_gamepad.as_deref() else {
        // no gamepad is connected
        return;
    };

    // add a short 100ms rumble at max intensity
    evw_rumble.send(GamepadRumbleRequest::Add {
        gamepad,
        duration: Duration::from_millis(100),
        intensity: GamepadRumbleIntensity::MAX,
    });

    // also rumble for a little longer (500 ms)
    // with the weak motor at half intensity
    // and the strong motor at quarter intensity
    evw_rumble.send(GamepadRumbleRequest::Add {
        gamepad,
        duration: Duration::from_millis(500),
        intensity: GamepadRumbleIntensity {
            strong_motor: 0.25,
            weak_motor: 0.5,
        },
    });
}| Bevy Version: | 0.16 | (outdated!) |
|---|
This entire book is outdated and no longer maintained. I am keeping it online, in case anyone still finds any of the information in it useful. To adapt to newer versions of Bevy, please consult Bevy's migration guides.
Touchscreen
Relevant official examples:
touch_input,
touch_input_events.
Multi-touch touchscreens are supported. You can track multiple fingers on the screen, with position and pressure/force information. Bevy does not offer gesture recognition.
The Touches resource allows you to track any
fingers currently on the screen:
fn touches(
    touches: Res<Touches>,
) {
    // There is a lot more information available, see the API docs.
    // This example only shows some very basic things.

    for finger in touches.iter() {
        if touches.just_pressed(finger.id()) {
            println!("A new touch with ID {} just began.", finger.id());
        }
        println!(
            "Finger {} is at position ({},{}), started from ({},{}).",
            finger.id(),
            finger.position().x,
            finger.position().y,
            finger.start_position().x,
            finger.start_position().y,
        );
    }

    for finger in touches.iter_just_released() {
        println!("Touch with ID {} just ended.", finger.id());
    }
    for finger in touches.iter_just_canceled() {
        println!("Touch with ID {} was canceled.", finger.id());
    }
}
Alternatively, you can use TouchInput events:
fn touch_events(
    mut evr_touch: EventReader<TouchInput>,
) {
    use bevy::input::touch::TouchPhase;
    for ev in evr_touch.read() {
        // in real apps you probably want to store and track touch ids somewhere
        match ev.phase {
            TouchPhase::Started => {
                println!("Touch {} started at: {:?}", ev.id, ev.position);
            }
            TouchPhase::Moved => {
                println!("Touch {} moved to: {:?}", ev.id, ev.position);
            }
            TouchPhase::Ended => {
                println!("Touch {} ended at: {:?}", ev.id, ev.position);
            }
            TouchPhase::Canceled => {
                println!("Touch {} canceled at: {:?}", ev.id, ev.position);
            }
        }
    }
}| Bevy Version: | 0.14 | (outdated!) |
|---|
This entire book is outdated and no longer maintained. I am keeping it online, in case anyone still finds any of the information in it useful. To adapt to newer versions of Bevy, please consult Bevy's migration guides.
Gestures
Multi-finger gestures on a Touchpad or Touchscreen are a very common way to implement various operations, like panning, zooming, and rotating.
Platform Gesture Events
Bevy offers events that allow you to handle gestures as they are detected / implemented by the OS.
Currently, only macOS and iOS are supported. Other platforms may be supported in the future.
The supported gestures are:
RotationGesture: rotating with two fingersPinchGesture: pinch-to-zoom with two fingersPanGesture: panning gestureDoubleTapGesture: double-tap gesture
use bevy::input::gestures::{
    DoubleTapGesture, PanGesture, PinchGesture, RotationGesture
};

// these only work on macOS and iOS
fn builtin_gestures(
    mut evr_gesture_pinch: EventReader<PinchGesture>,
    mut evr_gesture_rotate: EventReader<RotationGesture>,
    mut evr_gesture_pan: EventReader<PanGesture>,
    mut evr_gesture_doubletap: EventReader<PanGesture>,
) {
    for ev_pinch in evr_gesture_pinch.read() {
        // Positive numbers are zooming in
        // Negative numbers are zooming out
        println!("Two-finger zoom by {}", ev_pinch.0);
    }
    for ev_rotate in evr_gesture_rotate.read() {
        // Positive numbers are anticlockwise
        // Negative numbers are clockwise
        println!("Two-finger rotate by {}", ev_rotate.0);
    }
    for ev_pan in evr_gesture_pan.read() {
        // Each event is a Vec2 giving you the X/Y pan amount
        println!("Two-finger pan by X: {}, Y: {}", ev_pan.0.x, ev_pan.0.y);
    }
    for ev_doubletap in evr_gesture_doubletap.read() {
        // This one has no data
        println!("Double-Tap gesture!");
    }
}
Custom Touchpad Gestures
It is not currently possible to implement your own gestures on a touchpad, because there is no API to detect the individual fingers that are touching the touchpad.
Custom Touchscreen Gestures
You can (and probably should) implement your own touchscreen gestures. Bevy offers multi-touch detection, tracking each finger that is currently on the screen. Implementing your own gestures is be a good way to make touchscreen input behave appropriately to your application.
See here for more info on touchscreen input in Bevy.
| Bevy Version: | 0.14 | (outdated!) |
|---|
This entire book is outdated and no longer maintained. I am keeping it online, in case anyone still finds any of the information in it useful. To adapt to newer versions of Bevy, please consult Bevy's migration guides.
Drag-and-Drop (Files)
Relevant official examples:
drag_and_drop.
Bevy supports the Drag-and-Drop gesture common on most desktop operating systems, but only for files, not arbitrary data / objects.
If you drag a file (say, from the file manager app) into a Bevy app, Bevy
will produce a FileDragAndDrop event, containing the path
of the file that was dropped in.
fn file_drop(
    mut evr_dnd: EventReader<FileDragAndDrop>,
) {
    for ev in evr_dnd.read() {
        if let FileDragAndDrop::DroppedFile { window, path_buf } = ev {
            println!("Dropped file with path: {:?}, in window id: {:?}", path_buf, window);
        }
    }
}
Detecting the Position of the Drop
You may want to do different things depending on where the cursor was when the drop gesture ended. For example, add the file to some collection, if it was dropped over a specific UI element/panel.
Unfortunately, this is currently somewhat tricky to implement, due to winit
bug #1550. Bevy does not get CursorMoved events
while the drag gesture is ongoing, and therefore does not respond to the
mouse cursor. Bevy completely loses track of the cursor position.
Checking the cursor position from the Window will also not work.
Systems that use cursor events to respond to cursor movements will not work
during a drag gesture. This includes Bevy UI’s Interaction detection,
which is the usual way of detecting when a UI element is hovered over.
Workaround
The only way to workaround this issue is to store the file path somewhere
temporarily after receiving the drop event. Then, wait until the next
CursorMoved event, and then process the file.
Note that this might not even be on the next frame update. The next cursor update will happen whenever the user moves the cursor. If the user does not immediately move the mouse after dropping the file and leaves the cursor in the same place for a while, there will be no events and your app will have no way of knowing the cursor position.
| Bevy Version: | 0.14 | (outdated!) |
|---|
This entire book is outdated and no longer maintained. I am keeping it online, in case anyone still finds any of the information in it useful. To adapt to newer versions of Bevy, please consult Bevy's migration guides.
IME Input
Bevy has support for IMEs (Input Method Editors), which is how people perform text input in languages with more complex scripts, like East Asian languages, and how non-keyboard text input methods (such as handwriting recognition) work. It requires some special handling from you, however.
If you’d like all international users to be able to input text in their language, the way they usually do in other GUI apps on their OS, you should support IMEs. If you want good accessibility for disabled users or users who prefer alternative text input methods like handwriting recognition, you should support IMEs. This should be in addition to supporting text input via the keyboard, which is how most users will input text.
How IMEs Work
IMEs work by using a special “buffer”, which shows the current in-progress text suggestions and allows users to preview and compose the next part of their text before confirming it. The text suggestions are provided by the OS, but your app needs to display them for the user.
For example, imagine you have a text input box in your UI. You show the text that the user has already inputted, with a cursor at the end.
If IME is enabled, you will get Ime::Preedit events
for “pending” text. You should show that “unconfirmed” text in the text
input box, but with different formatting to be visually distinct.
When the user confirms their desired input, you will get an
Ime::Commit event with the final text. You should
then discard any previous “uncofirmed” text and append the new text to your
actual text input string.
How to support IMEs in your Bevy app
First, you need to inform the OS when your application is expecting text input. You don’t want the IME to accidentally activate during gameplay, etc.
Whenever you want the user to input text, you enable “IME mode” on the Window.
When you are done, disable it.
If the user is not using an IME, nothing happens when you enable “IME mode”. You will still get keyboard events as usual and you can accept text input that way.
If the user has an IME, you will get an Ime::Enabled event. At that point,
your application will no longer receive any KeyboardInput events.
You can then handle Ime::Preedit events for pending/unconfirmed
text, and Ime::Commit for final/confirmed text.
// for this simple example, we will just enable/disable IME mode on mouse click
fn ime_toggle(
    mousebtn: Res<ButtonInput<MouseButton>>,
    mut q_window: Query<&mut Window, With<PrimaryWindow>>,
) {
    if mousebtn.just_pressed(MouseButton::Left) {
        let mut window = q_window.single_mut();

        // toggle "IME mode"
        window.ime_enabled = !window.ime_enabled;

        // We need to tell the OS the on-screen coordinates where the text will
        // be displayed; for this simple example, let's just use the mouse cursor.
        // In a real app, this might be the position of a UI text field, etc.
        window.ime_position = window.cursor_position().unwrap();
    }
}

fn ime_input(
    mut evr_ime: EventReader<Ime>,
) {
    for ev in evr_ime.read() {
        match ev {
            Ime::Commit { value, .. } => {
                println!("IME confirmed text: {}", value);
            }
            Ime::Preedit { value, cursor, .. } => {
                println!("IME buffer: {:?}, cursor: {:?}", value, cursor);
            }
            Ime::Enabled { .. } => {
                println!("IME mode enabled!");
            }
            Ime::Disabled { .. } => {
                println!("IME mode disabled!");
            }
        }
    }
}
For the sake of brevity, this example just prints the events to the console.
In a real app, you will want to display the “pre-edit” text on-screen, and use different formatting to show the cursor. On “commit”, you can append the provided text to the actual string where you normally accept text input.
| Bevy Version: | (any) |
|---|
This entire book is outdated and no longer maintained. I am keeping it online, in case anyone still finds any of the information in it useful. To adapt to newer versions of Bevy, please consult Bevy's migration guides.
Window Management
This chapter covers topics related to working with the application’s OS window.
| Bevy Version: | 0.13 | (outdated!) |
|---|
This entire book is outdated and no longer maintained. I am keeping it online, in case anyone still finds any of the information in it useful. To adapt to newer versions of Bevy, please consult Bevy's migration guides.
Window Properties
Page coming soon…
In the meantime, you can learn from Bevy’s examples.
See the window_settings example.
| Bevy Version: | 0.13 | (outdated!) |
|---|
This entire book is outdated and no longer maintained. I am keeping it online, in case anyone still finds any of the information in it useful. To adapt to newer versions of Bevy, please consult Bevy's migration guides.
Changing the Background Color
Relevant official examples:
clear_color.
Use the ClearColor resource to choose the default background
color. This color will be used as the default for all cameras,
unless overriden.
Note that the window will be black if no cameras exist. You must spawn at least one camera.
fn setup(
    mut commands: Commands,
) {
    // this camera will use the default color
    commands.spawn(Camera2dBundle::default());
}

fn main() {
    App::new()
        .add_plugins(DefaultPlugins)
        // set the global default clear color
        .insert_resource(ClearColor(Color::rgb(0.9, 0.3, 0.6)))
        .add_systems(Startup, setup)
        .run();
}
To override the default and use a different color for a specific camera, you can
set it using the Camera component.
use bevy::render::camera::ClearColorConfig;

// configure the background color (if any), for a specific camera (3D)
commands.spawn(Camera3dBundle {
    camera: Camera {
        // clear the whole viewport with the given color
        clear_color: ClearColorConfig::Custom(Color::rgb(0.8, 0.4, 0.2)),
        ..Default::default()
    },
    ..Default::default()
});

// configure the background color (if any), for a specific camera (2D)
commands.spawn(Camera2dBundle {
    camera: Camera {
        // disable clearing completely (pixels stay as they are)
        // (preserves output from previous frame or camera/pass)
        clear_color: ClearColorConfig::None,
        ..Default::default()
    },
    ..Default::default()
});
All of these locations (the components on specific cameras, the global default resource) can be mutated at runtime, and bevy will use your new color. Changing the default color using the resource will apply the new color to all existing cameras that do not specify a custom color, not just newly-spawned cameras.
| Bevy Version: | 0.13 | (outdated!) |
|---|
This entire book is outdated and no longer maintained. I am keeping it online, in case anyone still finds any of the information in it useful. To adapt to newer versions of Bevy, please consult Bevy's migration guides.
Grabbing the Mouse
Relevant official examples:
mouse_grab.
For some genres of games, you want to the mouse to be restricted to the window, to prevent it from leaving the window during gameplay.
There are two variations on this behavior (CursorGrabMode):
Confinedallows the cursor to be moved, but only within the bounds of the window.Lockedfixes the cursor in place and does not allow it to move.- Relative mouse motion events still work.
To grab the cursor:
use bevy::window::{CursorGrabMode, PrimaryWindow};

fn cursor_grab(
    mut q_windows: Query<&mut Window, With<PrimaryWindow>>,
) {
    let mut primary_window = q_windows.single_mut();

    // if you want to use the cursor, but not let it leave the window,
    // use `Confined` mode:
    primary_window.cursor.grab_mode = CursorGrabMode::Confined;

    // for a game that doesn't use the cursor (like a shooter):
    // use `Locked` mode to keep the cursor in one place
    primary_window.cursor.grab_mode = CursorGrabMode::Locked;

    // also hide the cursor
    primary_window.cursor.visible = false;
}
To release the cursor:
fn cursor_ungrab(
    mut q_windows: Query<&mut Window, With<PrimaryWindow>>,
) {
    let mut primary_window = q_windows.single_mut();

    primary_window.cursor.grab_mode = CursorGrabMode::None;
    primary_window.cursor.visible = true;
}
You should grab the cursor during active gameplay and release it when the player pauses the game / exits to menu / etc.
For relative mouse movement, you should use mouse motion instead of cursor input to implement your gameplay.
Platform Differences
macOS does not natively support Confined mode. Bevy will fallback to Locked.
If you want to support macOS and you want to use cursor input,
you might want to implement a “virtual cursor” instead.
Windows does not natively support Locked mode. Bevy will fallback to Confined.
You could emulate the locked behavior by re-centering the cursor every frame:
#[cfg(target_os = "windows")]
fn cursor_recenter(
    mut q_windows: Query<&mut Window, With<PrimaryWindow>>,
) {
    let mut primary_window = q_windows.single_mut();
    let center = Vec2::new(
        primary_window.width() / 2.0,
        primary_window.height() / 2.0,
    );
    primary_window.set_cursor_position(Some(center));
}
#[cfg(target_os = "windows")]
app.add_systems(Update, cursor_recenter);| Bevy Version: | 0.13 | (outdated!) |
|---|
This entire book is outdated and no longer maintained. I am keeping it online, in case anyone still finds any of the information in it useful. To adapt to newer versions of Bevy, please consult Bevy's migration guides.
Setting the Window Icon
You might want to set a custom Window Icon. On Windows and Linux, this is the icon image shown in the window title bar (if any) and task bar (if any).
Unfortunately, Bevy does not yet provide an easy and ergonomic built-in way
to do this. However, it can be done via the winit APIs.
The way shown here is quite hacky. To save on code complexity, instead of
using Bevy’s asset system to load the image in the background, we bypass
the assets system and directly load the file using the image library.
There is some WIP on adding a proper API for this to Bevy; see PRs #1163, #2268, #5488, #8130, and Issue #1031.
This example shows how to set the icon for the primary/main window, from a Bevy startup system.
use bevy::winit::WinitWindows;
use winit::window::Icon;

fn set_window_icon(
    // we have to use `NonSend` here
    windows: NonSend<WinitWindows>,
) {
    // here we use the `image` crate to load our icon data from a png file
    // this is not a very bevy-native solution, but it will do
    let (icon_rgba, icon_width, icon_height) = {
        let image = image::open("my_icon.png")
            .expect("Failed to open icon path")
            .into_rgba8();
        let (width, height) = image.dimensions();
        let rgba = image.into_raw();
        (rgba, width, height)
    };
    let icon = Icon::from_rgba(icon_rgba, icon_width, icon_height).unwrap();

    // do it for all windows
    for window in windows.windows.values() {
        window.set_window_icon(Some(icon.clone()));
    }
}

fn main() {
    App::new()
        .add_plugins(DefaultPlugins)
        .add_systems(Startup, set_window_icon)
        .run();
}
Note: that WinitWindows is a non-send resource.
Note: you need to add winit and image to your project’s dependencies,
and they must be the same versions as used by Bevy. As of Bevy 0.13, that
should be winit = "0.29" and image = "0.24". If you don’t know which
version to use, you can use cargo tree or check Cargo.lock to see which
is the correct version.
| Bevy Version: | 0.9 | (outdated!) |
|---|
This entire book is outdated and no longer maintained. I am keeping it online, in case anyone still finds any of the information in it useful. To adapt to newer versions of Bevy, please consult Bevy's migration guides.
Bevy Asset Management
Assets are the data that the game engine is working with: all of your images, 3D models, sounds, scenes, game-specific things like item descriptions, and more!
Bevy has a flexible system for loading and managing your game assets asynchronously (in the background, without causing lag spikes in your game).
In your code, you refer to individual assets using handles.
Asset data can be loaded from files and also accessed from code. Hot-reloading is supported to help you during development, by reloading asset files if they change while the game is running.
If you want to write some code to do something when assets finish loading, get modified, or are unloaded, you can use asset events.
| Bevy Version: | 0.9 | (outdated!) |
|---|
This entire book is outdated and no longer maintained. I am keeping it online, in case anyone still finds any of the information in it useful. To adapt to newer versions of Bevy, please consult Bevy's migration guides.
Handles
Handles are lightweight IDs that refer to a specific asset. You need them to use your assets, for example to spawn entities like 2D sprites or 3D models, or to access the data of the assets.
Handles have the Rust type Handle<T>, where T is the
asset type.
You can store handles in your entity components or resources.
Handles can refer to not-yet-loaded assets, meaning you can just spawn your entities anyway, using the handles, and the assets will just “pop in” when they become ready.
Obtaining Handles
If you are loading an asset from a file, the
asset_server.load(…) call will give you the handle. The loading of the
data happens in the background, meaning that the handle will initially refer
to an unavailable asset, and the actual data will become available later.
If you are creating your own asset data from code,
the assets.add(…) call will give you the handle.
Reference Counting; Strong and Weak Handles
Bevy keeps track of how many handles to a given asset exist at any time. Bevy will automatically unload unused assets, after the last handle is dropped.
For this reason, creating additional handles to the same asset requires you
to call handle.clone(). This makes the operation explicit, to ensure you are
aware of all the places in your code where you create additional handles. The
.clone() operation is cheap, so don’t worry about performance (in most cases).
There are two kinds of handles: “strong” and “weak”. Strong assets are
counted, weak handles are not. By default, handles are strong. If you want
to create a weak handle, use .clone_weak() (instead of .clone()) on an
existing handle. Bevy can unload the asset after all strong handles are gone,
even if you are still holding some weak handles.
Untyped Handles
Bevy also has a HandleUntyped type. Use this type
of handle if you need to be able to refer to any asset, regardless of the
asset type.
This allows you to store a collection (such as Vec or HashMap)
containing assets of mixed types.
You can create an untyped handle using .clone_untyped() on an existing
handle.
Just like regular handles, untyped handles can be strong or weak.
You need to do this to access the asset data.
You can convert an untyped handle into a typed handle with .typed::<T>(),
specifying the type to use. You need to do this to access the asset
data.
| Bevy Version: | 0.9 | (outdated!) |
|---|
This entire book is outdated and no longer maintained. I am keeping it online, in case anyone still finds any of the information in it useful. To adapt to newer versions of Bevy, please consult Bevy's migration guides.
Load Assets from Files with AssetServer
Relevant official examples:
asset_loading.
To load assets from files, use the AssetServer
resource.
#[derive(Resource)]
struct UiFont(Handle<Font>);

fn load_ui_font(
    mut commands: Commands,
    server: Res<AssetServer>
) {
    let handle: Handle<Font> = server.load("font.ttf");

    // we can store the handle in a resource:
    //  - to prevent the asset from being unloaded
    //  - if we want to use it to access the asset later
    commands.insert_resource(UiFont(handle));
}
This queues the asset loading to happen in the background, and return a handle. The asset will take some time to become available. You cannot access the actual data immediately in the same system, but you can use the handle.
You can spawn entities like your 2D sprites, 3D models, and UI, using the handle, even before the asset has loaded. They will just “pop in” later, when the asset becomes ready.
Note that it is OK to call asset_server.load(…) as many times as you want,
even if the asset is currently loading, or already loaded. It will just
provide you with the same handle. Every time you call it, it will just check
the status of the asset, begin loading it if needed, and give you a handle.
Bevy supports loading a variety of asset file formats, and can be extended to support more. The asset loader implementation to use is selected based on the file extension.
Untyped Loading
If you want an untyped handle, you can use
asset_server.load_untyped(…) instead.
Untyped loading is possible, because Bevy always detects the file type from the file extension anyway.
Loading Folders
You can also load an entire folder of assets, regardless of how many
files are inside, using asset_server.load_folder(…). This gives you a
Vec<HandleUntyped> with all the untyped handles.
#[derive(Resource)]
struct ExtraAssets(Vec<HandleUntyped>);

fn load_extra_assets(
    mut commands: Commands,
    server: Res<AssetServer>,
) {
    if let Ok(handles) = server.load_folder("extra") {
        commands.insert_resource(ExtraAssets(handles));
    }
}
Loading folders is not supported by all I/O backends. Notably, it does not work on WASM/Web.
AssetPath and Labels
The asset path you use to identify an asset from the filesystem is actually
a special AssetPath, which consists of the file path +
a label. Labels are used in situations where multiple assets are contained
in the same file. An example of this are GLTF files, which can
contain meshes, scenes, textures, materials, etc.
Asset paths can be created from a string, with the label (if any) attached
after a # symbol.
fn load_gltf_things(
    mut commands: Commands,
    server: Res<AssetServer>
) {
    // get a specific mesh
    let my_mesh: Handle<Mesh> = server.load("my_scene.gltf#Mesh0/Primitive0");

    // spawn a whole scene
    let my_scene: Handle<Scene> = server.load("my_scene.gltf#Scene0");
    commands.spawn(SceneBundle {
        scene: my_scene,
        ..Default::default()
    });
}
See the GLTF page for more info about working with 3D models.
Where are assets loaded from?
The asset server internally relies on an implementation of the
AssetIo Rust trait, which is Bevy’s way of providing
“backends” for fetching data from different types of storage.
Bevy provides its own default built-in I/O backends for each supported platform.
On desktop platforms, it treats asset paths as relative to a folder called
assets, that must be placed at one of the following locations:
- Alongside the game’s executable file, for distribution
- In your Cargo project folder, when running your game using
cargoduring development- This is identified by the
CARGO_MANIFEST_DIRenvironment variable
- This is identified by the
On the web, it fetches assets using HTTP URLs pointing within an assets
folder located alongside the game’s .wasm file.
There are unofficial plugins available that provide alternative
I/O backend implementations, such as for loading assets from inside archive
files (.zip), embedded inside the game executable, using a network protocol,
… many other possibilities.
| Bevy Version: | 0.9 | (outdated!) |
|---|
This entire book is outdated and no longer maintained. I am keeping it online, in case anyone still finds any of the information in it useful. To adapt to newer versions of Bevy, please consult Bevy's migration guides.
Access the Asset Data
To access the actual asset data from systems, use the
Assets<T> resource.
You can identify your desired asset using the handle.
untyped handles need to be “upgraded” into typed handles.
#[derive(Resource)]
struct SpriteSheets {
    map_tiles: Handle<TextureAtlas>,
}

fn use_sprites(
    handles: Res<SpriteSheets>,
    atlases: Res<Assets<TextureAtlas>>,
    images: Res<Assets<Image>>,
) {
    // Could be `None` if the asset isn't loaded yet
    if let Some(atlas) = atlases.get(&handles.map_tiles) {
        // do something with the texture atlas
    }
}
Creating Assets from Code
You can also add assets to Assets<T> manually.
Sometimes you need to create assets from code, rather than loading them from files. Some common examples of such use-cases are:
- creating texture atlases
- creating 3D or 2D materials
- procedurally-generating assets like images or 3D meshes
To do this, first create the data for the asset (an instance of the
asset type), and then add it .add(…) it to the
Assets<T> resource, for it to be stored and tracked by
Bevy. You will get a handle to use to refer to it, just like
any other asset.
fn add_material(
    mut materials: ResMut<Assets<StandardMaterial>>,
) {
    let new_mat = StandardMaterial {
        base_color: Color::rgba(0.25, 0.50, 0.75, 1.0),
        unlit: true,
        ..Default::default()
    };

    let handle = materials.add(new_mat);

    // do something with the handle
}| Bevy Version: | 0.9 | (outdated!) |
|---|
This entire book is outdated and no longer maintained. I am keeping it online, in case anyone still finds any of the information in it useful. To adapt to newer versions of Bevy, please consult Bevy's migration guides.
React to Changes with Asset Events
If you need to perform specific actions when an asset is created,
modified, or removed, you can make a system that reacts to
AssetEvent events.
#[derive(Resource)]
struct MyMapImage {
    handle: Handle<Image>,
}

fn fixup_images(
    mut ev_asset: EventReader<AssetEvent<Image>>,
    mut assets: ResMut<Assets<Image>>,
    map_img: Res<MyMapImage>,
) {
    for ev in ev_asset.iter() {
        match ev {
            AssetEvent::Created { handle } => {
                // a texture was just loaded or changed!

                // WARNING: this mutable access will cause another
                // AssetEvent (Modified) to be emitted!
                let texture = assets.get_mut(handle).unwrap();
                // ^ unwrap is OK, because we know it is loaded now

                if *handle == map_img.handle {
                    // it is our special map image!
                } else {
                    // it is some other image
                }
            }
            AssetEvent::Modified { handle } => {
                // an image was modified
            }
            AssetEvent::Removed { handle } => {
                // an image was unloaded
            }
        }
    }
}
Note: If you are handling Modified events and doing a mutable access to
the data, the .get_mut will trigger another Modified event for the same
asset. If you are not careful, this could result in an infinite loop! (from
events caused by your own system)
| Bevy Version: | 0.9 | (outdated!) |
|---|
This entire book is outdated and no longer maintained. I am keeping it online, in case anyone still finds any of the information in it useful. To adapt to newer versions of Bevy, please consult Bevy's migration guides.
Track Loading Progress
There are good community plugins that can help with this. Otherwise, this page shows you how to do it yourself.
If you want to check the status of various asset files,
you can poll it from the AssetServer. It will tell you
whether the asset(s) are loaded, still loading, not loaded, or encountered
an error.
To check an individual asset, you can use asset_server.get_load_state(…) with
a handle or path to refer to the asset.
To check a group of many assets, you can add them to a single collection
(such as a Vec<HandleUntyped>; untyped handles are very
useful for this) and use asset_server.get_group_load_state(…).
Here is a more complete code example:
#[derive(Resource)]
struct AssetsLoading(Vec<HandleUntyped>);

fn setup(server: Res<AssetServer>, mut loading: ResMut<AssetsLoading>) {
    // we can have different asset types
    let font: Handle<Font> = server.load("my_font.ttf");
    let menu_bg: Handle<Image> = server.load("menu.png");
    let scene: Handle<Scene> = server.load("level01.gltf#Scene0");

    // add them all to our collection for tracking
    loading.0.push(font.clone_untyped());
    loading.0.push(menu_bg.clone_untyped());
    loading.0.push(scene.clone_untyped());
}

fn check_assets_ready(
    mut commands: Commands,
    server: Res<AssetServer>,
    loading: Res<AssetsLoading>
) {
    use bevy::asset::LoadState;

    match server.get_group_load_state(loading.0.iter().map(|h| h.id)) {
        LoadState::Failed => {
            // one of our assets had an error
        }
        LoadState::Loaded => {
            // all assets are now ready

            // this might be a good place to transition into your in-game state

            // remove the resource to drop the tracking handles
            commands.remove_resource::<AssetsLoading>();
            // (note: if you don't have any other handles to the assets
            // elsewhere, they will get unloaded after this)
        }
        _ => {
            // NotLoaded/Loading: not fully ready yet
        }
    }
}| Bevy Version: | 0.9 | (outdated!) |
|---|
This entire book is outdated and no longer maintained. I am keeping it online, in case anyone still finds any of the information in it useful. To adapt to newer versions of Bevy, please consult Bevy's migration guides.
Hot-Reloading Assets
Relevant official examples:
hot_asset_reloading.
At runtime, if you modify the file of an asset
that is loaded into the game (via the
AssetServer), Bevy can detect that and reload the
asset automatically. This is very useful for quick iteration. You can edit
your assets while the game is running and see the changes instantly in-game.
Not all file formats and use cases are supported equally well. Typical asset types like textures / images should work without issues, but complex GLTF or scene files, or assets involving custom logic, might not.
If you need to run custom logic as part of your hot-reloading
workflow, you could implement it in a system, using
AssetEvent (learn more).
Hot reloading is opt-in and has to be enabled in order to work:
fn main() {
    App::new()
        .add_plugins(DefaultPlugins.set(AssetPlugin {
            watch_for_changes: true,
            ..Default::default()
        }))
        .run();
}
Note that this requires the filesystem_watcher Bevy cargo
feature. It is enabled by default, but if you have disabled
default features to customize Bevy, be sure to include it if you need it.
Shaders
Bevy also supports hot-reloading for shaders. You can edit your custom shader code and see the changes immediately.
This works for any shader loaded from a file path, such as shaders specified
in your Materials definitions, or shaders loaded via the
AssetServer.
Shader code that does not come from asset files, such as if you include it as a static string in your source code, cannot be hot-reloaded (for obvious reasons).
| Bevy Version: | 0.12 | (outdated!) |
|---|
This entire book is outdated and no longer maintained. I am keeping it online, in case anyone still finds any of the information in it useful. To adapt to newer versions of Bevy, please consult Bevy's migration guides.
Processing Assets
TODO / WIP
Coming soon…
| Bevy Version: | 0.12 | (outdated!) |
|---|
This entire book is outdated and no longer maintained. I am keeping it online, in case anyone still finds any of the information in it useful. To adapt to newer versions of Bevy, please consult Bevy's migration guides.
Audio
Bevy offers a (somewhat barebones, but still useful) ECS-based Audio framework. This chapter will teach you how to use it.
You can play sound effects and music from your game, with volume control. There is a rudimentary “spatial audio” implementation, which can pan sounds left/right in stereo, based on the transforms of entities. You can also implement your own custom sources of audio data, if you want to synthesize sound from code, stream data from somewhere, or any other custom use case.
There are also 3rd-party alternatives to Bevy’s audio support:
bevy_kira_audio: useskira; provides a richer set of features and playback controlsbevy_oddio: usesoddio; seems to offer more advanced 3D spatial soundbevy_fundsp: usesfundsp; for advanced sound synthesis and effects
(Bevy’s official audio is based on the rodio library.)
As you can see, the Rust audio ecosystem is quite fragmented. There are many backend libraries, all offering a different mix of features, none of them particularly exhaustive. All of them are somewhat immature. You have to pick your poison.
Audio is an area sorely in need of improvement. If you are an enthusiastic audio developer, consider joining Discord and helping with development!
| Bevy Version: | 0.12 | (outdated!) |
|---|
This entire book is outdated and no longer maintained. I am keeping it online, in case anyone still finds any of the information in it useful. To adapt to newer versions of Bevy, please consult Bevy's migration guides.
Playing Sounds
Relevant official examples:
audio,
audio_control.
TODO
| Bevy Version: | 0.12 | (outdated!) |
|---|
This entire book is outdated and no longer maintained. I am keeping it online, in case anyone still finds any of the information in it useful. To adapt to newer versions of Bevy, please consult Bevy's migration guides.
Spatial Audio
Relevant official examples:
spatial_audio_2d,
spatial_audio_3d.
TODO
| Bevy Version: | 0.12 | (outdated!) |
|---|
This entire book is outdated and no longer maintained. I am keeping it online, in case anyone still finds any of the information in it useful. To adapt to newer versions of Bevy, please consult Bevy's migration guides.
Custom Audio Streams
Relevant official examples:
decodable.
TODO
Bevy UI Framework
| Bevy Version: | (any) |
|---|
This entire book is outdated and no longer maintained. I am keeping it online, in case anyone still finds any of the information in it useful. To adapt to newer versions of Bevy, please consult Bevy's migration guides.
Bevy Programming Framework
This chapter presents the features of the Bevy core programming framework. This covers the ECS (Entity Component System), App and Scheduling.
All the knowledge of this chapter is useful even if you want to use Bevy as something other than a game engine. For example: using just the ECS for a scientific simulation.
Hence, this chapter does not cover the game-engine parts of Bevy. Those features are covered in other chapters of the book. You can start with Game Engine Fundamentals chapter.
For additional of programming patterns and idioms, see the Programming Patterns chapter.
If you are also interested in GPU programming, see the Bevy GPU Framework chapter.
| Bevy Version: | 0.14 | (outdated!) |
|---|
This entire book is outdated and no longer maintained. I am keeping it online, in case anyone still finds any of the information in it useful. To adapt to newer versions of Bevy, please consult Bevy's migration guides.
ECS Programming Introduction
This page will try to teach you the general ECS mindset/paradigm.
Relevant official examples:
ecs_guide.
Also check out the complete game examples:
alien_cake_addict,
breakout.
ECS is a programming paradigm that separates data and behavior. Bevy will store all of your data and manage all of your individual pieces of functionality for you. The code will run when appropriate. Your code can get access to whatever data it needs to do its thing.
This makes it easy to write game logic (Systems) in a way that is flexible and reusable. For example, you can implement:
- health and damage that works the same way for anything in the game, regardless of whether that’s the player, an NPC, or a monster, or a vehicle
- gravity and collisions for anything that should have physics
- an animation or sound effect for all buttons in your UI
Of course, when you need specialized behavior only for specific entities (say, player movement, which only applies to the player), that is naturally easy to express, too.
If you are familiar with database programming, you will feel right at home. ECS is conceptually very similar to a lightweight in-memory database.
Read more about how to represent your data.
Read more about how to represent your functionality.
| Bevy Version: | 0.14 | (outdated!) |
|---|
This entire book is outdated and no longer maintained. I am keeping it online, in case anyone still finds any of the information in it useful. To adapt to newer versions of Bevy, please consult Bevy's migration guides.
Intro: Your Data
This page is an overview, to give you an idea of the big picture of how Bevy works. Click on the various links to be taken to dedicated pages where you can learn more about each concept.
As mentioned in the ECS Intro, Bevy stores all your data for you and allows you easy and flexible access to whatever you need, wherever you need it.
The ECS’s data structure is called the World. That is what
stores and manages all of the data. For advanced scenarios, is possible to
have multiple worlds, and then each one will behave as
its own separate ECS instance. However, normally, you just work with the
main World that Bevy sets up for your App.
You can represent your data in two different ways: Entities/Components, and Resources.
Entities / Components
Conceptually, you can think of it by analogy with tables, like in a database or
spreadsheet. Your different data types (Components) are like
the “columns” of a table, and there can be arbitrarily many “rows”
(Entities) containing values / instances of various components.
The Entity ID is like the row number. It’s an integer index
that lets you find specific component values.
Component types that are empty structs (contain no data) are called marker
components. They are useful as “tags” to identify
specific entities, or enable certain behaviors. For example, you could use them
to identify the player entity, to mark enemies that are currently chasing the
player, to select entities to be despawned at the end of the level, etc.
Here is an illustration to help you visualize the logical structure. The checkmarks show what component types are present on each entity. Empty cells mean that the component is not present. In this example, we have a player, a camera, and several enemies.
Entity (ID) | Transform | Player | Enemy | Camera | Health | … |
|---|---|---|---|---|---|---|
| … | ||||||
| 107 | ✓ <translation> <rotation> <scale> | ✓ | ✓ 50.0 | |||
| 108 | ✓ <translation> <rotation> <scale> | ✓ | ✓ 25.0 | |||
| 109 | ✓ <translation> <rotation> <scale> | ✓ <camera data> | ||||
| 110 | ✓ <translation> <rotation> <scale> | ✓ | ✓ 10.0 | |||
| 111 | ✓ <translation> <rotation> <scale> | ✓ | ✓ 25.0 | |||
| … |
Representing things this way gives you flexibility. For example, you could
create a Health component for your game. You could then have many entities
representing different things in your game, such as the player, NPCs, or
monsters, all of which can have a Health value (as well as other relevant
components).
The typical and obvious pattern is to use entities to represent “objects in the game/scene”, such as the camera, the player, enemies, lights, props, UI elements, and other things. However, you are not limited to that. The ECS is a general-purpose data structure. You can create entities and components to store any data. For example, you could create an entity to store a bunch of settings or configuration parameters, or other abstract things.
Data stored using Entities and Components is accessed using
queries. For example, if you want to implement a new game
mechanic, write a system (just a Rust function that takes
special parameters), specify what component types you want to access, and do
your thing. You can either iterate through all entities that match your query,
or access the data of a specific one (using the Entity ID).
#[derive(Component)]
struct Xp(u32);

#[derive(Component)]
struct Health {
    current: u32,
    max: u32,
}

fn level_up(
    // We want to access the Xp and Health data:
    mut query: Query<(&mut Xp, &mut Health)>,
) {
    // process all relevant entities
    for (mut xp, mut health) in query.iter_mut() {
        if xp.0 > 1000 {
            xp.0 -= 1000;
            health.max += 25;
            health.current = health.max;
        }
    }
}
Bevy can automatically keep track of what data your systems have access to and run them in parallel on multiple CPU cores. This way, you get multithreading with no extra effort from you!
What if you want to create or remove entities and components, not just access existing data? That requires special consideration. Bevy cannot change the memory layout while other systems might be running. These operations can be buffered/deferred using Commands. Bevy will apply them later when it is safe to do so. You can also get direct World access using exclusive systems, if you want to perform such operations immediately.
Bundles serve as “templates” for common sets of components, to help you when you spawn new entities, so you don’t accidentally forget anything.
/// Marker for the player
#[derive(Component)]
struct Player;

/// Bundle to make it easy to spawn the player entity
/// with all the correct components:
#[derive(Bundle)]
struct PlayerBundle {
    marker: Player,
    health: Health,
    xp: Xp,
    // including all the components from another bundle
    sprite: SpriteBundle,
}

fn spawn_player(
    // needed for safely creating/removing data in the ECS World
    // (anything done via Commands will be applied later)
    mut commands: Commands,
    // needed for loading assets
    asset_server: Res<AssetServer>,
) {
    // create a new entity with whatever components we want
    commands.spawn(PlayerBundle {
        marker: Player,
        health: Health {
            current: 100,
            max: 125,
        },
        xp: Xp(0),
        sprite: SpriteBundle {
            texture: asset_server.load("player.png"),
            transform: Transform::from_xyz(25.0, 50.0, 0.0),
            // use the default values for all other components in the bundle
            ..Default::default()
        },
    });

    // Call .id() if you want to store the Entity ID of your new entity
    let my_entity = commands.spawn((/* ... */)).id();
}
Comparison with Object-Oriented Programming
Object-Oriented programming teaches you to think of everything as “objects”, where each object is an instance of a “class”. The class specifies the data and functionality for all objects of that type, in one place. Every object of that class has the same data (with different values) and the same associated functionality.
This is the opposite of the ECS mentality. In ECS, any entity can have any data (any combination of components). The purpose of entities is to identify that data. Your systems are loose pieces of functionality that can operate on any data. They can easily find what they are looking for, and implement the desired behavior.
If you are an object-oriented programmer, you might be tempted to define a big
monolithic struct Player containing all the fields / properties of the player.
In Bevy, this is considered bad practice, because doing it that way can make it
more difficult to work with your data and limit performance. Instead, you should
make things granular, when different pieces of data may be accessed independently.
For example, represent the player in your game as an entity, composed of
separate component types (separate structs) for things like the health, XP, or
whatever is relevant to your game. You can also attach standard Bevy components
like Transform (transforms explained) to it.
Then, each piece of functionality (each system) can just query for the data it needs. Common functionality (like a health/damage system) can be applied to any entity with the matching components, regardless of whether that’s the player or something else in the game.
If you have functionality that should only be applied to the player entity,
you can use a marker component (like struct Player;)
to narrow down your query (using a query filter like
With<Player>).
However, if some data always makes sense to be accessed together, then you
should put it in a single struct. For example, Bevy’s Transform.
With these types, the fields are not likely to be useful independently.
Additional Internal Details
The set / combination of components that a given entity has is called the entity’s Archetype. Bevy keeps track of that internally, to organize the data in RAM. Entities of the same Archetype have their data stored together in contiguous arrays, which allows the CPU to access and cache it efficiently.
If you add/remove component types on existing entities, you are changing the Archetype, which may require Bevy to move previously-existing data to a different location.
Learn more about Bevy’s component storage.
Bevy will reuse Entity IDs. The Entity type is actually
two integers: the ID and a “generation”. After you despawn some entities,
their IDs can be reused for newly-spawned entities, but Bevy will increase
the generation value.
Resources
If there is only one global instance (singleton) of something, and it is standalone (not associated with other data), create a Resource.
For example, you could create a resource to store your game’s graphics settings, or an interface to a non-Bevy library.
This is a simple way of storing data, when you know you don’t need the flexibility of Entities/Components.
#[derive(Resource)]
struct GameSettings {
    current_level: u32,
    difficulty: u32,
    max_time_seconds: u32,
}

fn setup_game(
    mut commands: Commands,
) {
    // Add the GameSettings resource to the ECS
    // (if one already exists, it will be overwritten)
    commands.insert_resource(GameSettings {
        current_level: 1,
        difficulty: 100,
        max_time_seconds: 60,
    });
}

fn spawn_extra_enemies(
    mut commands: Commands,
    // we can easily access our resource from any system
    game_settings: Res<GameSettings>,
) {
    if game_settings.difficulty > 50 {
        commands.spawn((
            // ...
        ));
    }
}
| Bevy Version: | 0.14 | (outdated!) |
|---|
This entire book is outdated and no longer maintained. I am keeping it online, in case anyone still finds any of the information in it useful. To adapt to newer versions of Bevy, please consult Bevy's migration guides.
Intro: Your Code
This page is an overview, to give you an idea of the big picture of how Bevy works. Click on the various links to be taken to dedicated pages where you can learn more about each concept.
As mentioned in the ECS Intro, Bevy manages all of your functionality/behaviors for you, running them when appropriate and giving them access to whatever parts of your data they need.
Individual pieces of functionality are called systems. Each system
is a Rust function (fn) you write, which accepts special parameter
types to indicate what data it needs to
access. Think of the function signature as a “specification” for what to fetch
from the ECS World.
Here is what a system might look like. Note how, just by looking at the function parameters, we know exactly what data can be accessed.
fn enemy_detect_player(
    // access data from resources
    mut ai_settings: ResMut<EnemyAiSettings>,
    gamemode: Res<GameModeData>,
    // access data from entities/components
    query_player: Query<&Transform, With<Player>>,
    query_enemies: Query<&mut Transform, (With<Enemy>, Without<Player>)>,
    // in case we want to spawn/despawn entities, etc.
    mut commands: Commands,
) {
    // ... implement your behavior here ...
}
(learn more about: systems, queries, commands, resources, entities, components)
Parallel Systems
Based on the parameter types of the systems you write, Bevy knows what data each system can access and whether it conflicts with any other systems. Systems that do not conflict (don’t access any of the same data mutably) will automatically be run in parallel on different CPU threads. This way, you get multithreading, utilizing modern multi-core CPU hardware effectively, with no extra effort from you!
For best parallelism, it is recommended that you keep your functionality and
your data granular. Split up your systems, so each
one has a narrowly-scoped purpose and access to only the data it needs. This
gives Bevy more opportunities for parallelism. Putting too much functionality
in one system, or too much data in a single component or
resource struct, limits parallelism.
Bevy’s parallelism is non-deterministic by default. Your systems might run in a different and unpredictable order relative to one another, unless you add ordering dependencies to constrain it.
Exclusive Systems
Exclusive systems provide you with a way to get full direct
access to the ECS World. They cannot run in parallel
with other systems, because they can access anything and do anything. Sometimes,
you might need this additonal power.
fn save_game(
    // get full access to the World, so we can access all data and do anything
    world: &mut World,
) {
    // ... save game data to disk, or something ...
}
Schedules
Bevy stores systems inside of schedules
(Schedule). The schedule contains the systems and all
relevant metadata to organize them, telling Bevy when and how to run them. Bevy
Apps typically contain many schedules. Each one is a collection of
systems to be invoked in different scenarios (every frame update, fixed
timestep update, at app startup, on state
transitions, etc.).
The metadata stored in schedules allows you to control how systems run:
- Add run conditions to control if systems should run during an invocation of the schedule. You can disable systems if you only need them to run sometimes.
- Add ordering constraints, if one system depends on another system completing before it.
Within schedules, systems can be grouped into sets. Sets allow multiple systems to share common configuration/metadata. Systems inherit configuration from all sets they belong to. Sets can also inherit configuration from other sets.
Here is an illustration to help you visualize the logical structure of a schedule. Let’s look at how a hypothetical “Update” (run every frame) schedule of a game might be organized.
List of systems:
| System name | Sets it belongs to | Run conditions | Ordering constraints |
|---|---|---|---|
footstep_sound | AudioSet GameplaySet | after(player_movement) after(enemy_movement) | |
player_movement | GameplaySet | player_alive not(cutscene) | after(InputSet) |
camera_movement | GameplaySet | after(InputSet) | |
enemy_movement | EnemyAiSet | ||
enemy_spawn | EnemyAiSet | ||
enemy_despawn | EnemyAiSet | before(enemy_spawn) | |
mouse_input | InputSet | mouse_enabled | |
controller_input | InputSet | gamepad_enabled | |
background_music | AudioSet | ||
ui_button_animate | |||
menu_logo_animate | MainMenuSet | ||
menu_button_sound | MainMenuSet AudioSet | ||
| … |
List of sets:
| Set name | Parent Sets | Run conditions | Ordering constraints |
|---|---|---|---|
MainMenuSet | in_state(MainMenu) | ||
GameplaySet | in_state(InGame) | ||
InputSet | GameplaySet | ||
EnemyAiSet | GameplaySet | not(cutscene) | after(player_movement) |
AudioSet | not(audio_muted) |
Note that it doesn’t matter in what order systems are listed in the schedule. Their order of execution is determined by the metadata. Bevy will respect those constraints, but otherwise run systems in parallel as much as it can, depending on what CPU threads are available.
Also note how our hypothetical game is implemented using many individually-small
systems. For example, instead of playing audio inside of the player_movement
system, we made a separate play_footstep_sounds system. These two pieces of
functionality probably need to access different data, so
putting them in separate systems allows Bevy more opportunities for parallelism.
By being separate systems, they can also have different configuration. The
play_footstep_sounds system can be added to an AudioSet
set, from which it inherits a not(audio_muted) run
condition.
Similarly, we put mouse and controller input in separate systems. The InputSet
set allows systems like player_movement to share an ordering dependency
on all of them at once.
You can see how Bevy’s scheduling APIs give you a lot of flexibility to organize all the functionality in your game. What will you do with all this power? ;)
Here is how schedule that was illustrated above could be created in code:
// Set configuration is per-schedule. Here we do it for `Update`
app.configure_sets(Update, (
    MainMenuSet
        .run_if(in_state(MainMenu)),
    GameplaySet
        .run_if(in_state(InGame)),
    InputSet
        .in_set(GameplaySet),
    EnemyAiSet
        .in_set(GameplaySet)
        .run_if(not(cutscene))
        .after(player_movement),
    AudioSet
        .run_if(not(audio_muted)),
));
app.add_systems(Update, (
    (
        ui_button_animate,
        menu_logo_animate.in_set(MainMenuSet),
    ),
    (
        enemy_movement,
        enemy_spawn,
        enemy_despawn.before(enemy_spawn),
    ).in_set(EnemyAiSet),
    (
        mouse_input.run_if(mouse_enabled),
        controller_input.run_if(gamepad_enabled),
    ).in_set(InputSet),
    (
        footstep_sound.in_set(GameplaySet),
        menu_button_sound.in_set(MainMenuSet),
        background_music,
    ).in_set(AudioSet),
    (
        player_movement
            .run_if(player_alive)
            .run_if(not(cutscene)),
        camera_movement,
    ).in_set(GameplaySet).after(InputSet),
));
(learn more about: schedules, system sets, states, run conditions, system ordering)
| Bevy Version: | 0.14 | (outdated!) |
|---|
This entire book is outdated and no longer maintained. I am keeping it online, in case anyone still finds any of the information in it useful. To adapt to newer versions of Bevy, please consult Bevy's migration guides.
The App
Relevant official examples: All of them ;)
In particular, check out the complete game examples:
alien_cake_addict,
breakout.
To enter the Bevy runtime, you need to configure an App. The app is how you
define the structure of all the things that make up your project:
plugins, systems (and their configuration/metadata:
run conditions, ordering, sets),
event types, states, schedules…
You typically create your App in your project’s main function. However,
you don’t have to add everything from there. If you want to add things to your
app from multiple places (like other Rust files or crates), use
plugins. As your project grows, you will need to do that to keep
everything organized.
fn main() {
    App::new()
        // Bevy itself:
        .add_plugins(DefaultPlugins)

        // Plugins from our game/project:
        .add_plugins(ui::MyUiPlugin)

        // events:
        .add_event::<LevelUpEvent>()

        // systems to run once at startup:
        .add_systems(Startup, spawn_things)

        // systems to run each frame:
        .add_systems(Update, (
            camera_follow_player,
            debug_levelups,
            debug_stats_change,
        ))
        // ...

        // launch the app!
        .run();
}
Note: use tuples with add_systems/add_plugins/configure_sets to add
multiple things at once.
Component types do not need to be registered.
Schedules cannot (yet) be modified at runtime; all systems you
want to run must be added/configured in the App ahead of time. You can
control individual systems using run conditions. You can also
dynamically enable/disable entire schedules using the MainScheduleOrder
resource.
Builtin Bevy Functionality
The Bevy game engine’s own functionality is represented as a plugin group. Every typical Bevy app must first add it, using either:
DefaultPluginsif you are making a full game/app.MinimalPluginsfor something like a headless server.
Setting up data
Normally, you can set up your data from systems. Use Commands from regular systems, or use exclusive systems to get full World access.
Add your setup systems to the Startup schedule for
things you want to initialize at launch, or use state enter/exit
systems to do things when transitioning between menus, game modes, levels, etc.
However, you can also initialize data directly from the app builder. This is common for resources, if they need to be present at all times. You can also get direct World access.
// Create (or overwrite) resource with specific value
app.insert_resource(StartingLevel(3));

// Ensure resource exists; if not, create it
// (using `Default` or `FromWorld`)
app.init_resource::<MyFancyResource>();

// We can also access/manipulate the World directly
// (in this example, to spawn an entity, but you can do anything)
app.world_mut().spawn(SomeBundle::default());
Quitting the App
To cleanly shut down bevy, send an AppExit event from any
system:
use bevy::app::AppExit;

fn exit_system(mut exit: EventWriter<AppExit>) {
    exit.send(AppExit::Success);
}
In a real app, you could do this from various places, such as a handler for an “Exit” button in your main menu, etc.
You can specify the exit code to return to the OS. If Bevy receives
multiple AppExit events, success will only be returned if all
of them report success. If some report an error, the last event will
determine the actual exit code of the process.
| Bevy Version: | 0.14 | (outdated!) |
|---|
This entire book is outdated and no longer maintained. I am keeping it online, in case anyone still finds any of the information in it useful. To adapt to newer versions of Bevy, please consult Bevy's migration guides.
Systems
Relevant official examples:
ecs_guide,
startup_system,
system_param.
Systems are pieces of functionality to be run by Bevy. They are typically implemented using regular Rust functions. This is how you implement all your game logic.
These functions can only take special parameter types, to specify what data you need access to. If you use unsupported parameter types in your function, you will get confusing compiler errors!
Some of the possibilities are:
- accessing resources using
Res/ResMut - accessing components of entities using queries (
Query) - creating/destroying entities, components, and resources using Commands (
Commands) - sending/receiving events using
EventWriter/EventReader
fn debug_start(
    // access resource
    start: Res<StartingLevel>
) {
    eprintln!("Starting on level {:?}", *start);
}
System parameters can be grouped into tuples (which can be nested). This is useful for organization.
fn complex_system(
    (a, mut b): (
        Res<ResourceA>,
        ResMut<ResourceB>,
    ),
    (q0, q1, q2): (
        Query<(/* … */)>,
        Query<(/* … */)>,
        Query<(/* … */)>,
    ),
) {
    // …
}
Your function can have a maximum of 16 total parameters. If you need more, group them into tuples to work around the limit. Tuples can contain up to 16 members, but can be nested indefinitely.
There is also a different kind of system: exclusive systems. They have full direct access to the ECS World, so you can access any data you want and do anything, but cannot run in parallel. For most use cases, you should use regular parallel systems.
fn reload_game(world: &mut World) {
    // ... access whatever we want from the World
}
Runtime
In order for your systems to actually be run by Bevy, you need to configure them via the app builder:
fn main() {
    App::new()
        .add_plugins(DefaultPlugins)
        // run these only once at launch
        .add_systems(Startup, (setup_camera, debug_start))
        // run these every frame update
        .add_systems(Update, (move_player, enemies_ai))
        // ...
        .run();
}
Be careful: writing a new system fn and forgetting to add it to your app is a
common mistake! If you run your project and your new code doesn’t seem to be
running, make sure you added the system!
The above is enough for simple projects.
Systems are contained in schedules. Update is the schedule
where you typically add any systems you want to run every frame. Startup is
where you typically add systems that should run only once on app startup. There
are also other possibilities.
As your project grows more complex, you might want to make use of some of the powerful tools that Bevy offers for managing when/how your systems run, such as: explicit ordering, run conditions, system sets, states.
One-Shot Systems
Sometimes you don’t want Bevy to run your system for you. In that case, don’t add it to a schedule.
If you are a writing a system that you want to call yourself whenever you want (such as on a button press), you can do that using one-shot systems.
| Bevy Version: | 0.14 | (outdated!) |
|---|
This entire book is outdated and no longer maintained. I am keeping it online, in case anyone still finds any of the information in it useful. To adapt to newer versions of Bevy, please consult Bevy's migration guides.
Resources
Relevant official examples:
ecs_guide.
Resources allow you to store a single global instance of some data type, independently of entities.
Use them for data that is truly global for your app, such as configuration / settings. Resources make it easy for you to access such data from anywhere.
To create a new resource type, simply define a Rust struct or enum, and
derive the Resource trait, similar to
components and events.
#[derive(Resource)]
struct GoalsReached {
    main_goal: bool,
    bonus: u32,
}
Types must be unique; there can only be at most one instance of a given type. If you might need multiple, consider using entities and components instead.
Bevy uses resources for many things. You can use these builtin resources to access various features of the engine. They work just like your own custom types.
Accessing Resources
To access the value of a resource from systems, use
Res/ResMut:
fn my_system(
    // these will panic if the resources don't exist
    mut goals: ResMut<GoalsReached>,
    other: Res<MyOtherResource>,
    // use Option if a resource might not exist
    mut fancy: Option<ResMut<MyFancyResource>>,
) {
    if let Some(fancy) = &mut fancy {
        // TODO: do things with `fancy`
    }
    // TODO: do things with `goals` and `other`
}
Managing Resources
If you need to create/remove resources at runtime, you can do so using
commands (Commands):
fn my_setup(mut commands: Commands, /* ... */) {
    // add (or overwrite if existing) a resource, with the given value
    commands.insert_resource(GoalsReached { main_goal: false, bonus: 100 });
    // ensure resource exists (create it with its default value if necessary)
    commands.init_resource::<MyFancyResource>();
    // remove a resource (if it exists)
    commands.remove_resource::<MyOtherResource>();
}
Alternatively, using direct World access from an exclusive system:
fn my_setup2(world: &mut World) {
    // The same methods as with Commands are also available here,
    // but we can also do fancier things:

    // Check if resource exists
    if !world.contains_resource::<MyFancyResource>() {
        // Get access to a resource, inserting a custom value if unavailable
        let _bonus = world.get_resource_or_insert_with(
            || GoalsReached { main_goal: false, bonus: 100 }
        ).bonus;
    }
}
Resources can also be set up from the app builder. Do this for resources that are meant to always exist from the start.
App::new()
    .add_plugins(DefaultPlugins)
    .insert_resource(StartingLevel(3))
    .init_resource::<MyFancyResource>()
    // ...
Resource Initialization
If you want to be able to use .init_resource to create your resource,
here is how you can provide the default value.
Implement Default for simple resources:
// simple derive, to set all fields to their defaults
#[derive(Resource, Default)]
struct GameProgress {
    game_completed: bool,
    secrets_unlocked: u32,
}

#[derive(Resource)]
struct StartingLevel(usize);

// custom implementation for unusual values
impl Default for StartingLevel {
    fn default() -> Self {
        StartingLevel(1)
    }
}

// on enums, you can specify the default variant
#[derive(Resource, Default)]
enum GameMode {
    Tutorial,
    #[default]
    Singleplayer,
    Multiplayer,
}
For resources that need complex initialization, implement FromWorld:
#[derive(Resource)]
struct MyFancyResource { /* stuff */ }

impl FromWorld for MyFancyResource {
    fn from_world(world: &mut World) -> Self {
        // You have full access to anything in the ECS World from here.

        // For example, you can access (and mutate!) other things:
        {
            let mut x = world.resource_mut::<MyOtherResource>();
            x.do_mut_stuff();
        }

        // You can load assets:
        let font: Handle<Font> = world.resource::<AssetServer>().load("myfont.ttf");

        MyFancyResource { /* stuff */ }
    }
}
Beware: it can be easy to get yourself into a mess of unmaintainable code
if you overuse FromWorld to do complex things.
Usage Advice
The choice of when to use entities/components vs. resources is typically about how you want to access the data: globally from anywhere (resources), or using ECS patterns (entities/components).
Even if there is only one of a certain thing in your game (such as the player in a single-player game), it can be a good fit to use an entity instead of resources, because entities are composed of multiple components, some of which can be common with other entities. This can make your game logic more flexible. For example, you could have a “health/damage system” that works with both the player and enemies.
Settings
One common usage of resources is for storing settings and configuration.
However, if it is something that cannot be changed at runtime and only used when
initializing a plugin, consider putting that inside the plugin’s
struct, instead of a resource.
Caches
Resources are also useful if you want to store some data in a way that is easier or more efficient for you to access. For example, keeping a collection of asset handles, or using a custom datastructure for representing a game map more efficiently than using entities and components, etc.
Entities and Components, as flexible as they are, are not necessarily the best fit for all use cases. If you want to represent your data some other way, feel free to do so. Simply create a resource and put it there.
Interfacing with external libraries
If you want to integrate some external non-Bevy software into a Bevy app, it can be very convenient to create a resource to hold onto its state/data.
For example, if you wanted to use an external physics or audio engine, you could put all its data in a resource, and write some systems to call its functions. That can give you an easy way to interface with it from Bevy code.
If the external code is not thread-safe (!Send in Rust parlance), which is
common for non-Rust (e.g C++ and OS-level) libraries, you should use a
Non-Send Bevy resource instead. This will make sure any Bevy
system that touches it will run on the main thread.
| Bevy Version: | 0.15 | (outdated!) |
|---|
This entire book is outdated and no longer maintained. I am keeping it online, in case anyone still finds any of the information in it useful. To adapt to newer versions of Bevy, please consult Bevy's migration guides.
Relevant official examples:
ecs_guide.
Entities
See here for more explanation on how storing data in the ECS works.
Conceptually, an entity represents a set of values for different components.
Each component is a Rust type (struct or enum) and an entity can be used to
store a value of that type.
Technically, an entity is just a simple integer ID (imagine the “row number” in a table/spreadsheet) that can be used to find related data values (in different “columns” of that table).
In Bevy, Entity is this value. It consists of two integers:
the ID and the “generation” (allowing IDs to be reused, after you despawn old
entities).
You can create (“spawn”) new entities and destroy (“despawn”) entities using
Commands or exclusive World access.
fn setup(mut commands: Commands) {
    // create a new entity
    commands.spawn((
        // Initialize all your components and bundles here
        Enemy,
        Health {
            hp: 100.0,
            extra: 25.0,
        },
        AiMode::Passive,
        // ...
    ));

    // If you want to get the Entity ID, just call `.id()` after spawn
    let my_entity = commands.spawn((/* ... */)).id();

    // destroy an entity, removing all data associated with it
    commands.entity(my_entity).despawn();
}
Many of your entities might need to have the same common components. You can use Bundles to make it easier to spawn your entities.
Components
Components are the data associated with entities.
To create a new component type, simply define a Rust struct or enum, and
derive the Component trait.
#[derive(Component)]
struct Health {
    hp: f32,
    extra: f32,
}

#[derive(Component)]
enum AiMode {
    Passive,
    ChasingPlayer,
}
Types must be unique – an entity can only have one component per Rust type.
Newtype Components
Use wrapper (newtype) structs to make unique components out of simpler types:
#[derive(Component)]
struct PlayerXp(u32);

#[derive(Component)]
struct PlayerName(String);
Marker Components
You can use empty structs to help you identify specific entities. These are known as “marker components”. Useful with query filters.
/// Add this to all menu ui entities to help identify them
#[derive(Component)]
struct MainMenuUI;

/// Marker for hostile game units
#[derive(Component)]
struct Enemy;

/// This will be used to identify the main player entity
#[derive(Component)]
struct Player;

/// Tag all creatures that are currently friendly towards the player
#[derive(Component)]
struct Friendly;
Accessing Components
Components can be accessed from systems, using queries.
You can think of the query as the “specification” for the data you want to access. It gives you access to specific component values from entities that match the query’s signature.
fn level_up_player(
    // get the relevant data. some components read-only, some mutable
    mut query_player: Query<(&PlayerName, &mut PlayerXp, &mut Health), With<Player>>,
) {
    // `single` assumes only one entity exists that matches the query
    let (name, mut xp, mut health) = query_player.single_mut();
    if xp.0 > 1000 {
        xp.0 = 0;
        health.hp = 100.0;
        health.extra += 25.0;
        info!("Player {} leveled up!", name.0);
    }
}

fn die(
    // `Entity` can be used to get the ID of things that match the query
    query_health: Query<(Entity, &Health)>,
    // we also need Commands, so we can despawn entities if we have to
    mut commands: Commands,
) {
    // we can have many such entities (enemies, player, whatever)
    // so we loop to check all of them
    for (entity_id, health) in query_health.iter() {
        if health.hp <= 0.0 {
            commands.entity(entity_id).despawn();
        }
    }
}
Adding/removing Components
You can add/remove components on existing entities, using Commands or
exclusive World access.
fn make_enemies_friendly(
    query_enemy: Query<Entity, With<Enemy>>,
    mut commands: Commands,
) {
    for entity_id in query_enemy.iter() {
        commands.entity(entity_id)
            .remove::<Enemy>()
            .insert(Friendly);
    }
}
Required Components
Components can require other components. When you spawn an entity, Bevy will ensure that any additional components required by the components you provide are also added to the entity. If you do not provide a value for those components, Bevy will automatically insert a default value.
For example, the way to create a 3D camera in Bevy is to spawn
an entity with the Camera3d component. Bevy will automatically make sure to
also add any other necessary components, such as Camera (where Bevy stores
general camera properties), Transform (transforms), and others.
These dependencies are recursive. For example, Transform requires
GlobalTransform, so our camera entity will also get that automatically.
To learn what components are required by a
specific component type, look for the impl Component for …
under “Trait Implementations” in the API Docs.
If you want to customize the values in any of those components, you can just add them yourself.
fn setup_camera(
    mut commands: Commands,
) {
    commands.spawn((
        // Add Camera2d to pull in everything needed for a 2D camera
        Camera2d,
        // Add our own transform
        Transform::from_xyz(1.0, 2.0, 3.0),

        // By just adding the above 2 components, our entity
        // will also automatically get other things, like:
        // - `Camera`: required by `Camera2d`
        // - `GlobalTransform`: required by `Transform`
        // - and various others … (see the API docs)
        // They will be initialized with default values.
        //
        // `Camera2d` also requires `Transform`, but we provided
        // our own value for that, so Bevy will use our value
        // instead of the default.
    ));
}
You can add required components to your own component types as follows:
#[derive(Component)]
#[require(Enemy, Health, Sprite, Transform, Visibility)]
struct RegularEnemy;

#[derive(Component)]
#[require(
    Enemy,
    // init using a custom function instead of `Default`
    Health(big_boss_health),
    Sprite,
    Transform,
    Visibility,
)]
struct BigBoss;
You need to make sure that all the required components impl Default. Or
alternatively, you can use a custom constructor function for initialization.
#[derive(Component, Default)]
struct Enemy;

#[derive(Component)]
struct Health(f32);

impl Default for Health {
    fn default() -> Self {
        Health(100.0)
    }
}

fn big_boss_health() -> Health {
    Health(500.0)
}
And now, with all the above, we can do:
fn spawn_enemies(
    mut commands: Commands,
) {
    commands.spawn(BigBoss);
    commands.spawn((
        RegularEnemy,
        Transform::from_xyz(10.0, 20.0, 30.0),
    ));
}| Bevy Version: | 0.14 | (outdated!) |
|---|
This entire book is outdated and no longer maintained. I am keeping it online, in case anyone still finds any of the information in it useful. To adapt to newer versions of Bevy, please consult Bevy's migration guides.
Relevant official examples:
ecs_guide.
Bundles
You can think of Bundles like “templates” for creating entities. They make it easy to create entities with a common set of components types.
By creating a bundle type, instead of adding your components one by one, you can make sure that you will never accidentally forget some important component on your entities. The Rust compiler will give an error if you do not set all the fields of a struct, thus helping you make sure your code is correct.
Bevy provides many built-in bundle types that you can use to spawn common kinds of entities.
Creating Bundles
To create your own bundle, derive Bundle on a struct:
#[derive(Bundle)]
struct PlayerBundle {
xp: PlayerXp,
name: PlayerName,
health: Health,
marker: Player,
// We can nest/include another bundle.
// Add the components for a standard Bevy Sprite:
sprite: SpriteBundle,
}When you have nested bundles, everything gets flattened. You end up with an entity that has all the included component types. If a type appears more than once, that’s an error.
Using Bundles
You can then use your bundle when you spawn your entities:
commands.spawn(PlayerBundle {
xp: PlayerXp(0),
name: PlayerName("Player 1".into()),
health: Health {
hp: 100.0,
extra: 0.0,
},
marker: Player,
sprite: SpriteBundle {
// TODO
..Default::default()
},
});If you want to have default values (similar to Bevy’s bundles):
impl Default for PlayerBundle {
fn default() -> Self {
Self {
xp: PlayerXp(0),
name: PlayerName("Player".into()),
health: Health {
hp: 100.0,
extra: 0.0,
},
marker: Player,
sprite: Default::default(),
}
}
}Now you can do this:
commands.spawn(PlayerBundle {
name: PlayerName("Player 1".into()),
..Default::default()
});Bundles for Removal
Bundles can also be useful to represent a set of components that you want to be able to easily remove from an entity.
/// Contains all components to remove when
/// resetting the player between rooms/levels.
#[derive(Bundle)]
struct PlayerResetCleanupBundle {
status_effect: StatusEffect,
pending_action: PlayerPendingAction,
modifier: CurrentModifier,
low_hp_marker: LowHpMarker,
}commands.entity(e_player)
.remove::<PlayerResetCleanupBundle>();The component types included in the bundle will be removed from the entity, if any of them exist on the entity.
Loose components as bundles
Technically, Bevy also considers arbitrary tuples of components as bundles:
(ComponentA, ComponentB, ComponentC)
This allows you to easily spawn an entity using a loose bunch of components (or
bundles), or add more arbitrary components when you spawn entities. However,
this way you don’t have the compile-time correctness advantages that a
well-defined struct gives you.
commands.spawn((
SpriteBundle {
// ...
..default()
},
Health {
hp: 50.0,
extra: 0.0,
},
Enemy,
// ...
));You should strongly consider creating proper structs, especially if you are
likely to spawn many similar entities. It will make your code easier to maintain.
Querying
Note that you cannot query for a whole bundle. Bundles are just a convenience when creating the entities. Query for the individual component types that your system needs to access.
This is wrong:
fn my_system(query: Query<&SpriteBundle>) {
// ...
}Instead, do this:
fn my_system(query: Query<(&Transform, &Handle<Image>)>) {
// ...
}(or whatever specific components you need in that system)
| Bevy Version: | 0.14 | (outdated!) |
|---|
This entire book is outdated and no longer maintained. I am keeping it online, in case anyone still finds any of the information in it useful. To adapt to newer versions of Bevy, please consult Bevy's migration guides.
Queries
Relevant official examples:
ecs_guide.
Queries let you access components of entities. Use the
Query system parameter, where you can specify the data
you want to access, and optionally additional filters.
Think of the types you put in your Query as a “specification” for
selecting what entities you want to be able to access. Queries will match
only those entities in the ECS World that fit your specification. You are
then able to use the query in various different ways, to access the relevant
data from such entities.
Query Data
The first type parameter for a query is the data you want to access. Use & for
shared/readonly access and &mut for exclusive/mutable access. Use Option if
the component is not required (you want to access entities with or without that
component). If you want multiple components, put them in a tuple.
Iterating
The most common operation is to simply iterate the query, to access the component values of every entity that matches:
fn check_zero_health(
// access entities that have `Health` and `Transform` components
// get read-only access to `Health` and mutable access to `Transform`
// optional component: get access to `Player` if it exists
mut query: Query<(&Health, &mut Transform, Option<&Player>)>,
) {
// get all matching entities
for (health, mut transform, player) in &mut query {
eprintln!("Entity at {} has {} HP.", transform.translation, health.hp);
// center if hp is zero
if health.hp <= 0.0 {
transform.translation = Vec3::ZERO;
}
if let Some(player) = player {
// the current entity is the player!
// do something special!
}
}
}Instead of iterating in a for loop, you can also call .for_each(…) with a
closure to run for each entity. This syntax often tends to be optimized better
by the compiler and may lead to better performance. However, it may be less
flexible (you cannot use control flow like break/continue/return/?)
and more cumbersome to write. Your choice.
fn enemy_pathfinding(
mut query_enemies: Query<(&Transform, &mut EnemyAiState)>,
) {
query_enemies.iter_mut().for_each(|(transform, mut enemy_state)| {
// TODO: do something with `transform` and `enemy_state`
})
}If you want to know the entity IDs of the entities you are accessing, you can
put the special Entity type in your query. This is useful if you need
to later perform specific operations on those entities.
// add `Entity` to `Query` to get Entity IDs
fn query_entities(q: Query<(Entity, /* ... */)>) {
for (e, /* ... */) in q.iter() {
// `e` is the Entity ID of the entity we are accessing
}
}Accessing Specific Entities
To access the components from one specific entity
only, you need to know the Entity ID:
if let Ok((health, mut transform)) = query.get_mut(entity) {
// do something with the components
} else {
// the entity does not have the components from the query
}If you want to access the data from several entities all at once, you can use
many/many_mut (panic on error) or get_many/get_many_mut (return
Result). These methods ensure that all the requested entities exist and
match the query, and will produce an error otherwise.
#[derive(Resource)]
struct UiHudIndicators {
// say we have 3 special UI elements
entities_ui: [Entity; 3],
entities_text: [Entity; 3],
}
fn update_ui_hud_indicators(
indicators: Res<UiHudIndicators>,
query_text: Query<&Text>,
query_ui: Query<(&Style, &BackgroundColor)>,
) {
// we can get everything as an array
if let Ok(my_texts) = query_text.get_many(indicators.entities_text) {
// the entities exist and match the query
// TODO: something with `my_texts[0]`, `my_texts[1]`, `my_texts[2]`
} else {
// query unsuccessful
};
// we can use "destructuring syntax"
// if we want to unpack everything into separate variables
let [(style0, color0), (style1, color1), (style2, color2)] =
query_ui.many(indicators.entities_ui);
// TODO: something with all these variables
}Unique Entities
If you know that only one matching entity is supposed to exist (the query is
expected to only ever match a single entity), you can use single/single_mut
(panic on error) or get_single/get_single_mut (return Result). These
methods ensure that there exists exactly one candidate entity that can match
your query, and will produce an error otherwise.
You do not need to know the Entity ID.
fn query_player(mut q: Query<(&Player, &mut Transform)>) {
let (player, mut transform) = q.single_mut();
// do something with the player and its transform
}Combinations
If you want to iterate over all possible combinations of N entities, Bevy provides a method for that too. Be careful: with a lot of entities, this can easily become very slow!
fn print_potential_friends(
q_player_names: Query<&PlayerName>,
) {
// this will iterate over every possible pair of two entities
// (that have the PlayerName component)
for [player1, player2] in q_player_names.iter_combinations() {
println!("Maybe {} could be friends with {}?", player1.0, player2.0);
}
}
fn apply_gravity_to_planets(
mut query: Query<&mut Transform, With<Planet>>,
) {
// this will iterate over every possible pair of two planets
// For mutability, we need a different syntax
let mut combinations = query.iter_combinations_mut();
while let Some([planet1, planet2]) = combinations.fetch_next() {
// TODO: calculate the gravity force between the planets
}
}Bundles
You cannot query for a bundle!
Bundles are only a convenience to help you set up your entities with the correct set of components you’d like to have on them. They are only used during spawning / insert / remove.
Queries work with individual components. You need to query for the specific components from that bundle that you care about.
A common beginner mistake is to query for the bundle type!
Query Filters
Add query filters to narrow down the entities you get from the query.
This is done using the second (optional) generic type parameter of the
Query type.
Note the syntax of the query: first you specify the data you want to access (using a tuple to access multiple things), and then you add any additional filters (can also be a tuple, to add multiple).
Use With/Without to only get entities that have specific components.
fn debug_player_hp(
// access the health (and optionally the PlayerName, if present), only for friendly players
query: Query<(&Health, Option<&PlayerName>), (With<Player>, Without<Enemy>)>,
) {
// get all matching entities
for (health, name) in query.iter() {
if let Some(name) = name {
eprintln!("Player {} has {} HP.", name.0, health.hp);
} else {
eprintln!("Unknown player has {} HP.", health.hp);
}
}
}This is useful if you don’t actually care about the data stored inside these components, but you want to make sure that your query only looks for entities that have (or not have) them. If you want the data, then put the component in the first part of the query (as shown previously), instead of using a filter.
Multiple filters can be combined:
- in a tuple to apply all of them (AND logic)
- using the
Or<(…)>wrapper to detect any of them (OR logic).- (note the tuple inside)
Query Transmutation
If you want one function with a Query parameter to call another function
with a different (but compatible) Query parameter, you can create the
needed Query from the one you have using something called QueryLens.
fn debug_positions(
query: Query<&Transform>,
) {
for transform in query.iter() {
eprintln!("{:?}", transform.translation);
}
}
fn move_player(
mut query_player: Query<&mut Transform, With<Player>>,
) {
// TODO: mutate the transform to move the player
// say we want to call our debug_positions function
// first, convert into a query for `&Transform`
let mut lens = query_player.transmute_lens::<&Transform>();
debug_positions(lens.query());
}
fn move_enemies(
mut query_enemies: Query<&mut Transform, With<Enemy>>,
) {
// TODO: mutate the transform to move our enemies
let mut lens = query_enemies.transmute_lens::<&Transform>();
debug_positions(lens.query());
}Note: when we call debug_positions from each function, it will access
different entities! Even though the Query<&Transform> parameter type does not
have any additional filters, it was created by transmuting
via QueryLens, and therefore it can only access the entities and components
of the original Query that it was derived from. If we were to add
debug_positions to Bevy as a regular system, it would access the transforms of
all entities.
Also note: this has some performance overhead; the transmute operation is not free. Bevy normally caches some query metadata across multiple runs of a system. When you create the new query, it has to make a copy of it.
Query Joining
You can combine two queries to get a new query to access only those entities that would match both queries, yielding the combined set of components.
This works via QueryLens, just like transmutation.
fn query_join(
mut query_common: Query<(&Transform, &Health)>,
mut query_player: Query<&PlayerName, With<Player>>,
mut query_enemy: Query<&EnemyAiState, With<Enemy>>,
) {
let mut player_with_common:
QueryLens<(&Transform, &Health, &PlayerName), With<Player>> =
query_player.join_filtered(&mut query_common);
for (transform, health, player_name) in &player_with_common.query() {
// TODO: do something with all these components
}
let mut enemy_with_common:
QueryLens<(&Transform, &Health, &EnemyAiState), With<Enemy>> =
query_enemy.join_filtered(&mut query_common);
for (transform, health, enemy_ai) in &enemy_with_common.query() {
// TODO: do something with all these components
}
}Note: the resulting query cannot access any data that the original queries
were not able to access. If you try to add With/Without filters,
they will not have their usual effect.
| Bevy Version: | 0.14 | (outdated!) |
|---|
This entire book is outdated and no longer maintained. I am keeping it online, in case anyone still finds any of the information in it useful. To adapt to newer versions of Bevy, please consult Bevy's migration guides.
Commands
Relevant official examples:
ecs_guide.
Use Commands to spawn/despawn entities, add/remove components on existing
entities, manage resources, from your systems.
fn spawn_things(
mut commands: Commands,
) {
// manage resources
commands.insert_resource(MyResource::new());
commands.remove_resource::<MyResource>();
// create a new entity using `spawn`,
// providing the data for the components it should have
// (typically using a Bundle)
commands.spawn(PlayerBundle {
name: PlayerName("Henry".into()),
xp: PlayerXp(1000),
health: Health {
hp: 100.0, extra: 20.0
},
_p: Player,
sprite: Default::default(),
});
// you can use a tuple if you need additional components or bundles
// (tuples of component and bundle types are considered bundles)
// (note the extra parentheses)
let my_entity_id = commands.spawn((
// add some components
ComponentA,
ComponentB::default(),
// add some bundles
MyBundle::default(),
TransformBundle::default(),
)).id(); // get the Entity (id) by calling `.id()` at the end
// add/remove components of an existing entity
commands.entity(my_entity_id)
.insert(ComponentC::default())
.remove::<ComponentA>()
.remove::<(ComponentB, MyBundle)>();
// remove everything except the given components / bundles
commands.entity(my_entity_id)
.retain::<(TransformBundle, ComponentC)>();
}
fn make_all_players_hostile(
mut commands: Commands,
// we need the Entity id, to perform commands on specific entities
query: Query<Entity, With<Player>>,
) {
for entity in query.iter() {
commands.entity(entity)
// add an `Enemy` component to the entity
.insert(Enemy)
// remove the `Friendly` component
.remove::<Friendly>();
}
}
fn despawn_all_enemies(
mut commands: Commands,
query: Query<Entity, With<Enemy>>,
) {
for entity in query.iter() {
commands.entity(entity).despawn();
}
}When do these actions get applied?
Commands do not take effect immediately, because it wouldn’t be safe to
modify the data layout in memory when other systems could be
running in parallel. When you do anything using Commands, it gets queued to
be applied later when it is safe to do so.
Within the same schedule, you can add .before()/.after()
ordering constraints to your systems, and Bevy will
automatically make sure that Commands get applied in-between if necessary, so
that the second system can see the changes made by the first system.
app.add_systems(Update, spawn_new_enemies_if_needed);
// This system will see any newly-spawned enemies when it runs,
// because Bevy will make sure to apply the first system's Commands
// (thanks to the explicit `.after()` dependency)
app.add_systems(Update, enemy_ai.after(spawn_new_enemies_if_needed));If you do not have explicit ordering dependencies, it is undefined when Commands will be applied. It is possible that some systems will only see the changes on the next frame update!
Otherwise, Commands are normally applied at the end of every
schedule. Systems that live in different schedules
will see the changes. For example, Bevy’s engine systems (that live in
PostUpdate) will see the entities you spawn in your systems (that live in
Update).
Custom Commands
Commands can also serve as a convenient way to do any custom manipulations
that require full access to the ECS World. You can queue up
any custom code to run in a deferred fashion, the same way as the standard
commands work.
For a one-off thing, you can just pass a closure:
fn my_system(mut commands: Commands) {
let x = 420;
commands.add(move |world: &mut World| {
// do whatever you want with `world` here
// note: it's a closure, you can use variables from
// the parent scope/function
eprintln!("{}", x);
});
}If you want something reusable, consider one-shot systems. They are a way to write regular Bevy systems and run them on-demand.
Extending the Commands API
If you want something more integrated, that feels like as if it was part of Bevy’s Commands API, here is how to do it.
Create a custom type and implement the Command trait:
use bevy::ecs::world::Command;
struct MyCustomCommand {
// you can have some parameters
data: u32,
}
impl Command for MyCustomCommand {
fn apply(self, world: &mut World) {
// do whatever you want with `world` and `self.data` here
}
}
// use it like this
fn my_other_system(mut commands: Commands) {
commands.add(MyCustomCommand {
data: 920, // set your value
});
}And if you want to make it extra nice to use, you can create
an extension trait to add extra methods to Commands:
pub trait MyCustomCommandsExt {
// define a method that we will be able to call on `commands`
fn do_custom_thing(&mut self, data: u32);
}
// implement our trait for Bevy's `Commands`
impl<'w, 's> MyCustomCommandsExt for Commands<'w, 's> {
fn do_custom_thing(&mut self, data: u32) {
self.add(MyCustomCommand {
data,
});
}
}
fn my_fancy_system(mut commands: Commands) {
// now we can call our custom method just like Bevy's `spawn`, etc.
commands.do_custom_thing(42);
}Note: if you want to use your custom extension method from other Rust files, you will have to import your trait, or it will not be available:
use crate::thing::MyCustomCommandsExt;| Bevy Version: | 0.14 | (outdated!) |
|---|
This entire book is outdated and no longer maintained. I am keeping it online, in case anyone still finds any of the information in it useful. To adapt to newer versions of Bevy, please consult Bevy's migration guides.
Events
Relevant official examples:
event.
Send data between systems! Let your systems communicate with each other!
Like resources or components, events are
simple Rust structs or enums. When creating a new event type, derive
the Event trait.
Then, any system can send (broadcast) values of that type, and any system can receive those events.
- To send events, use an
EventWriter<T>. - To receive events, use an
EventReader<T>.
Every reader tracks the events it has read independently, so you can handle the same events from multiple systems.
#[derive(Event)]
struct LevelUpEvent(Entity);
fn player_level_up(
mut ev_levelup: EventWriter<LevelUpEvent>,
query: Query<(Entity, &PlayerXp)>,
) {
for (entity, xp) in query.iter() {
if xp.0 > 1000 {
ev_levelup.send(LevelUpEvent(entity));
}
}
}
fn debug_levelups(
mut ev_levelup: EventReader<LevelUpEvent>,
) {
for ev in ev_levelup.read() {
eprintln!("Entity {:?} leveled up!", ev.0);
}
}You need to register your custom event types via the app builder:
app.add_event::<LevelUpEvent>();Usage Advice
Events should be your go-to data flow tool. As events can be sent from any system and received by multiple systems, they are extremely versatile.
Events can be a very useful layer of abstraction. They allow you to decouple things, so you can separate different functionality and more easily reason about which system is responsible for what.
You can imagine how, even in the simple “player level up” example shown above,
using events would allow us to easily extend our hypothetical game with more
functionality. If we wanted to display a fancy level-up effect or animation,
update UI, or anything else, we can just add more systems that read the events
and do their respective things. If the player_level_up system had simply
checked the player XP and managed the player level directly, without going via
events, it would be unwieldy for future development of the game.
How it all works
When you register an event type, Bevy will create an Events<T>
resource, which acts as the backing storage for the event queue. Bevy
also adds an “event maintenance” system to clear events periodically,
preventing them from accumulating and using up memory.
Bevy ensures that events are kept around for at least two frame update cycles, or two fixed timestep cycles, whichever is longer. After that, they are silently dropped. This gives your systems enough opportunity to handle them, assuming your systems are running all the time. Beware when adding run conditions to your systems, as you might miss some events when your systems are not running!
If you don’t like this, you can have manual control over when events are cleared (at the risk of leaking / wasting memory if you forget to clear them).
The EventWriter<T> system parameter is just syntax sugar for mutably
accessing the Events<T> resource to add events to the queue. The
EventReader<T> is a little more complex: it accesses the events storage
immutably, but also stores an integer counter to keep track of how many events
you have read. This is why it also needs the mut keyword.
Events<T> itself is internally implemented using simple Vecs. Sending
events is equivalent to just pushing to a Vec. It is very fast,
low overhead. Events are often the most performant way to implement things
in Bevy, better than using change detection.
Possible Pitfalls
Beware of frame delay / 1-frame-lag. This can occur if Bevy runs the receiving system before the sending system. The receiving system will only get a chance to receive the events the next time it runs. If you need to ensure that events are handled on the same frame, you can use explicit system ordering.
If your systems have run conditions, beware that they might miss some events when they are not running! If your system does not check for events at least once every other frame or fixed timestep, the events will be lost.
If you want events to persist for longer than that, you can implement a custom cleanup/management strategy. However, you can only do this for your own event types. There is no solution for Bevy’s built-in types.
| Bevy Version: | 0.14 | (outdated!) |
|---|
This entire book is outdated and no longer maintained. I am keeping it online, in case anyone still finds any of the information in it useful. To adapt to newer versions of Bevy, please consult Bevy's migration guides.
Plugins
Relevant official examples:
plugin,
plugin_group.
As your project grows, it can be useful to make it more modular. You can split it into “plugins”.
Plugins are simply collections of things to be added to the App Builder. Think of this as a way to add things to the app from multiple places, like different Rust files/modules or crates.
The simplest way to create a plugin is by just writing a Rust function
that takes &mut App:
fn my_plugin(app: &mut App) {
app.init_resource::<MyCustomResource>();
app.add_systems(Update, (
do_some_things,
do_other_things,
));
}An alternative way is by creating a struct and implementing the Plugin trait:
struct MyPlugin;
impl Plugin for MyPlugin {
fn build(&self, app: &mut App) {
app.init_resource::<MyOtherResource>();
app.add_event::<MyEvent>();
app.add_systems(Startup, plugin_init);
app.add_systems(Update, my_system);
}
}The benefit of using a struct is that you could extend it with configuration
parameters or generics if you want to make your plugin configurable.
Either way, you get &mut access to the App, so you can add whatever
you want to it, just like you can do from your fn main().
You can now add your plugins to your App from elsewhere (most commonly
fn main()). Bevy will just call your plugin implementation above. In effect,
everything the plugin adds will be flattened into your App alongside
everything that is already there.
fn main() {
App::new()
.add_plugins(DefaultPlugins)
.add_plugins((
my_plugin, // the `fn`-based plugin
MyPlugin, // the `struct`-based plugin
))
.run();
}For internal organization in your own project, the main value of plugins
comes from not having to declare all your Rust types and functions as
pub, just so they can be accessible from fn main to be added to the
app builder. Plugins let you add things to your app from multiple
different places, like separate Rust files / modules.
You can decide how plugins fit into the architecture of your game.
Some suggestions:
- Create plugins for different states.
- Create plugins for various sub-systems, like physics or input handling.
Plugin Groups
Plugin groups register multiple plugins at once. Bevy’s DefaultPlugins
and MinimalPlugins are examples of this.
To create your own plugin group, implement the PluginGroup trait:
use bevy::app::PluginGroupBuilder;
struct MyPluginGroup;
impl PluginGroup for MyPluginGroup {
fn build(self) -> PluginGroupBuilder {
PluginGroupBuilder::start::<Self>()
.add(FooPlugin)
.add(BarPlugin)
}
}
fn main() {
App::new()
.add_plugins(DefaultPlugins)
.add_plugins(MyPluginGroup)
.run();
}When adding a plugin group to the app, you can disable some plugins while keeping the rest.
For example, if you want to manually set up logging (with your own tracing
subscriber), you can disable Bevy’s LogPlugin:
App::new()
.add_plugins(
DefaultPlugins.build()
.disable::<bevy::log::LogPlugin>()
)
.run();Note that this simply disables the functionality, but it cannot actually remove the code to avoid binary bloat. The disabled plugins still have to be compiled into your program.
If you want to slim down your build, you should look at disabling Bevy’s default cargo features, or depending on the various Bevy sub-crates individually.
Plugin Configuration
Plugins are also a convenient place to store settings/configuration that are used during initialization/startup. For settings that can be changed at runtime, it is recommended that you put them in resources instead.
struct MyGameplayPlugin {
/// Should we enable dev hacks?
enable_dev_hacks: bool,
}
impl Plugin for MyGameplayPlugin {
fn build(&self, app: &mut App) {
// add our gameplay systems
app.add_systems(Update, (
health_system,
movement_system,
));
// ...
// if "dev mode" is enabled, add some hacks
if self.enable_dev_hacks {
app.add_systems(Update, (
player_invincibility,
free_camera,
));
}
}
}
fn main() {
App::new()
.add_plugins(DefaultPlugins)
.add_plugins(MyGameplayPlugin {
// change to true for dev testing builds
enable_dev_hacks: false,
})
.run();
}Plugins that are added using Plugin Groups can also be
configured. Many of Bevy’s DefaultPlugins work this way.
use bevy::window::WindowResolution;
App::new()
.add_plugins(DefaultPlugins.set(
// here we configure the main window
WindowPlugin {
primary_window: Some(Window {
resolution: WindowResolution::new(800.0, 600.0),
// ...
..Default::default()
}),
..Default::default()
}
))
.run();Publishing Crates
Plugins give you a nice way to publish Bevy-based libraries for other people to easily include into their projects.
Bevy offers some official guidance for good practices when you develop plugins you want to publish for other people to use. You can read it here.
Don’t forget to submit an entry to Bevy Assets on the official website, so that people can find your plugin more easily. You can do this by making a PR in the Github repo.
If you are interested in supporting bleeding-edge Bevy (main), see here for advice.
| Bevy Version: | 0.14 | (outdated!) |
|---|
This entire book is outdated and no longer maintained. I am keeping it online, in case anyone still finds any of the information in it useful. To adapt to newer versions of Bevy, please consult Bevy's migration guides.
Local Resources
Relevant official examples:
ecs_guide.
Local resources allow you to have per-system data. This data is not stored in the ECS World, but rather together with your system. Nothing outside of your system can access it. The value will be kept across subsequent runs of the system.
Local<T> is a system parameter similar to ResMut<T>, which gives
you full mutable access to a single value of the given data type, that is
independent from entities and components.
Res<T>/ResMut<T> refer to a single global instance of the type, shared
between all systems. On the other hand, every Local<T> parameter is a
separate instance, exclusively for that system.
#[derive(Default)]
struct MyState {
// ...
}
fn my_system1(mut local: Local<MyState>) {
// you can do anything you want with the local here
}
fn my_system2(mut local: Local<MyState>) {
// the local in this system is a different instance
}The type must implement Default or FromWorld. It is automatically
initialized. It is not possible to specify a custom initial value.
A system can have multiple Locals of the same type.
Specify an initial value
Local<T> is always automatically initialized using the default value for
the type. If that doesn’t work for you, there is an alternative way to pass
data into a system.
If you need specific data, you can use a closure instead. Rust closures that take system parameters are valid Bevy systems, just like standalone functions. Using a closure allows you to “move data into the function”.
This example shows how to initialize some data to configure a system, without
using Local<T>:
#[derive(Default)]
struct MyConfig {
magic: usize,
}
fn my_system(
mut cmd: Commands,
my_res: Res<MyStuff>,
// note this isn't a valid system parameter
config: &MyConfig,
) {
// TODO: do stuff
}
fn main() {
let config = MyConfig {
magic: 420,
};
App::new()
.add_plugins(DefaultPlugins)
// create a "move closure", so we can use the `config`
// variable that we created above
// Note: we specify the regular system parameters we need.
// The closure needs to be a valid Bevy system.
.add_systems(Update, move |cmd: Commands, res: Res<MyStuff>| {
// call our function from inside the closure,
// passing in the system params + our custom value
my_system(cmd, res, &config);
})
.run();
}Another way to accomplish the same thing is to “return” the system from “constructor” helper function that creates it:
#[derive(Default)]
struct MyConfig {
magic: usize,
}
// create a "constructor" function, which can initialize
// our data and move it into a closure that Bevy can run as a system
fn my_system_constructor() -> impl FnMut(Commands, Res<MyStuff>) {
// create the `MyConfig`
let config = MyConfig {
magic: 420,
};
// this is the actual system that bevy will run
move |mut commands, res| {
// we can use `config` here, the value from above will be "moved in"
// we can also use our system params: `commands`, `res`
}
}
fn main() {
App::new()
.add_plugins(DefaultPlugins)
// note the parentheses `()`
// we are calling the "constructor" we made above,
// which will return the actual system that gets added to bevy
.add_systems(Update, my_system_constructor())
.run();
}| Bevy Version: | 0.14 | (outdated!) |
|---|
This entire book is outdated and no longer maintained. I am keeping it online, in case anyone still finds any of the information in it useful. To adapt to newer versions of Bevy, please consult Bevy's migration guides.
Exclusive Systems
Exclusive systems are systems that Bevy will not run in parallel
with any other system. They can have full unrestricted access
to the whole ECS World, by taking a &mut World parameter.
Inside of an exclusive system, you have full control over all data stored in the ECS. You can do whatever you want.
Some example situations where exclusive systems are useful:
- Dump various entities and components to a file, to implement things like saving and loading of game save files, or scene export from an editor
- Directly spawn/despawn entities, or insert/remove resources, immediately with no delay (unlike when using Commands from a regular system)
- Run arbitrary systems and schedules with your own custom control flow logic
- …
See the direct World access page to learn more about how to do such things.
fn do_crazy_things(world: &mut World) {
// we can do anything with any data in the Bevy ECS here!
}You need to add exclusive systems to the App, just like regular systems. All scheduling APIs (ordering, run conditions, sets) are supported and work the same as with regular systems.
app.add_systems(Update,
do_crazy_things
.run_if(needs_crazy_things)
.after(do_regular_things)
.before(other_things)
);Exclusive System Parameters
There are a few other things, besides &mut World, that can be used as
parameters for exclusive systems:
&mut World: Full direct access to the ECS WorldLocal<T>: Data local to the system&mut SystemState<P>: Emulates a regular system, allowing you to easily access data from the World.Pare the system parameters.&mut QueryState<Q, F = ()>: Allows you to perform queries on the World, similar to aQueryin regular systems.
SystemState can be used to emulate a normal system. You can put regular
system parameters inside. This allows you to access the World as you would
from a normal system, but you can confine it to a specific scope inside your
function body, making it more flexible.
QueryState is the same thing, but for a single query. It is a simpler
alternative to SystemState for when you just need to be able to query for
some data.
use bevy::ecs::system::SystemState;
fn spawn_particles_for_enemies(
world: &mut World,
// behaves sort of like a query in a regular system
q_enemies: &mut QueryState<&Transform, With<Enemy>>,
// emulates a regular system with an arbitrary set of parameters
params: &mut SystemState<(
ResMut<MyGameSettings>,
ResMut<MyParticleTracker>,
Query<&mut Transform, With<Player>>,
EventReader<MyDamageEvent>,
// yes, even Commands ;)
Commands,
)>,
// local resource, just like in a regular system
mut has_run_once: Local<bool>,
) {
// note: unlike with a regular Query, we need to provide the world as an argument.
// The world will only be "locked" for the duration of this loop
for transform in q_enemies.iter(world) {
// TODO: do something with the transforms
}
// create a scope where we can access our things like a regular system
{
let (mut settings, mut tracker, mut q_player, mut evr, commands) =
params.get_mut(world);
// TODO: do things with our resources, query, events, commands, ...
}
// because our SystemState includes Commands,
// we must apply them when we are done
params.apply(world);
// we are now free to directly spawn entities
// because the World is no longer used by anything
// (the SystemState and the QueryState are no longer accessing it)
world.spawn_batch((0..10000) // efficiently spawn 10000 particles
.map(|_| SpriteBundle {
// ...
..Default::default()
})
);
// and, of course, we can use our Local
*has_run_once = true;
}Note: if your SystemState includes Commands, you must call .apply()
after you are done! That is when the deferred operations queued via
commands will be applied to the World.
Performance Considerations
Exclusive systems, by definition, limit parallelism and multi-threading, as nothing else can access the same ECS World while they run. The whole schedule needs to come to a stop, to accomodate the exclusive system. This can easily introduce a performance bottleneck.
Generally speaking, you should avoid using exclusive systems, unless you need to do something that is only possible with them.
On the other hand, if your alternative is to use commands, and you need to process a huge number of entities, exclusive systems are faster.
Commands is effectively just a way to ask Bevy do to exclusive World
access for you, at a later time. Going through the commands queue is much
slower than just doing the exclusive access yourself.
Some examples for when exclusive systems can be faster:
- You want to spawn/despawn a ton of entities.
- Example: Setup/cleanup for your whole game map.
- You want to do it every frame.
- Example: Managing hordes of enemies.
Some examples for when normal systems with Commands can be faster:
- You need to check some stuff every frame, but only use commands sometimes.
- Example: Despawn enemies when they reach 0 HP.
- Example: Spawn/despawn entities when timers finish.
- Example: Add/remove some UI elements depending on what is happening in-game.
| Bevy Version: | 0.13 | (outdated!) |
|---|
This entire book is outdated and no longer maintained. I am keeping it online, in case anyone still finds any of the information in it useful. To adapt to newer versions of Bevy, please consult Bevy's migration guides.
Direct World Access
(This page is WIP)
The World is where Bevy ECS stores all data and associated metadata. It
keeps track of resources, entities and components.
Typically, the App’s runner will run all schedules (which,
in turn, run their systems) on the main world. Regular
systems are limited in what data they can access from the world,
by their system parameter types. Operations that
manipulate the world itself are only done indirectly using
Commands. This is how most typical Bevy user code behaves.
However, there are also ways you can get full direct access to the world, which gives you full control and freedom to do anything with any data stored in the Bevy ECS:
- Exclusive systems
FromWorldimpls- Via the
Appbuilder - Manually created
Worlds for purposes like tests or scenes - Custom Commands
Direct world access lets you do things like:
- Freely spawn/despawn entities, insert/remove resources, etc., taking effect immediately
(no delay like when using
Commandsfrom a regular system) - Access any component, entities, and resources you want
- Manually run arbitrary systems or schedules
This is especially useful if you want to do things that do not fit within Bevy’s typical execution model/flow of just running systems once every frame.
With direct world access, you can implement custom control flow, like looping some systems multiple times, selecting different systems to run in different circumstances, exporting/importing data from files like scenes or game saves, …
Working with the World
Here are some ways that you can make use of the direct world access APIs.
SystemState
The easiest way to do things is using a SystemState.
This is a type that “imitates a system”, behaving the same way as a
system with various parameters would. All the same behaviors like
queries, change detection, and even
Commands are available. You can use any system
params.
It also tracks any persistent state, used for things like change
detection or caching to improve performance. Therefore,
if you plan on reusing the same SystemState multiple times, you should store
it somewhere, rather than creating a new one every time. Every time you call
.get(world), it behaves like another “run” of a system.
If you are using Commands, you can choose when you want to apply them to the
world. You need to manually call .apply(world) on the SystemState, to
apply them.
// TODO: write code exampleRunning a System
// TODO: write code exampleRunning a Schedule
If you want to run many systems (a common use-case is testing), the easiest way is to construct an impromptu schedule. This way you reuse all the scheduling logic that Bevy normally does when running systems. They will run with multithreading, etc.
This is also useful if you want custom control flow. For example, Bevy’s states and fixed timestep abstractions are implemented just like this! There is an exclusive system that can contain loops, if/else branching, etc. to implement fancy algorithms and run entire schedules of systems as appropriate!
// TODO: write code exampleNavigating by Metadata
The world contains a lot of metadata that allows navigating all the data efficiently, such as information about all the stored components, entities, archeypes.
// TODO: write code example| Bevy Version: | 0.13 | (outdated!) |
|---|
This entire book is outdated and no longer maintained. I am keeping it online, in case anyone still finds any of the information in it useful. To adapt to newer versions of Bevy, please consult Bevy's migration guides.
Schedules
See also: ECS Intro: Your Code, for a general overview of Bevy’s scheduling framework.
All systems to be run by Bevy are contained and organized using schedules. A schedule is a collection of systems, with metadata for how they should run, and an associated executor algorithm to run the systems.
A Bevy app has many different schedules for different purposes, to run them in different situations.
Scheduling Systems
If you want a system to be run by Bevy, you need to add it to a schedule via the app builder. Writing a new Rust function and forgetting to add it / register it with Bevy is a common mistake.
Whenever you add a system, you specify what schedule to put it in:
// add something to the Update schedule (runs every frame)
app.add_systems(Update, camera_movement);
// add something to the Startup schedule (runs once at app startup)
app.add_systems(Startup, setup_camera);Per-System Configuration
You can add metadata to your systems, to affect how they will be run.
This can include:
- Run Conditions to control if a system should run
- Ordering Dependencies, if a system should run before/after specific other systems in the same schedule
- System Sets to group systems together, so common configuration can be applied to all of them
When the schedule runs, the executor algorithm will honor all of this configuration when determining if a system is ready to run. A system is ready when all of the following is true:
- No other currently-running system is accessing any of the same data mutably (as per the system parameters)
- All of the systems ordered “before” have finished or have been skipped due to run conditions
- The system’s run conditions all return true
When a system becomes ready, it will be run on an available CPU thread. Systems run in a non-deterministic order by default! A system might run at different times every frame. If you care about its relationship to other systems, add ordering dependencies.
Dynamically Adding/Removing Systems
Bevy’s schedules do not (yet?) support adding and removing systems at runtime. You need to configure everything ahead of time.
You should add all systems you might want to run, and then control them using run conditions. That is the mechanism for disabling them if they shouldn’t run.
Bevy’s App Structure
Bevy has three primary/foundational schedules: Main, Extract, Render.
There are also other schedules, which are managed and run within Main.
In a normal Bevy app, the Main+Extract+Render schedules are run repeatedly
in a loop. Together, they produce one frame of your game. Every time Main
runs, it runs a sequence of other schedules. On its first run, it also first
runs a sequence of “startup” schedules.
Most Bevy users only have to deal with the sub-schedules of Main.
Extract and Render are only relevant to graphics developers who want to
develop new/custom rendering features for the engine. This page is only focused
on Main. If you want to learn more about Extract and Render, see
this page about Bevy’s rendering architecture.
The Main Schedule
Main is where all the application logic runs. It is a sort of meta-schedule,
whose job is to run other schedules in a specific order. You should not add any
custom systems directly to Main. You should add your systems to the various
schedules managed by Main.
Bevy provides the following schedules, to organize all the systems:
First,PreUpdate,StateTransition,RunFixedMainLoop,Update,PostUpdate,Last- These schedules are run by
Mainevery time it runs
- These schedules are run by
PreStartup,Startup,PostStartup- These schedules are run by
Mainonce, the first time it runs
- These schedules are run by
FixedMain- The fixed timestep equivalent of the
Mainschedule. - Run by
RunFixedMainLoopas many times as needed, to catch up to the fixed timestep interval.
- The fixed timestep equivalent of the
FixedFirst,FixedPreUpdate,FixedUpdate,FixedPostUpdate,FixedLast- The fixed timestep equivalents of the
Mainsub-schedules.
- The fixed timestep equivalents of the
OnEnter(…)/OnExit(…)/OnTransition(…)- These schedules are run by
StateTransitionon state changes
- These schedules are run by
The intended places for most user systems (your game logic) are Update,
FixedUpdate, Startup, and the state transition schedules.
Update is for your usual game logic that should run every frame. Startup is
useful to perform initialization tasks, before the first normal frame update
loop. FixedUpdate is if you want to use a fixed timestep.
The other schedules are intended for engine-internal functionality. Splitting them like that ensures that Bevy’s internal engine systems will run correctly with respect to your systems, without any configuration on your part. Remember: Bevy’s internals are implemented using ordinary systems and ECS, just like your own stuff!
If you are developing plugins to be used by other people, you might be
interested in adding functionality to PreUpdate/PostUpdate (or the Fixed
equivalents), so it can run alongside other “engine systems”. Also consider
PreStartup and PostStartup if you have startup systems that should be
separated from your users’ startup systems.
First and Last exist only for special edge cases, if you really need to
ensure something runs before/after everything else, including all the normal
“engine-internal” code.
Configuring Schedules
Bevy also offers some features that can be configured at the schedule level.
Single-Threaded Schedules
If you consider multi-threading to not be working well for you, for whatever reason, you can disable it per-schedule.
In a single-threaded schedule, systems will run one at a time, on the main thread. However, the same “readiness” algorithm is still applied and so systems can run in an undefined order. You should still specify ordering dependencies where you need determinism.
// Make FixedUpdate run single-threaded
app.edit_schedule(FixedUpdate, |schedule| {
schedule.set_executor_kind(ExecutorKind::SingleThreaded);
// or alternatively: Simple will apply Commands after every system
schedule.set_executor_kind(ExecutorKind::Simple);
});Ambiguity Detection
The Ambiguity Detector is an optional Bevy feature that can help you debug issues related to non-determinism.
// Enable ambiguity warnings for the Update schedule
app.edit_schedule(Update, |schedule| {
schedule.set_build_settings(ScheduleBuildSettings {
ambiguity_detection: LogLevel::Warn,
..default()
});
});It will print warnings for any combination of systems where at least one of them accesses some piece of data (resource or component) mutably, but the others don’t have explicit ordering dependencies on that system.
Such situations might indicate a bug, because you don’t know if the systems that read the data would run before or after the system that mutates the data.
It is up to you to decide if you care about this, on a case-by-case basis.
Deferred Application
Normally, Bevy will automatically manage where Commands and other deferred operations get applied. If systems have ordering dependencies on one another, Bevy will make sure to apply any pending deferred operations from the first system before the second system runs.
If you would like to disable this automatic behavior and manually manage the sync points, you can do that.
app.edit_schedule(Update, |schedule| {
schedule.set_build_settings(ScheduleBuildSettings {
auto_insert_apply_deferred: false,
..default()
});
});Now, to manually create sync points, add special [apply_deferred] systems
where you like them:
app.add_systems(
Update,
apply_deferred
.after(MyGameplaySet)
.before(MyUiSet)
);
app.add_systems(Update, (
(
system_a,
apply_deferred,
system_b,
).chain(),
));Main Schedule Configuration
The order of schedules to be run by Main every frame is configured in the
MainScheduleOrder resource. For advanced use cases, if Bevy’s
predefined schedules don’t work for your needs, you can change it.
Creating a New Custom Schedule
As an example, let’s say we want to add an additional schedule, that runs every
frame (like Update), but runs before fixed timestep.
First, we need to create a name/label for our new schedule, by creating a Rust
type (a struct or enum) and deriving ScheduleLabel + an assortment of
required standard Rust traits.
#[derive(ScheduleLabel, Debug, Clone, PartialEq, Eq, Hash)]
struct PrepareUpdate;Now, we can init the schedule in the app, add it to
MainScheduleOrder to make it run every frame where we like it, and add some
systems to it!
// Ensure the schedule has been created
// (this is technically optional; Bevy will auto-init
// the schedule the first time it is used)
app.init_schedule(PrepareUpdate);
// Add it to the MainScheduleOrder so it runs every frame
// as part of the Main schedule. We want our PrepareUpdate
// schedule to run after StateTransition.
app.world.resource_mut::<MainScheduleOrder>()
.insert_after(StateTransition, PrepareUpdate);
// Now we can add some systems to our new schedule!
app.add_systems(PrepareUpdate, (
my_weird_custom_stuff,
));| Bevy Version: | 0.13 | (outdated!) |
|---|
This entire book is outdated and no longer maintained. I am keeping it online, in case anyone still finds any of the information in it useful. To adapt to newer versions of Bevy, please consult Bevy's migration guides.
System Order of Execution
Bevy’s scheduling algorithm is designed to deliver maximum performance by running as many systems as possible in parallel across the available CPU threads.
This is possible when the systems do not conflict over the data they need to access. However, when a system needs to have mutable (exclusive) access to a piece of data, other systems that need to access the same data cannot be run at the same time. Bevy determines all of this information from the system’s function signature (the types of the parameters it takes).
In such situations, the order is nondeterministic by default. Bevy takes no regard for when each system will run, and the order could even change every frame!
Explicit System Ordering
If a specific system must always run before or after some other systems, you can add ordering constraints:
fn main() {
let mut app = App::new();
app.add_systems(Update, (
enemy_movement,
input_handling,
player_movement
// `player_movement` must always run before `enemy_movement`
.before(enemy_movement)
// `player_movement` must always run after `input_handling`
.after(input_handling),
// order doesn't matter for some systems:
particle_effects,
npc_behaviors,
// we can apply ordering to multiple systems at once:
(
spawn_monsters,
spawn_zombies,
spawn_spiders,
).before(enemy_movement),
// to run a sequence of systems in order, use `.chain()`
// (this is just syntax sugar to automatically add
// before/after dependencies between the systems in the tuple)
(
spawn_particles,
animate_particles,
debug_particle_statistics,
).chain()
));When you have a lot of systems that you need to configure, it can start to get unwieldy. Consider using system sets to organize and manage your systems.
Does it even matter?
In many cases, you don’t need to worry about this.
However, sometimes you need to rely on specific systems to run in a particular order. For example:
- Maybe the logic you wrote in one of your systems needs any modifications done to that data by another system to always happen first?
- One system needs to receive events sent by another system.
- You are using change detection.
In such situations, systems running in the wrong order typically causes their behavior to be delayed until the next frame. In rare cases, depending on your game logic, it may even result in more serious logic bugs!
It is up to you to decide if this is important.
With many things in typical games, such as juicy visual effects, it probably doesn’t matter if they get delayed by a frame. It might not be worthwhile to bother with it. If you don’t care, leaving the order ambiguous may also result in better performance.
On the other hand, for things like handling the player input controls, this would result in annoying lag or worse, so you should probably fix it.
Circular Dependencies
If you have multiple systems mutually depending on each other, then it is clearly impossible to resolve the situation completely like that.
You should try to redesign your game to avoid such situations, or just accept the consequences. You can at least make it behave predictably, using explicit ordering to specify the order you prefer.
| Bevy Version: | 0.13 | (outdated!) |
|---|
This entire book is outdated and no longer maintained. I am keeping it online, in case anyone still finds any of the information in it useful. To adapt to newer versions of Bevy, please consult Bevy's migration guides.
Run Conditions
Run Conditions (RC) are a mechanism for controlling if Bevy should run specific systems, at runtime. This allows you to enable/disable systems on-demand, so that they only run sometimes.
RCs are Rust functions that return a value of type bool. They can accept
any system parameters, like a normal system, but
they must all be read-only (immutable).
fn run_if_player_alive(
q_player: Query<&Health, With<Player>>,
) -> bool {
let health = q_player.single();
health.hp > 0.0
}
fn run_if_connected(
mode: Res<MyMultiplayerMode>,
session: Res<MyNetworkSession>,
) -> bool
{
*mode != MyMultiplayerMode::Local && session.is_connected()
}
fn run_if_enemies_present(
q_enemies: Query<(), With<Enemy>>,
) -> bool {
!q_enemies.is_empty()
}RCs can be applied to individual systems or to entire system sets.
app.configure_sets(Update,
MyPlayerSet
.run_if(run_if_player_alive)
);
app.add_systems(Update, (
player_input,
player_movement,
player_alert_enemies
.run_if(run_if_enemies_present)
).in_set(MyPlayerSet));
app.add_systems(Update,
manage_multiplayer_server
.run_if(run_if_connected)
);When applied to a single system, Bevy will evaluate the RC at the last moment, right before the system would otherwise be ready to run. If you add the same RC to multiple systems, Bevy will evaluate it separately for each one.
When applied to a set, the run condition will only be evaluated once, before Bevy runs any system from the set, and if it returns false, the entire set will be skipped.
Any given system can be governed by any number of RCs. You can add multiple RCs
to one system, and it will also inherit the RCs of any sets
it belongs to. Bevy will evaluate all the RCs, and the system will only run
if all of them return true.
Common Conditions
Bevy provides some built-in RCs for some common scenarios, that you can just apply to your systems:
- ECS common conditions:
- Input common conditions:
- For input handling: running on key/button press/release.
- Time common conditions:
- For controlling systems based on time: repeating on a timer, running after a delay, etc…
Known Pitfalls
When receiving events in systems that don’t run every frame update, you can miss some events that are sent while the receiving systems are not running!
To mitigate this, you could implement a custom cleanup strategy, to manually manage the lifetime of the relevant event types.
| Bevy Version: | 0.13 | (outdated!) |
|---|
This entire book is outdated and no longer maintained. I am keeping it online, in case anyone still finds any of the information in it useful. To adapt to newer versions of Bevy, please consult Bevy's migration guides.
System Sets
System Sets allow you to easily apply common properties to multiple systems, such as ordering and run conditions.
Anything you add to the set will automatically be applied to all systems belonging to the set.
A system can belong to multiple different sets, and will inherit all the properties from all of them. You can also add additional properties to individual systems.
All of this combined gives you a lot of flexibility and control over how your systems run.
Anonymous Sets
The simplest kind of system set is when you just add a tuple of
multiple systems using .add_systems.
app.add_systems(
Update,
(
system_a,
system_b,
system_c
)
.run_if(common_run_condition)
.after(some_system)
);This syntax is useful when you just want to apply some common configuration to multiple systems.
Named Sets
This is the more formal and powerful way to use system sets.
You can create a Rust type (struct or enum) to serve as a label/identifier,
so you can refer to the set from different places.
For a single set, create an empty struct. If you need to create multiple
related sets, create an enum. Every variant of the enum is a separate system
set.
You need to derive SystemSet + an assortment of required standard Rust traits:
#[derive(SystemSet, Debug, Clone, PartialEq, Eq, Hash)]
struct MyAudioSet;
#[derive(SystemSet, Debug, Clone, PartialEq, Eq, Hash)]
struct MyInputSet;
#[derive(SystemSet, Debug, Clone, PartialEq, Eq, Hash)]
enum MyInputKindSet {
Touch,
Mouse,
Gamepad,
}
#[derive(SystemSet, Debug, Clone, PartialEq, Eq, Hash)]
enum MyGameplaySet {
Player,
Enemies,
}Now, you can apply the set to your systems using .in_set():
app.add_systems(Update, (
(
play_music
.run_if(music_enabled),
play_ui_sounds,
).in_set(MyAudioSet),
(
player_movement,
player_animation
.after(player_movement),
player_level_up,
player_footsteps
.in_set(MyAudioSet),
).in_set(MyGameplaySet::Player),
(
enemy_movement,
enemy_ai
.after(MyGameplaySet::Player),
enemy_footsteps
.in_set(MyAudioSet),
).in_set(MyGameplaySet::Enemies),
(
(
mouse_cursor_tracking,
mouse_clicks,
).in_set(MyInputKindSet::Mouse),
(
gamepad_cursor_tracking,
gamepad_buttons,
).in_set(MyInputKindSet::Gamepad),
(
touch_gestures,
).in_set(MyInputKindSet::Touch),
).in_set(MyInputSet),
));You can add run conditions and ordering
dependencies on your set using .configure_sets:
app.configure_sets(Update, (
MyAudioSet
.run_if(audio_enabled),
MyGameplaySet::Player
.after(MyInputSet)
.run_if(player_is_alive),
MyGameplaySet::Enemies
.run_if(enemies_present),
MyInputKindSet::Touch
.run_if(touchscreen_enabled),
MyInputKindSet::Mouse
.run_if(mouse_enabled),
MyInputKindSet::Gamepad
.run_if(gamepad_connected),
));The main use case of named system sets is for logical organization, so that you can manage your systems and refer to the whole group.
Some examples:
- A set for all your audio-related systems, so you can disable them all if sound is muted.
- A set for all your touchscreen input systems, so you can disable them all if there is no touchscreen.
- A set for all your input handling systems, so you can order them to run before gameplay systems.
- A set for all your gameplay systems, so that they only run during the in-game state.
With Plugins
Named sets are also very useful together with plugins. When you are writing
a plugin, you can expose (make pub) some system set types, to allow users of your
plugin to control how things in your plugin run, or how their things run in relation to
your plugin. This way, you don’t have to expose any of your individual systems.
Some examples:
- You are making a physics plugin. Make a set for your whole plugin, so your users can easily order their systems to run before/after physics. They can also easily control whether your physics runs at all, by adding an extra run condition to your set.
- You are using plugins for internal organization in your project. You have an UI plugin. Create a system set for the systems that need to update UI state from gameplay state, so that you can easily add ordering dependencies between UI and gameplay. Other plugins / places in your code now don’t need to know about the internals of your UI plugin.
Common Pitfalls
WARNING! System set configuration is stored per-schedule! Notice how
we had to specify .configure_sets(Update, ...). It can be very easy to configure your
sets once and then just assume you can use them anywhere, but that is not true.
If you try to use them in a schedule other than the one where you configured them, your code will compile and run (Bevy silently initializes the sets in each schedule), but will not work correctly, as they will not have any of your configurations.
Some common scenarios where this can occur:
- You configure your set in
Updateand try to also use it inFixedUpdate, or vice versa. - You try to use your sets in the
OnEnter/OnExitschedules of various app states. - You add a system to
PostUpdateorPreUpdate.
| Bevy Version: | 0.13 | (outdated!) |
|---|
This entire book is outdated and no longer maintained. I am keeping it online, in case anyone still finds any of the information in it useful. To adapt to newer versions of Bevy, please consult Bevy's migration guides.
States
Relevant official examples:
state.
States allow you to structure the runtime “flow” of your app.
This is how you can implement things like:
- A menu screen or a loading screen
- Pausing / unpausing the game
- Different game modes
- …
In every state, you can have different systems running. You can also add setup and cleanup systems to run when entering or exiting a state.
To use states, first define an enum type. You need to derive
States + an assortment of required standard Rust traits:
#[derive(States, Debug, Clone, PartialEq, Eq, Hash)]
enum MyAppState {
LoadingScreen,
MainMenu,
InGame,
}
#[derive(States, Default, Debug, Clone, PartialEq, Eq, Hash)]
enum MyGameModeState {
#[default]
NotInGame,
Singleplayer,
Multiplayer,
}
#[derive(States, Default, Debug, Clone, PartialEq, Eq, Hash)]
enum MyPausedState {
#[default]
Paused,
Running,
}Note: you can have multiple orthogonal states! Create multiple types if you want to track multiple things independently!
You then need to register the state type(s) in the app builder:
// Specify the initial value:
app.insert_state(MyAppState::LoadingScreen);
// Or use the default (if the type impls Default):
app.init_state::<MyGameModeState>();
app.init_state::<MyPausedState>();Running Different Systems for Different States
If you want some systems to only run in specific states,
Bevy offers an in_state run condition. Add it
to your systems. You probably want to create system sets
to help you group many systems and control them at once.
// configure some system sets to help us manage our systems
// (note: it is per-schedule, so we also need it for FixedUpdate
// if we plan to use fixed timestep)
app.configure_sets(Update, (
MyMainMenuSet
.run_if(in_state(MyAppState::MainMenu)),
MyGameplaySet
// note: you can check for a combination of different states
.run_if(in_state(MyAppState::InGame))
.run_if(in_state(MyPausedState::Running)),
));
app.configure_sets(FixedUpdate, (
// configure the same set here, so we can use it in both
// FixedUpdate and Update
MyGameplaySet
.run_if(in_state(MyAppState::InGame))
.run_if(in_state(MyPausedState::Running)),
// configure a bunch of different sets only for FixedUpdate
MySingleplayerSet
// inherit configuration from MyGameplaySet and add extras
.in_set(MyGameplaySet)
.run_if(in_state(MyGameModeState::Singleplayer)),
MyMultiplayerSet
.in_set(MyGameplaySet)
.run_if(in_state(MyGameModeState::Multiplayer)),
));
// now we can easily add our different systems
app.add_systems(Update, (
update_loading_progress_bar
.run_if(in_state(MyAppState::LoadingScreen)),
(
handle_main_menu_ui_input,
play_main_menu_sounds,
).in_set(MyMainMenuSet),
(
camera_movement,
play_game_music,
).in_set(MyGameplaySet),
));
app.add_systems(FixedUpdate, (
(
player_movement,
enemy_ai,
).in_set(MySingleplayerSet),
(
player_net_sync,
enemy_net_sync,
).in_set(MyMultiplayerSet),
));
// of course, if we need some global (state-independent)
// setup to run on app startup, we can still use Startup as usual
app.add_systems(Startup, (
load_settings,
setup_window_icon,
));Bevy also creates special OnEnter, OnExit,
and OnTransition schedules for each
possible value of your state type. Use them to perform setup and cleanup for
specific states. Any systems you add to them will run once every time the state
is changed to/from the respective values.
// do the respective setup and cleanup on state transitions
app.add_systems(OnEnter(MyAppState::LoadingScreen), (
start_load_assets,
spawn_progress_bar,
));
app.add_systems(OnExit(MyAppState::LoadingScreen), (
despawn_loading_screen,
));
app.add_systems(OnEnter(MyAppState::MainMenu), (
setup_main_menu_ui,
setup_main_menu_camera,
));
app.add_systems(OnExit(MyAppState::MainMenu), (
despawn_main_menu,
));
app.add_systems(OnEnter(MyAppState::InGame), (
spawn_game_map,
setup_game_camera,
spawn_enemies,
));
app.add_systems(OnEnter(MyGameModeState::Singleplayer), (
setup_singleplayer,
));
app.add_systems(OnEnter(MyGameModeState::Multiplayer), (
setup_multiplayer,
));
// ...With Plugins
This can also be useful with Plugins. You can set up all the state types for your project in one place, and then your different plugins can just add their systems to the relevant states.
You can also make plugins that are configurable, so that it is possible to specify what state they should add their systems to:
pub struct MyPlugin<S: States> {
pub state: S,
}
impl<S: States> Plugin for MyPlugin<S> {
fn build(&self, app: &mut App) {
app.add_systems(Update, (
my_plugin_system1,
my_plugin_system2,
// ...
).run_if(in_state(self.state.clone())));
}
}Now you can configure the plugin when adding it to the app:
app.add_plugins(MyPlugin {
state: MyAppState::InGame,
});When you are just using plugins to help with internal organization of your project, and you know what systems should go into each state, you probably don’t need to bother with making the plugin configurable as shown above. Just hardcode the states / add things to the correct states directly.
Controlling States
Inside of systems, you can check the current state using the
State<T> resource:
fn debug_current_gamemode_state(state: Res<State<MyGameModeState>>) {
eprintln!("Current state: {:?}", state.get());
}To change to another state, you can use the NextState<T>:
fn toggle_pause_game(
state: Res<State<MyPausedState>>,
mut next_state: ResMut<NextState<MyPausedState>>,
) {
match state.get() {
MyPausedState::Paused => next_state.set(MyPausedState::Running),
MyPausedState::Running => next_state.set(MyPausedState::Paused),
}
}
// if you have multiple states that must be set correctly,
// don't forget to manage them all
fn new_game_multiplayer(
mut next_app: ResMut<NextState<MyAppState>>,
mut next_mode: ResMut<NextState<MyGameModeState>>,
) {
next_app.set(MyAppState::InGame);
next_mode.set(MyGameModeState::Multiplayer);
}This will queue up state transitions to be performed during the next frame update cycle.
State Transitions
Every frame update, a schedule called
StateTransition runs. There, Bevy will check if
any new state is queued up in NextState<T> and perform
the transition for you.
The transition involves several steps:
- A
StateTransitionEventevent is sent. - The
OnExit(old_state)schedule is run. - The
OnTransition { from: old_state, to: new_state }schedule is run. - The
OnEnter(new_state)schedule is run.
StateTransitionEvent is useful in any systems that run
regardless of state, but want to know if a transition has occurred. You can use
it to detect state transitions.
The StateTransition schedule runs after PreUpdate (which
contains Bevy engine internals), but before FixedMain (fixed
timestep) and Update, where your game’s
systems usually live.
Therefore, state transitions happen before your game logic for the current frame.
If doing state transitions once per frame is not enough for you, you can add
additional transition points, by adding Bevy’s apply_state_transition
system wherever you like.
// Example: also do state transitions for MyPausedState
// before MyGameplaySet on each fixed timestep run
app.add_systems(
FixedUpdate,
apply_state_transition::<MyPausedState>
.before(MyGameplaySet)
);Known Pitfalls
System set configuration is per-schedule!
This is the same general caveat that applies any time you configure system sets.
Note that app.configure_sets() is per-schedule! If you configure some sets
in one schedule, that configuration does not carry over to other schedules.
Because states are so schedule-heavy, you have to be especially careful. Don’t assume that just because you configured a set, you can use it anywhere.
For example, your sets from Update and FixedUpdate will not work in
OnEnter/OnExit for your various state transitions.
Events
This is the same general caveat that applies to any systems with run conditions that want to receive events.
When receiving events in systems that don’t run all the time, such as during a pause state, you will miss any events that are sent while when the receiving systems are not running!
To mitigate this, you could implement a custom cleanup strategy, to manually manage the lifetime of the relevant event types.
| Bevy Version: | 0.13 | (outdated!) |
|---|
This entire book is outdated and no longer maintained. I am keeping it online, in case anyone still finds any of the information in it useful. To adapt to newer versions of Bevy, please consult Bevy's migration guides.
Change Detection
Relevant official examples:
component_change_detection.
Bevy allows you to easily detect when data is changed. You can use this to perform actions in response to changes.
One of the main use cases is optimization – avoiding unnecessary work by only doing it if the relevant data has changed. Another use case is triggering special actions to occur on changes, like configuring something or sending the data somewhere.
Components
Filtering
You can make a query that only yields entities if specific components on them have been modified.
Use query filters:
Added<T>: detect new component instances- if the component was added to an existing entity
- if a new entity with the component was spawned
Changed<T>: detect component instances that have been changed- triggers when the component is mutated
- also triggers if the component is newly-added (as per
Added)
(If you want to react to removals, see removal detection. It works differently.)
/// Print the stats of friendly players when they change
fn debug_stats_change(
query: Query<
// components
(&Health, &PlayerXp),
// filters
(Without<Enemy>, Or<(Changed<Health>, Changed<PlayerXp>)>),
>,
) {
for (health, xp) in query.iter() {
eprintln!(
"hp: {}+{}, xp: {}",
health.hp, health.extra, xp.0
);
}
}
/// detect new enemies and print their health
fn debug_new_hostiles(
query: Query<(Entity, &Health), Added<Enemy>>,
) {
for (entity, health) in query.iter() {
eprintln!("Entity {:?} is now an enemy! HP: {}", entity, health.hp);
}
}Checking
If you want to access all the entities, as normal, regardless of if they have
been modified, but you just want to know if a component has been changed,
you can use special [Ref<T>] query parameters instead of & for immutable access.
For mutable access, the change detection methods are always available (because
Bevy queries actually return a special Mut<T> type whenever you have &mut
in the query).
/// Make sprites flash red on frames when the Health changes
fn debug_damage(
mut query: Query<(&mut Sprite, Ref<Health>)>,
) {
for (mut sprite, health) in query.iter_mut() {
// detect if the Health changed this frame
if health.is_changed() {
eprintln!("HP is: {}", health.hp);
// we can also check if the sprite has been changed
if !sprite.is_changed() {
sprite.color = Color::RED;
}
}
}
}Resources
For resources, change detection is provided via methods on the
Res<T>/ResMut<T> system parameters.
fn check_res_changed(
my_res: Res<MyResource>,
) {
if my_res.is_changed() {
// do something
}
}
fn check_res_added(
// use Option, not to panic if the resource doesn't exist yet
my_res: Option<Res<MyResource>>,
) {
if let Some(my_res) = my_res {
// the resource exists
if my_res.is_added() {
// it was just added
// do something
}
}
}What gets detected?
Changed detection is triggered by DerefMut. Simply accessing
components via a mutable query, or
resources via ResMut, without actually performing a &mut
access, will not trigger it. This makes change detection quite accurate.
Note: if you call a Rust function that takes a &mut T (mutable borrow),
that counts! It will trigger change detection even if the function does
not actually do any mutation. Be careful with helper functions!
Also, when you mutate a component, Bevy does not check if the new value is actually different from the old value. It will always trigger the change detection. If you want to avoid that, simply check it yourself:
fn update_player_xp(
mut query: Query<&mut PlayerXp>,
) {
for mut xp in query.iter_mut() {
let new_xp = maybe_lvl_up(&xp);
// avoid triggering change detection if the value is the same
if new_xp != *xp {
*xp = new_xp;
}
}
}Change detection works on a per-system granularity, and is reliable. A system will detect changes only if it has not seen them before (the changes happened since the last time it ran).
Unlike events, you do not have to worry about missing changes If your system only runs sometimes (such as when using states or run conditions).
Possible Pitfalls
Beware of frame delay / 1-frame-lag. This can occur if Bevy runs the detecting system before the changing system. The detecting system will see the change the next time it runs, typically on the next frame update.
If you need to ensure that changes are handled immediately / during the same frame, you can use explicit system ordering.
Removal Detection
Relevant official examples:
removal_detection.
Removal detection is special. This is because, unlike with change detection, the data does not exist in the ECS anymore (obviously), so Bevy cannot keep tracking metadata for it.
Nevertheless, being able to respond to removals is important for some applications, so Bevy offers a limited form of it.
Components
You can check for components that have been removed during the current frame. The data is cleared at the end of every frame update. You must make sure your detecting system is ordered after (or is in another schedule that runs after) the system that does the removing.
Note: removal detection also includes despawned entities!
Use the RemovedComponents<T> special system parameter type. Internally, it
is implemented using events and behaves like an EventReader,
but it gives you the Entity IDs of entities whose component T was removed.
fn detect_removals(
mut removals: RemovedComponents<EnemyIsTrackingPlayer>,
// ... (maybe Commands or a Query ?) ...
) {
for entity in removals.read() {
// do something with the entity
eprintln!("Entity {:?} had the component removed.", entity);
}
}(To do things with these entities, you can just use the Entity IDs with
Commands::entity() or Query::get().)
Resources
Bevy does not provide any API for detecting when resources are removed.
You can work around this using Option and a separate Local
system parameter, effectively implementing your own detection.
fn detect_removed_res(
my_res: Option<Res<MyResource>>,
mut my_res_existed: Local<bool>,
) {
if let Some(my_res) = my_res {
// the resource exists!
// remember that!
*my_res_existed = true;
// (... you can do something with the resource here if you want ...)
} else if *my_res_existed {
// the resource does not exist, but we remember it existed!
// (it was removed)
// forget about it!
*my_res_existed = false;
// ... do something now that it is gone ...
}
}Note that, since this detection is local to your system, it does not have to happen during the same frame update.
| Bevy Version: | 0.14 | (outdated!) |
|---|
This entire book is outdated and no longer maintained. I am keeping it online, in case anyone still finds any of the information in it useful. To adapt to newer versions of Bevy, please consult Bevy's migration guides.
One-Shot Systems
One-Shot Systems are systems that you intend to call yourself, whenever you want. For example: on a button press, upon triggering a special item or ability in your game, etc…
fn item_handler_health(
mut q_player: Query<&mut Health, With<Player>>,
) {
let mut health = q_player.single_mut();
health.hp += 25.0;
}
fn item_handler_magic_potion(
mut evw_magic: EventWriter<MyMagicEvent>,
mut commands: Commands,
) {
evw_magic.send(MyMagicEvent::Sparkles);
commands.spawn(MySparklesBundle::default());
}Registration
You should not add these systems to a schedule.
Instead, you can register them into the World, to get a SystemId.
You can then store that SystemId somewhere and use it to run the
system later.
The most convenient way is probably to use FromWorld and put your
SystemIds in a resource:
/// For this simple example, we will just organize our systems
/// using string keys in a hash map.
#[derive(Resource)]
struct MyItemSystems(HashMap<String, SystemId>);
impl FromWorld for MyItemSystems {
fn from_world(world: &mut World) -> Self {
let mut my_item_systems = MyItemSystems(HashMap::new());
my_item_systems.0.insert(
"health".into(),
world.register_system(item_handler_health)
);
my_item_systems.0.insert(
"magic".into(),
world.register_system(item_handler_magic_potion)
);
my_item_systems
}
}app.init_resource::<MyItemSystems>();Alternative: register from an exclusive system:
Code:
fn register_item_handler_systems(world: &mut World) {
let mut my_item_systems = MyItemSystems(HashMap::new());
my_item_systems.0.insert(
"health".into(),
world.register_system(item_handler_health)
);
my_item_systems.0.insert(
"magic".into(),
world.register_system(item_handler_magic_potion)
);
world.insert_resource(my_item_systems);
}app.add_systems(Startup, register_item_handler_systems);Or from the app builder:
Code:
fn my_plugin(app: &mut App) {
let mut my_item_systems = MyItemSystems(HashMap::new());
my_item_systems.0.insert(
"health".into(),
app.register_system(item_handler_health)
);
my_item_systems.0.insert(
"magic".into(),
app.register_system(item_handler_magic_potion)
);
app.insert_resource(my_item_systems);
}Running
The easiest way is using Commands (Commands):
fn trigger_health_item(
mut commands: Commands,
systems: Res<MyItemSystems>,
) {
// TODO: do some logic to implement picking up the health item
let id = systems.0["health"];
commands.run_system(id);
}This queues up the system to be run later, whenever Bevy decides to apply the Commands.
If you want to run a one-shot system immediately, like a normal function
call, you need direct World access. Do it from an exclusive
system:
fn trigger_magic_item(world: &mut World) {
// TODO: do some logic to implement picking up the magic item
let id = world.resource::<MyItemSystems>().0["magic"];
world.run_system(id).expect("Error Running Oneshot System");
// Since we are in an exclusive system, we can expect
// the magic potion to now be in effect!
}Either way, the one-shot system’s Commands are automatically applied immediately when it runs.
Without Registration
It is possible to also run one-shot systems without registering them beforehand:
world.run_system_once(my_oneshot_system_fn);If you do this, Bevy is unable to store any data related to the system:
- Locals will not retain their value from a previous run.
- Queries will not be able to cache their lookups, leading to slower performance.
- etc…
It is therefore recommended to register your one-shot systems, unless you really only intend to run them once.
Performance Considerations
To run a one-shot system, exclusive World access is required. The
system can have arbitrary parameters, and Bevy cannot validate its data
access against other systems, like it does when the system is part of a
schedule. So, no multi-threading allowed.
In practice, this isn’t usually a problem, because the use cases for one-shot systems are things that happen rarely.
But maybe don’t overuse them! If something happens regularly, consider doing it from a normal system that is part of a schedule, and controlling it with run conditions instead.
| Bevy Version: | 0.14 | (outdated!) |
|---|
This entire book is outdated and no longer maintained. I am keeping it online, in case anyone still finds any of the information in it useful. To adapt to newer versions of Bevy, please consult Bevy's migration guides.
Internal Parallelism
Internal parallelism is multithreading within a system.
The usual multithreading in Bevy is to run each system in parallel when possible (when there is no conflicting data access with other systems). This is called “external parallelism”.
However, sometimes, you need to write a system that has to process a huge number of entities or events. In that case, simple query or event iteration would not scale to make good use of the CPU.
Bevy offers a solution: parallel iteration. Bevy will automatically split all the entities/events into appropriately-sized batches, and iterate each batch on a separate CPU thread for you, calling a function/closure you provide.
If there are only a few entities/events, Bevy will automatically fall back to single-threaded iteration, and it will behave the same way as if you had just iterated normally. With a few entities/events, that is faster than multi-threading.
Even through parallel iteration should automatically make a good decision regardless of the number of entities/events, it is more awkward to use and not always suitable, as you have to do everything from inside a closure and there are other limitations.
Also, if your system is unlikely to ever encounter huge numbers of entities/events, don’t bother with it and just iterate your queries and events normally.
Parallel Query Iteration
Queries support parallel iteration to let you process many entities across multiple CPU threads.
fn my_particle_physics(
mut q_particles: Query<(&mut Transform, &MyParticleState), With<MyParticle>>,
) {
q_particles.par_iter_mut().for_each(|(mut transform, my_state)| {
my_state.move_particle(&mut transform);
});
}One limitation of parallel iteration is that safe Rust does not allow you to
share &mut access across CPU threads. Therefore, it is not possible to mutate
any data outside of the current entity’s own components.
If you need to mutate shared data, you could use something like Mutex,
but beware of the added overhead. It could easily drown out any benefits
you get from parallel iteration.
Parallel Commands
If you need to use commands, there is the ParallelCommands
system parameter. It allows you to get access to Commands from within
the parallel iteration closure.
fn my_particle_timers(
time: Res<Time>,
mut q_particles: Query<(Entity, &mut MyParticleState), With<MyParticle>>,
par_commands: ParallelCommands,
) {
q_particles.par_iter_mut().for_each(|(e_particle, mut my_state)| {
my_state.timer.tick(time.delta());
if my_state.timer.finished() {
par_commands.command_scope(|mut commands| {
commands.entity(e_particle).despawn();
})
}
});
}However, generally speaking, commands are an inefficient way to do things in Bevy, and they do not scale well to huge numbers of entities. If you need to spawn/despawn or insert/remove components on huge numbers of entities, you should probably do it from an exclusive system, instead of using commands.
In the above example, we update timers stored across many entities, and use commands to despawn any entities whose time has elapsed. It is a good use of commands, because the timers need to be ticked for all entities, but only a few entities are likely to need despawning at once.
Parallel Event Iteration
EventReader<T> offers parallel iteration for events,
allowing you to process a huge number of events across multiple CPU threads.
fn handle_many_events(
mut evr: EventReader<MyEvent>,
) {
evr.par_read().for_each(|ev| {
// TODO: do something with `ev`
});
}However, one downside is that you cannot use it for events that need to be handled in order. With parallel iteration, the order becomes undefined.
Though, if you use .for_each_with_id, your closure will
be given an EventId, which is a sequential index to indicate which event
you are currently processing. That can help you know where you are in the
event queue, even though you are still processing events in an undefined order.
Another downside is that typically you need to be able to mutate some data in response to events, but, in safe Rust, it is not possible to share mutable access to anything across CPU threads. Thus, parallel event handling is impossible for most use cases.
If you were to use something like Mutex for shared access to data, the
synchronization overhead would probably kill performance, and you’d have
been better off with regular single-threaded event iteration.
Controlling the Batch Size
The batch size and number of parallel tasks are chosen automatically using smart algorithms, based on how many entities/events need to be processed, and how Bevy ECS has stored/organized the entity/component data in memory. However, it assumes that the amount of work/computation you do for each entity is roughly the same.
If you find that you want to manually control the batch size, you can specify
a minimum and maximum using BatchingStrategy.
fn par_iter_custom_batch_size(
q: Query<&MyComponent>,
) {
q.par_iter().batching_strategy(
BatchingStrategy::new()
// whatever fine-tuned values you come up with ;)
.min_batch_size(256)
.max_batch_size(4096)
).for_each(|my_component| {
// TODO: do some heavy work
});
q.par_iter().batching_strategy(
// fixed batch size
BatchingStrategy::fixed(1024)
).for_each(|my_component| {
// TODO: do some heavy work
});
}Parallel Processing of Arbitrary Data
Internal parallelism isn’t limited to just ECS constructs like entities/components or events.
It is also possible to process a slice (or anything that can be referenced
as a slice, such as a Vec) in parallel chunks. If you just have a big
buffer of arbitrary data, this is for you.
Use .par_splat_map/.par_splat_map_mut
to spread the work across a number of parallel tasks. Specify None for
the task count to automatically use the total number of CPU threads available.
Use .par_chunk_map/.par_chunk_map_mut
to manually specify a specific chunk size.
In both cases, you provide a closure to process each chunk (sub-slice). It will
be given the starting index of its chunk + the reference to its chunk slice.
You can return values from the closure, and they will be concatenated and
returned to the call site as a Vec.
use bevy::tasks::{ParallelSlice, ParallelSliceMut};
fn parallel_slices(/* ... */) {
// say we have a big vec with a bunch of data
let mut my_data = vec![Something; 10000];
// and we want to process it across the number of
// available CPU threads, splitting it into equal chunks
my_data.par_splat_map_mut(ComputeTaskPool::get(), None, |i, data| {
// `i` is the starting index of the current chunk
// `data` is the sub-slice / chunk to process
for item in data.iter_mut() {
process_thing(item);
}
});
// Example: we have a bunch of numbers
let mut my_values = vec![10; 8192];
// Example: process it in chunks of 1024
// to compute the sums of each sequence of 1024 values.
let sums = my_values.par_chunk_map(ComputeTaskPool::get(), 1024, |_, data| {
// sum the current chunk of 1024 values
let sum: u64 = data.iter().sum();
// return it out of the closure
sum
});
// `sums` is now a `Vec<u64>` containing
// the returned value from each chunk, in order
}When you are using this API from within a Bevy system, spawn
your tasks on the ComputeTaskPool.
This API can also be useful when you are doing background
computation, to get some extra parallelism.
In that case, use the AsyncComputeTaskPool instead.
Scoped Tasks
Scoped tasks are actually the underlying primitive that all of the above abstractions (parallel iterators and slices) are built on. If the previously-discussed abstractions aren’t useful to you, you can implement whatever custom processing flow you want, by spawning scoped tasks yourself.
Scoped tasks let you borrow whatever you want out of the parent function. The
Scope will wait until the tasks return, before returning back to the parent
function. This ensures your parallel tasks do not outlive the parent function,
thus accomplishing “internal parallelism”.
To get a performance benefit, make sure each of your tasks has a significant and roughly similar amount of work to do. If your tasks complete very quickly, it is possible that the overhead of parallelism outweighs the gains.
use bevy::tasks::ComputeTaskPool;
fn my_system(/* ... */) {
// say we have a bunch of variables
let mut a = Something;
let mut b = Something;
let mut more_things = [Something; 5];
// and we want to process the above things in parallel
ComputeTaskPool::get().scope(|scope| {
// spawn our tasks using the scope:
scope.spawn(async {
process_thing(&mut a);
});
scope.spawn(async {
process_thing(&mut b);
});
// nested spawning is also possible:
// you can use the scope from within a task,
// to spawn more tasks
scope.spawn(async {
for thing in more_things.iter_mut() {
scope.spawn(async {
process_thing(thing);
})
}
debug!("`more_things` array done processing.");
});
});
// at this point, after the task pool scope returns,
// all our tasks are done and everything has been processed
}When you are using this API from within a Bevy system, spawn
your tasks on the ComputeTaskPool.
This API can also be useful when you are doing background
computation, to dispatch additional tasks for extra
parallelism. In that case, use the AsyncComputeTaskPool instead.
| Bevy Version: | 0.13 | (outdated!) |
|---|
This entire book is outdated and no longer maintained. I am keeping it online, in case anyone still finds any of the information in it useful. To adapt to newer versions of Bevy, please consult Bevy's migration guides.
System Piping
Relevant official examples:
system_piping.
You can compose a single Bevy system from multiple Rust functions.
You can make functions that can take an input and produce an output, and be connected together to run as a single larger system. This is called “system piping”.
You can think of it as creating “modular” systems made up of multiple building blocks. This way, you can reuse some common code/logic in multiple systems.
Note that system piping is not a way of communicating between systems. If you want to pass data between systems, you should use Events instead.
Your functions will be combined and Bevy will treat them as if they were a single big system with all the combined system parameters for data access.
Example: Handling Results
One useful application of system piping is to be able to return errors (allowing
the use of Rust’s ? operator) and then have a separate function for handling
them:
fn net_receive(mut netcode: ResMut<MyNetProto>) -> std::io::Result<()> {
netcode.send_updates(/* ... */)?;
netcode.receive_updates(/* ... */)?;
Ok(())
}
fn handle_io_errors(
In(result): In<std::io::Result<()>>,
// we can also have regular system parameters
mut commands: Commands,
) {
if let Err(e) = result {
eprintln!("I/O error occurred: {}", e);
// Maybe spawn some error UI or something?
commands.spawn((/* ... */));
}
}Such functions cannot be added individually as systems (Bevy doesn’t know what to do with the input/output). By “piping” them together, we create a valid system that we can add:
app.add_systems(FixedUpdate, net_receive.pipe(handle_io_errors));Performance Warning
Beware that Bevy treats the whole chain as if it was a single big system, with all the combined system parameters and their respective data access requirements. This implies that parallelism could be limited, affecting performance.
If you create multiple “piped systems” that all contain a common function which contains any mutable access, that prevents all of them from running in parallel!
| Bevy Version: | 0.14 | (outdated!) |
|---|
This entire book is outdated and no longer maintained. I am keeping it online, in case anyone still finds any of the information in it useful. To adapt to newer versions of Bevy, please consult Bevy's migration guides.
Param Sets
For safety reasons, a system cannot have multiple parameters whose data access might have a chance of mutability conflicts over the same data.
Some examples:
- Multiple incompatible queries.
- Using
&Worldwhile also having other system parameters to access specific data. - …
Consider this example system:
fn reset_health(
mut q_player: Query<&mut Health, With<Player>>,
mut q_enemy: Query<&mut Health, With<Enemy>>,
) {
// ...
}The two queries are both trying to mutably access Health. They
have different filters, but what if there are entities that
have both Player and Enemy components? If we know that shouldn’t happen, we
can add Without filters, but what if it is actually valid for our game?
Such code will compile (Rust cannot know about Bevy ECS semantics), but will result in a runtime panic. When Bevy tries to run the system, it will panic with a message about conflicting system parameters:
thread 'main' panicked at bevy_ecs/src/system/system_param.rs:225:5:
error[B0001]: Query<&mut game::Health, bevy_ecs::query::filter::With<game::Enemy>> in
system game::reset_health accesses component(s) game::Health in a way that conflicts
with a previous system parameter. Consider using `Without<T>` to create disjoint Queries
or merging conflicting Queries into a `ParamSet`.
Bevy provides a solution: wrap any incompatible parameters in a ParamSet:
fn reset_health(
// access the health of enemies and the health of players
// (note: some entities could be both!)
mut set: ParamSet<(
Query<&mut Health, With<Enemy>>,
Query<&mut Health, With<Player>>,
// also access the whole world ... why not
&World,
)>,
) {
// set health of enemies (use the 1st param in the set)
for mut health in set.p0().iter_mut() {
health.hp = 50.0;
}
// set health of players (use the 2nd param in the set))
for mut health in set.p1().iter_mut() {
health.hp = 100.0;
}
// read some data from the world (use the 3rd param in the set)
let my_resource = set.p2().resource::<MyResource>();
}This ensures only one of the conflicting parameters can be used at the same time. Bevy will now happily run our system.
The maximum number of parameters in a param set is 8.
| Bevy Version: | 0.14 | (outdated!) |
|---|
This entire book is outdated and no longer maintained. I am keeping it online, in case anyone still finds any of the information in it useful. To adapt to newer versions of Bevy, please consult Bevy's migration guides.
Non-Send Resources
“Non-send” refers to data types that must only be accessed from the “main
thread” of the application. Such data is marked by Rust as !Send (lacking
the Send trait).
Some (often system) libraries have interfaces that cannot be safely used from other threads. A common example of this are various low-level OS interfaces for things like windowing, graphics, or audio. If you are doing advanced things like creating a Bevy plugin for interfacing with such things, you may encounter the need for this.
Normally, Bevy works by running all your systems on a thread-pool, making use of many CPU cores. However, you might need to ensure that some code always runs on the “main thread”, or access data that is not safe to access in a multithreaded way.
Non-Send Systems and Data Access
To do this, you can use a NonSend<T> / NonSendMut<T> system parameter.
This behaves just like Res<T> / ResMut<T>, letting you access an ECS
resource (single global instance of some data), except that the
presence of such a parameter forces the Bevy scheduler to always run the
system on the main thread. This ensures that data never has to be
sent between threads or accessed from different threads.
One example of such a resource is WinitWindows in Bevy. This is the
low-level layer behind the window entities that you typically use
for window management. It gives you more direct access to OS window management
functionality.
fn setup_raw_window(
q_primary: Query<Entity, With<PrimaryWindow>>,
mut windows: NonSend<WinitWindows>
) {
let raw_window = windows.get_window(q_primary.single());
// do some special things using `winit` APIs
}// just add it as a normal system;
// Bevy will notice the NonSend parameter
// and ensure it runs on the main thread
app.add_systems(Startup, setup_raw_window);Custom Non-Send Resources
Normally, to insert resources, their types must be Send.
Bevy tracks non-Send resources separately, to ensure that they can only be
accessed using NonSend<T> / NonSendMut<T>.
It is not possible to insert non-send resources using
Commands, only using direct World access. This
means that you have to initialize them in an exclusive system,
FromWorld impl, or from the app builder.
fn setup_platform_audio(world: &mut World) {
// assuming `OSAudioMagic` is some primitive that is not thread-safe
let instance = OSAudioMagic::init();
world.insert_non_send_resource(instance);
}app.add_systems(Startup, setup_platform_audio);Or, for simple things, if you don’t need a full-blown system:
app.insert_non_send_resource(OSAudioMagic::init());If you just need to write a system that must run on
the main thread, but you don’t actually have any data to store,
you can use NonSendMarker as a dummy.
fn my_main_thread_system(
marker: NonSend<NonSendMarker>,
// ...
) {
// TODO: do stuff ...
}| Bevy Version: | (any) |
|---|
This entire book is outdated and no longer maintained. I am keeping it online, in case anyone still finds any of the information in it useful. To adapt to newer versions of Bevy, please consult Bevy's migration guides.
Programming Patterns
This chapter is about any non-obvious tricks, programming techniques, patterns and idioms, that may be useful when programming with Bevy.
These topics are an extension of the topics covered in the Bevy Programming Framework chapter. See that chapter to learn the foundational concepts.
Some of the things covered in this chapter might be controversial or only useful to specific use cases. Don’t take this chapter as teaching “general best practice”.
| Bevy Version: | 0.9 | (outdated!) |
|---|
This entire book is outdated and no longer maintained. I am keeping it online, in case anyone still finds any of the information in it useful. To adapt to newer versions of Bevy, please consult Bevy's migration guides.
Generic Systems
Bevy systems are just plain rust functions, which means they can be generic. You can add the same system multiple times, parametrized to work on different Rust types or values.
Generic over Component types
You can use the generic type parameter to specify what component types (and hence what entities) your system should operate on.
This can be useful when combined with Bevy states. You can do the same thing to different sets of entities depending on state.
Example: Cleanup
One straightforward use-case is for cleanup. We can make a generic cleanup system that just despawns all entities that have a certain component type. Then, trivially run it on exiting different states.
use bevy::ecs::component::Component;
fn cleanup_system<T: Component>(
mut commands: Commands,
q: Query<Entity, With<T>>,
) {
for e in q.iter() {
commands.entity(e).despawn_recursive();
}
}Menu entities can be tagged with cleanup::MenuExit, entities from the game
map can be tagged with cleanup::LevelUnload.
We can add the generic cleanup system to our state transitions, to take care of the respective entities:
/// Marker components to group entities for cleanup
mod cleanup {
use bevy::prelude::*;
#[derive(Component)]
pub struct LevelUnload;
#[derive(Component)]
pub struct MenuClose;
}
#[derive(Debug, Clone, Eq, PartialEq, Hash)]
enum AppState {
MainMenu,
InGame,
}
fn main() {
App::new()
.add_plugins(DefaultPlugins)
.add_state(AppState::MainMenu)
// add the cleanup systems
.add_system_set(SystemSet::on_exit(AppState::MainMenu)
.with_system(cleanup_system::<cleanup::MenuClose>))
.add_system_set(SystemSet::on_exit(AppState::InGame)
.with_system(cleanup_system::<cleanup::LevelUnload>))
.run();
}Using Traits
You can use this in combination with Traits, for when you need some sort of varying implementation/functionality for each type.
Example: Bevy’s Camera Projections
(this is a use-case within Bevy itself)
Bevy has a CameraProjection trait. Different
projection types like PerspectiveProjection
and OrthographicProjection implement that
trait, providing the correct logic for how to respond to resizing the window,
calculating the projection matrix, etc.
There is a generic system fn camera_system::<T: CameraProjection + Component>, which handles all the cameras with a given projection type. It
will call the trait methods when appropriate (like on window resize events).
The Bevy Cookbook Custom Camera Projection Example shows this API in action.
Using Const Generics
Now that Rust has support for Const Generics, functions can also be parametrized by values, not just types.
fn process_layer<const LAYER_ID: usize>(
// system params
) {
// do something for this `LAYER_ID`
}
fn main() {
App::new()
.add_plugins(DefaultPlugins)
.add_system(process_layer::<1>)
.add_system(process_layer::<2>)
.add_system(process_layer::<3>)
.run();
}Note that these values are static / constant at compile-time. This can be a severe limitation. In some cases, when you might suspect that you could use const generics, you might realize that you actually want a runtime value.
If you need to “configure” your system by passing in some data, you could, instead, use a Resource or Local.
Note: As of Rust 1.65, support for using enum values as const generics is
not yet stable. To use enums, you need Rust Nightly, and to enable the
experimental/unstable feature (put this at the top of your main.rs or
lib.rs):
#![feature(adt_const_params)]| Bevy Version: | 0.9 | (outdated!) |
|---|
This entire book is outdated and no longer maintained. I am keeping it online, in case anyone still finds any of the information in it useful. To adapt to newer versions of Bevy, please consult Bevy's migration guides.
Component Storage (Table/Sparse-Set)
Bevy ECS provides two different ways of storing data: tables and sparse sets. The two storage kinds offer different performance characteristics.
The kind of storage to be used can be chosen per component
type. When you derive the Component trait, you can
specify it. The default, if unspecified, is table storage. You can have
components with a mixture of different storage kinds on the same entity.
The rest of this page is dedicated to explaining the performance trade-offs and why you might want to choose one storage kind vs. the other.
/// Component for entities that can cast magic spells
#[derive(Component)] // Use the default table storage
struct Mana {
mana: f32,
}
/// Component for enemies that currently "see" the player
/// Every frame, add/remove to entities based on visibility
/// (use sparse-set storage due to frequent add/remove)
#[derive(Component)]
#[component(storage = "SparseSet")]
struct CanSeePlayer;
/// Component for entities that are currently taking bleed damage
/// Add to entities to apply bleed effect, remove when done
/// (use sparse-set storage to not fragment tables,
/// as this is a "temporary effect")
#[derive(Component)]
#[component(storage = "SparseSet")]
struct Bleeding {
damage_rate: f32,
}Table Storage
Table storage is optimized for fast query iteration. If the way you usually use a specific component type is to iterate over its data across many entities, this will offer the best performance.
However, adding/removing table components to existing entities is a relatively slow operation. It requires copying the data of all table components for the entity to a different location in memory.
It’s OK if you have to do this sometimes, but if you are likely to add/remove a component very frequently, you might want to switch that component type to sparse-set storage.
You can see why table storage was chosen as Bevy’s default. Most component types are rarely added/removed in practice. You typically spawn entities with all the components they should have, and then access the data via queries, usually every frame. Sometimes you might add or remove a component to change an entity’s behavior, but probably not nearly as often, or every frame.
Sparse-Set Storage
Sparse-Set storage is optimized for fast adding/removing of a component to existing entities, at the cost of slower querying. It can be more efficient for components that you would like to add/remove very frequently.
An example of this might be a marker component indicating whether an enemy is currently aware of the player. You might want to have such a component type, so that you can easily use a query filter to find all the enemies that are currently tracking the player. However, this is something that can change every frame, as enemies or the player move around the game level. If you add/remove this component every time the visibility status changed, that’s a lot of additions and removals.
You can see that situations like these are more niche and do not apply to most typical component types. Treat sparse-set storage as a potential optimization you could try in specific circumstances.
Even in situations like the example above, it might not be a performance win. Everything depends on your application’s unique usage patterns. You have to measure and try.
Table Fragmentation
Furthermore, the actual memory layout of the “tables” depends on the set of all table components that each of your entities has.
ECS queries perform best when many of the entities they match have the same overall set of components.
Having a large number of entities, that all have the same component types, is very efficient in terms of data access performance. Having diverse entities with a varied mixture of different component types, means that their data will be fragmented in memory and be less efficient to access.
Sparse-Set components do not affect the memory layout of tables. Hence, components that are only used on a few entities or as a “temporary effect”, might also be good candidates for sparse-set storage. That way they don’t fragment the memory of the other (table) components. Systems that do not care about these components will be completely unaffected by them existing.
Overall Advice
While this page describes the general performance characteristics and gives some guidelines, you often cannot know if something improves performance without benchmarking.
When your game grows complex enough and you have something to benchmark, you could try to apply sparse-set storage to situations where it might make sense, as described above, and see how it affects your results.
| Bevy Version: | 0.9 | (outdated!) |
|---|
This entire book is outdated and no longer maintained. I am keeping it online, in case anyone still finds any of the information in it useful. To adapt to newer versions of Bevy, please consult Bevy's migration guides.
Manual Event Clearing
The event queue needs to be cleared periodically, so that it does not grow indefinitely and waste unbounded memory.
Bevy’s default cleanup strategy is to clear events every frame, but with double buffering, so that events from the previous frame update stay available. This means that you can handle the events only until the end of the next frame after the one when they are sent.
This default works well for systems that run every frame and check for events every time, which is the typical usage pattern.
However, if you have systems that do not read events every frame, they might miss some events. Some common scenarios where this occurs are:
- systems with an early-return, that don’t read events every time they run
- when using fixed timestep
- systems that only run in specific states, such as if your game has a pause state
- when using custom run criteria to control your systems
To be able to reliably manage events in such circumstances, you might want to have manual control over how long the events are held in memory.
You can replace Bevy’s default cleanup strategy with your own.
To do this, simply add your event type (wrapped as Events<T>)
to the app builder using .init_resource, instead of .add_event.
(.add_event is actually just a convenience method that initializes the
resource and adds Bevy’s built-in system (generic
over your event type) for the default cleanup strategy)
You must then clear the events at your discretion. If you don’t do this often enough, your events might pile up and waste memory.
Example
We can create generic systems for this. Implement
the custom cleanup strategy, and then add that system to your
App as many times as you need, for each event type
where you want to use your custom behavior.
use bevy::ecs::event::Events;
fn main() {
App::new()
.add_plugins(DefaultPlugins)
// add the `Events<T>` resource manually
// these events will not have automatic cleanup
.init_resource::<Events<MySpecialEvent>>()
// this is a regular event type with automatic cleanup
.add_event::<MyRegularEvent>()
// add the cleanup systems
.add_system(my_event_manager::<MySpecialEvent>)
.run();
}
/// Custom cleanup strategy for events
///
/// Generic to allow using for any custom event type
fn my_event_manager<T: 'static + Send + Sync>(
mut events: ResMut<Events<T>>,
) {
// TODO: implement your custom logic
// for deciding when to clear the events
// clear all events like this:
events.clear();
// or with double-buffering
// (this is what Bevy's default strategy does)
events.update();
// or drain them, if you want to iterate,
// to access the values:
for event in events.drain() {
// TODO: do something with each event
}
}| Bevy Version: | 0.9 | (outdated!) |
|---|
This entire book is outdated and no longer maintained. I am keeping it online, in case anyone still finds any of the information in it useful. To adapt to newer versions of Bevy, please consult Bevy's migration guides.
Writing Tests for Systems
You might want to write and run automated tests for your systems.
You can use the regular Rust testing features (cargo test) with Bevy.
To do this, you can create an empty ECS World in your
tests, and then, using direct World access, insert whatever
entities and resources you need for testing. Create
a standalone stage with the systems you want to
run, and manually run it on the World.
Bevy’s official repository has a fantastic example of how to do this.
| Bevy Version: | (any) |
|---|
This entire book is outdated and no longer maintained. I am keeping it online, in case anyone still finds any of the information in it useful. To adapt to newer versions of Bevy, please consult Bevy's migration guides.
Bevy Render (GPU) Framework
NOTE: This chapter of the book is an early Work in Progress! Many links are still broken!
This chapter covers Bevy’s rendering framework and how to work with the GPU.
Make sure you are well familiar with Bevy’s Core Programming Framework. Everything here builds on top of it.
Here you will learn how to write custom rendering code. If you are simply interested in using the existing graphical features provided by Bevy, check out the chapters about General Graphics Features, 2D, and 3D.
| Bevy Version: | 0.9 | (outdated!) |
|---|
This entire book is outdated and no longer maintained. I am keeping it online, in case anyone still finds any of the information in it useful. To adapt to newer versions of Bevy, please consult Bevy's migration guides.
Render Architecture Overview
NOTE: This chapter of the book is an early Work in Progress! Many links are still broken!
The current Bevy render architecture premiered in Bevy 0.6. The news blog post is another place you can learn about it. :)
It was inspired by the Destiny Render Architecture (from the Destiny game).
Pipelined Rendering
Bevy’s renderer is architected in a way that operates independently from all the normal app logic. It operates in its own separate ECS World and has its own schedule, with stages and systems.
The plan is that, in a future Bevy version, the renderer will run in parallel with all the normal app logic, allowing for greater performance. This is called “pipelined rendering”: rendering the previous frame at the same time as the app is processing the next frame update.
Every frame, the two parts are synchronized in a special stage called “Extract”. The Extract stage has access to both ECS Worlds, allowing it to copy data from the main World into the render World.
From then on, the renderer only has access to the render World, and can only use data that is stored there.
Every frame, all entities in the render World are erased, but resources are kept. If you need to persist data from frame to frame, store it in resources. Dynamic data that could change every frame should be copied into the render world in the Extract stage, and typically stored using entities and components.

Core Architecture
The renderer operates in multiple render stages. This is how the work that needs to be performed on the CPU is managed.
The ordering of the workloads to be performed on the GPU is controlled using the render graph. The graph consists of nodes, each representing a workload for the GPU, typically a render pass. The nodes are connected using edges, representing their ordering/dependencies with regard to one another.
Layers of Abstraction
The Bevy rendering framework can accomodate you working at various different levels of abstraction, depending on how much you want to integrate with the Bevy ecosystem and built-in features, vs. have more direct control over the GPU.
For most things, you would be best served by the “high-level” or “mid-level” APIs.
Low-Level
Bevy works directly with wgpu, a Rust-based cross-platform
graphics API. It is the abstraction layer over the GPU APIs of the underlying
platform. This way, the same GPU code can work on all
supported platforms. The API design of wgpu is based on
the WebGPU standard, but with extensions to support native platform features,
going beyond the limitations of the web platform.
wgpu (and hence Bevy) supports the following backends:
| Platform | Backends (in order of priority) |
|---|---|
| Linux | Vulkan, GLES3 |
| Windows | DirectX 12, Vulkan, GLES3 |
| macOS | Metal |
| iOS | Metal |
| Android | Vulkan, GLES3 |
| Web | WebGPU, WebGL2 |
On GLES3 and WebGL2, some renderer features are unsupported and performance is worse.
WebGPU is experimental and few browsers support it.
wgpu forms the “lowest level” of Bevy rendering. If you really need the
most direct control over the GPU, you can pretty much use wgpu directly,
from within the Bevy render framework.
Mid-Level
On top of wgpu, Bevy provides some abstractions that can help you, and
integrate better with the rest of Bevy.
The first is pipeline caching and specialization. If you create your render pipelines via this interface, Bevy can manage them efficiently for you, creating them when they are first used, and then caching and reusing them, for optimal performance.
Caching and specialization are, analogously, also available for GPU Compute pipelines.
Similar to the pipeline cache, there is a texture cache. This is what you use for rendering-internal textures (for example: shadow maps, reflection maps, …), that do not originate from assets. It will manage and reuse the GPU memory allocation, and free it when it becomes unused.
For using data from assets, Bevy provides the Render Asset abstraction to help with extracting the data from different asset types.
Bevy can manage all the “objects to draw” using phases, which sort and draw phase items. This way, Bevy can sort each object to render, relative to everything else in the scene, for optimal performance and correct transparency (if any).
Phase Items are defined using render commands and/or draw functions. These are, conceputally, the rendering equivalents of ECS systems and exclusive systems, fetching data from the ECS World and generating draw calls for the GPU.
All of these things fit into the core architecture of the Bevy render graph and render stages. During the Render stage, graph nodes will execute render passes with the render phases, to draw everything as it was set up in the Prepare/Queue/PhaseSort stages.
The bevy_core_pipeline crate defines a set of standard
phase/item and main pass types. If you can, you
should work with them, for best compatibility with the Bevy ecosystem.
High-Level
On top of all the mid-level APIs, Bevy provides abstractions to make many common kinds of workloads easier.
The most notable higher-level features are meshes and materials.
Meshes are the source of per-vertex data (vertex attributes) to be fed into your shaders. The material specifies what shaders to use and any other data that needs to be fed into it, like textures.
| Bevy Version: | 0.9 | (outdated!) |
|---|
This entire book is outdated and no longer maintained. I am keeping it online, in case anyone still finds any of the information in it useful. To adapt to newer versions of Bevy, please consult Bevy's migration guides.
Render Stages
Everything on the CPU side (the whole process of driving the GPU workloads) is structured in a sequence of “render stages”:
Timings
Note: Pipelined rendering is not yet actually enabled in Bevy 0.9. This section explains the intended behavior, which will land in a future Bevy version. You have to understand it, because any custom rendering code you write will have to work with it in mind.
Every frame, Extract serves as the synchronization point.
When the Render Schedule completes, it will start again, but Extract will wait for the App Schedule, if it has not completed yet. The App Schedule will start again as soon as Extract has completed.
Therefore:
- in an App-bound scenario (if app takes longer than render):
- The start of Extract is waiting for App to finish
- in a Render-bound scenario (if render takes longer than app):
- The start of App is waiting for Extract to finish
If vsync is enabled, the wait for the next refresh of the screen will happen in the Prepare stage. This has the effect of prolonging the Prepare stage in the Render schedule. Therefore, in practice, your game will behave like the “Render-bound” scenario shown above.
The final render (the framebuffer with the pixels to show in the window) is presented to the OS/driver at the end of the Render stage.
Bevy updates its timing information (in Res<Time>)
at the start of the First stage in the main App schedule. The value to
use is measured at “presentation time”, in the render world, and the
Instant is sent over a channel, to be applied on the
next frame.
Adding Systems to Render Stages
If you are implementing custom rendering functionality in Bevy, you will likely need to add some of your own systems to at least some of the render stages:
-
Anything that needs data from your main App World will need a system in Extract to copy that data. In practice, this is almost everything, unless it is fully contained on the GPU, or only uses renderer-internal generated data.
-
Most use cases will need to do some setup of GPU resources in Prepare and/or Queue.
-
In Cleanup, all entities are cleared automatically. If you have some custom data stored in resources, you can let it stay for the next frame, or add a system to clear it, if you want.
The way Bevy is set up, you shouldn’t need to do anything in Render or PhaseSort. If your custom rendering is part of the Bevy render graph, it will just be handled automatically when Bevy executes the render graph in the Render stage. If you are implementing custom phase items, the Main Pass render graph node will render them together with everything else.
You can add your rendering systems to the respective stages, using the render sub-app:
// TODO: code example
Extract
Extract is a very important and special stage. It is the synchronization point that links the two ECS Worlds. This is where the data required for rendering is copied (“extracted”) from the main App World into the Render World, allowing for pipelined rendering.
During the Extract stage, nothing else can run in parallel, on either the main App World or the Render World. Hence, Extract should be kept minimal and complete its work as quickly as possible.
It is recommended that you avoid doing any computations in Extract, if possible. Just copy data.
It is recommended that you only copy the data you actually need for rendering. Create new component types and resources just for use within the render World, with only the data you need.
For example, Bevy’s 2D sprites uses a struct ExtractedSprite, where it copies the relevant data
from the “user-facing” components of sprite and spritesheet entities in the
main World.
Bevy reserves Entity IDs in the render World, matching all the Entities existing in the main World. In most cases, you do not need to spawn new entities in the render World. You can just insert components with Commands on the same Entity IDs as from the main World.
// TODO: code example
Prepare
Prepare is the stage to use if you need to set up any data on the GPU. This is where you can create GPU buffers, textures, and bind groups.
// TODO: elaborate on different ways Bevy is using it internally
// TODO: code example
Queue
Queue is the stage where you can set up the “rendering jobs” you will need to execute.
Typically, this means creating phase items with the correct render pipeline and draw function, for everything that you need to draw.
For other things, analogously, Queue is where you would set up the workloads (like compute or draw calls) that the GPU would need to perform.
// TODO: elaborate on different ways Bevy is using it internally
// TODO: code example
PhaseSort
This stage exists for Bevy to sort all of the phase items that were set up during the Queue stage, before rendering in the Render stage.
It is unlikely that you will need to add anything custom here. I’m not aware of use cases. Let me know if you know of any.
Render
Render is the stage where Bevy executes the Render Graph.
The built-in behavior is configured using Cameras. For each active Camera, Bevy will execute its associated render graph, configured to output to its associated render target.
If you are using any of the standard render phases, you don’t need to do anything. Your custom phase items will be rendered automatically as part of the Main Pass built-in render graph nodes, alongside everything else.
If you are implementing a rendering feature that needs a separate step, you can add it as a render graph node, and it will be rendered automatically.
The only time you might need to do something custom here is if you really
want to sidestep Bevy’s frameworks and reach for low-level wgpu access.
You could place it in the Render stage.
Cleanup
Bevy has a built-in system in Cleanup that clears all entities in the render World. Therefore, all data stored in components will be lost. It is expected that fresh data will be obtained in the next frame’s Extract stage.
To persist rendering data over multiple frames, you should store it in resources. That way you have control over it.
If you need to clear some data from your resources sometimes, you could add a custom system to the Cleanup stage to do it.
// TODO: code example
| Bevy Version: | 0.12 | (outdated!) |
|---|
This entire book is outdated and no longer maintained. I am keeping it online, in case anyone still finds any of the information in it useful. To adapt to newer versions of Bevy, please consult Bevy's migration guides.
Bevy on Different Platforms
This chapter is a collection of platform-specific information, about using Bevy with different operating systems or environments.
Feel free to suggest things to add.
Platform Support
Bevy aims to also make it easy to target different platforms, such as the various desktop operating systems, web browsers (via WebAssembly), mobile (Android and iOS), and game consoles. Your Bevy code can be the same for all platforms, with differences only in the build process and environment setup.
However, that vision is not fully met yet. Currently, support for non-desktop platforms is limited, and requires more complex configuration.
Desktop
Bevy trivially works out-of-the-box on the three major desktop operating systems: Linux, macOS, Windows. No special configuration is required.
See the following pages for specific tips/advice when developing for the desktop platforms:
All Bevy features are fully supported on each of the above.
You can also build Windows EXEs for your Windows users, if you are working in Linux or macOS.
Web
Bevy works quite well on the web (using WebAssembly), but with some limitations.
Multithreading is not supported, so you will have limited performance and possible audio glitches. Rendering is limited to the features of the WebGL2 API, meaning worse performance and limitations like only supporting a maximum of 256 lights in 3D scenes. These limitations can be lifted by enabling the new WebGPU support, but then you will have limited browser compatibility.
For inspiration, check out the entries in the Bevy Game Jams (third, second, first). Many of them have web builds you can play in your browser.
Mobile
Apple iOS is well-supported and most features work well. There are developers in the Bevy community that have successfully shipped Bevy-based apps to the App Store.
Android support is not as good as iOS, but very usable (as of Bevy 0.12). If you find bugs, broken features, or other issues, please report them.
Bevy has been known to have issues with emulator devices. It is recommended you test your app on real hardware.
Game Consoles
Unfortunately, due to NDA requirements, developing for consoles is inaccessible to most community developers who work in the open, and Bevy support is still mostly nonexistent.
At some point, there was someone in the community working on PlayStation support. I do not know if they are still around, or anything about the status of that work. If you are interested, join Discord and ask around. Maybe you can find each other and work together.
The Rust Programming Language aims to make Nintendo Switch a supported target, but that work is in its early days and has not progressed enough to be useful for Bevy yet. It should be possible to work on Nintendo Switch support in the open, without NDAs, using emulators.
The Steam Deck, and other such “handheld PCs”, are well supported. Such devices run special versions of standard Desktop OSs (Linux, Windows) and are designed to support PC games out of the box. To develop for these devices, just make regular Linux/Windows builds of your game and ideally try them on an actual device, so you can see how the handheld experience is like and make sure your game feels good on such a device.
| Bevy Version: | 0.12 | (outdated!) |
|---|
This entire book is outdated and no longer maintained. I am keeping it online, in case anyone still finds any of the information in it useful. To adapt to newer versions of Bevy, please consult Bevy's migration guides.
Linux Desktop
If you have any additional Linux-specific knowledge, please help improve this page!
Create Issues or PRs on GitHub.
Desktop Linux is one of the best-supported platforms by Bevy.
There are some development dependencies you may need to setup, depending on your distribution. See instructions in official Bevy repo.
See here if you also want to build Windows EXEs from Linux.
GPU Drivers
Bevy apps need support for the Vulkan graphics API to run best. There is a fallback on OpenGL ES 3 for systems where Vulkan is unsupported, but it might not work and will have limited features and performance.
You (and your users) must ensure that you have compatible hardware and drivers installed. On most modern distributions and computers, this should be no problem.
If Bevy apps refuse to run and print an error to the console about not being able to find a compatible GPU, the problem is most likely with the Vulkan components of your graphics driver not being installed correctly. You may need to install some extra packages or reinstall your graphics drivers. Check with your Linux distribution for what to do.
To confirm that Vulkan is working, you can try to run this command (found in
a package called vulkan-tools on most distributions):
vulkaninfo
X11 and Wayland
As of the year 2023, the Linux desktop ecosystem is fragmented between the legacy X11 stack and the modern Wayland stack. Many distributions are switching to Wayland-based desktop environments by default.
Bevy supports both, but only X11 support is enabled by default. If you are running a Wayland-based desktop, this means your Bevy app will run in the XWayland compatibility layer.
To enable native Wayland support for Bevy, enable the wayland cargo feature:
[dependencies]
bevy = { version = "0.12", features = ["wayland"] }
Now your app will be built with support for both X11 and Wayland.
If you want to remove X11 support for whatever reason, you will have to disable
the default features and re-enable everything you need, without the x11
feature. See here to learn how to configure Bevy features.
If both are enabled, you can override which display protocol to use at runtime, using an environment variable:
export WINIT_UNIX_BACKEND=x11
(to run using X11/XWayland on a Wayland desktop)
or
export WINIT_UNIX_BACKEND=wayland
(to require the use of Wayland)
| Bevy Version: | 0.12 | (outdated!) |
|---|
This entire book is outdated and no longer maintained. I am keeping it online, in case anyone still finds any of the information in it useful. To adapt to newer versions of Bevy, please consult Bevy's migration guides.
macOS Desktop
If you have any additional macOS-specific knowledge, please help improve this page!
Create Issues or PRs on GitHub.
See here if you also want to build Windows EXEs from macOS.
Known Pitfalls
Input Peculiarities
Mouse wheel scrolling behaves in a peculiar manner,
because macOS does “scroll acceleration” at the OS level. Other OSs, with
regular PC mice, provide Line scroll events with whole number values, where
1.0 corresponds to one step on the scroll wheel. macOS scales the value
depending on how fast the user is spinning the wheel. You do not get whole
numbers. They can range anywhere from tiny values <0.1 (for the starting event,
before the scroll speed ramps up), up to values as big as >10.0 (say, for a fast
flick of the wheel), per event.
macOS provides special events for touchpad gestures for zooming and rotation, which you can handle in Bevy.
Some keyboard keys have a somewhat-unintuitive mapping:
- The Command (⌘) key is
KeyCode::{SuperLeft, SuperRight}. - The Option (⌥) key is
KeyCode::{AltLeft, AltRight}.
Other key codes have their intuitive names.
Window Management Apps Compatability
Bevy apps can encounter performance issues (such as lag when dragging the window
around the screen) when window management apps like “Magnet” are used. This is a
bug in winit (the OS window management library that Bevy uses). This issue can
be tracked here.
Until that bug is fixed, advise closing the window management apps, if encountering performance issues.
Creating an Application Bundle
When you build your Bevy project normally, cargo/Rust will produce a bare executable file, similar to other operating systems. However, this is not how “normal” macOS apps look and behave. You probably want to create a proper native-feeling Mac app for distribution to your users.
You need to do this, to have your app play nicely with the Mac desktop GUI, such as to have a nice icon appear in the dock.
macOS applications are typically stored on the filesystem as “bundles” – special
directories/folders that end in .app, that the OS displays to the user as one
item. macOS expects to find a special hieararchy of subfolders and files inside.
A minimal app bundle might have the following files:
MyGame.app/Contents/MacOS/MyGame: the actual executable fileMyGame.app/Contents/MacOS/assets/: your Bevy assets folderMyGame.app/Contents/Info.plist: metadata (see below)MyGame.app/Contents/Resources/AppIcon.icns: the app’s icon
Only the executable file is technically mandatory. If you have nothing else, the app will run, as long as the executable file name matches the app bundle file name. You should, however, follow the below instructions, if you want to make a proper nice Mac app. :)
Executable File
The executable file produced by the Rust compiler (in the target directory) is
a single-architecture binary for your current development machine. You could
just copy this file into the app bundle, but then you will not support all Mac
hardware natively.
If you want to support both machines with Intel CPUs and with Apple Silicon
(Arm) CPUs, you need to compile for both of them, and then combine them into a
single executable using Apple’s lipo tool.
First, make sure you have Rust toolchain support for both architectures installed:
rustup target add x86_64-apple-darwin
rustup target add aarch64-apple-darwin
Now, you can compile for both architectures:
cargo build --release --target x86_64-apple-darwin
cargo build --release --target aarch64-apple-darwin
Now, you can combine the two executables into one, for your app bundle.
lipo "target/x86_64-apple-darwin/release/my_game" \
"target/aarch64-apple-darwin/release/my_game" \
-create -output "MyGame.app/Contents/MacOS/MyGame"
Note: please ensure the Bevy dynamic_linking cargo feature is not enabled.
Game Assets
Your Bevy assets folder needs to be placed alongside the executable file,
for Bevy to find it and be able to load your assets. Just copy it into
Contents/MacOS in your app bundle.
Note: This is not the standard conventional location as prescribed by Apple.
Typically, macOS apps store their data files in Contents/Resources. However,
Bevy will not find them there. Thankfully, Apple does not enforce this, so we
are free to do something unusual when we have to.
Info.plist
This file contains all the metadata that macOS wants.
If you do not create this file, or if it is missing some of the fields, macOS
will try to guess them, so your app can still run. Ideally, you want to create a
proper Info.plist file, to prevent issues.
Download an example file as a starting point.
You can edit this file using Apple XCode or a text editor. Check that all the values make sense for your app. Pay special attention to these values:
CFBundleName(Bundle name)- Short user-visible name of your app
CFBundleDisplayName(Bundle display name)- Optional: You can set a longer user-visible name here, if you want
CFBundleExecutable(Executable file)- The name of the executable file
CFIconFile(Icon file)- The name of the icon file
CFBundleIdentifier(Bundle identifier)- Apple wants an ID for your app, in domain format, like:
com.mycompany.mygame
- Apple wants an ID for your app, in domain format, like:
CFBundleShortVersionString(Bundle version string (short))- The version of your app, like
0.1.0.
- The version of your app, like
App Icon
The icon file needs to be in a special Apple format.
Such a file can be created from a collection of PNGs of different standard sizes (powers of two). If you want your app to look nice at all sizes, you can hand-craft an image for each size, following Apple Design Guidelines. If you don’t care, you can just take one image (ideally 1024x1024, the biggest size used by macOS) and scale it to different sizes.
Here is a script that does that:
SOURCE_IMAGE="myicon1024.png"
mkdir -p AppIcon.iconset
sips -z 16 16 "${SOURCE_IMAGE}" --out AppIcon.iconset/icon_16x16.png
sips -z 32 32 "${SOURCE_IMAGE}" --out AppIcon.iconset/icon_16x16@2x.png
sips -z 32 32 "${SOURCE_IMAGE}" --out AppIcon.iconset/icon_32x32.png
sips -z 64 64 "${SOURCE_IMAGE}" --out AppIcon.iconset/icon_32x32@2x.png
sips -z 128 128 "${SOURCE_IMAGE}" --out AppIcon.iconset/icon_128x128.png
sips -z 256 256 "${SOURCE_IMAGE}" --out AppIcon.iconset/icon_128x128@2x.png
sips -z 256 256 "${SOURCE_IMAGE}" --out AppIcon.iconset/icon_256x256.png
sips -z 512 512 "${SOURCE_IMAGE}" --out AppIcon.iconset/icon_256x256@2x.png
sips -z 512 512 "${SOURCE_IMAGE}" --out AppIcon.iconset/icon_512x512.png
cp "${SOURCE_IMAGE}" AppIcon.iconset/icon_512x512@2x.png
iconutil -c icns AppIcon.iconset
## move it into the app bundle
mv AppIcon.icns MyGame.app/Contents/Resources
It works by creating a special iconset folder, with all the PNG files at different
sizes, created by resizing your source image. Then, it uses iconutil to produce
the final Apple ICNS file for your app bundle.
If you want hand-crafted icons for each size, you could use a similar process.
Create an iconset folder with your PNGs, and run iconutil -c icns on it.
Alternatively, Apple XCode has GUI tools for creating and editing app icons.
Putting Everything Together
Here is a simple shell script to build a Mac app. It follows the recommendations on this page. Adjust everything as necessary for your project.
# set the name of the Mac App
APP_NAME="MyGame"
# set the name of your rust crate
RUST_CRATE_NAME="my_game"
# create the folder structure
mkdir -p "${APP_NAME}.app/Contents/MacOS"
mkdir -p "${APP_NAME}.app/Contents/Resources"
# copy Info.plist
cp Info.plist "${APP_NAME}.app/Contents/Info.plist"
# copy the icon (assuming you already have it in Apple ICNS format)
cp AppIcon.icns "${APP_NAME}.app/Contents/Resources/AppIcon.icns"
# copy your Bevy game assets
cp -a assets "${APP_NAME}.app/Contents/MacOS/"
# compile the executables for each architecture
cargo build --release --target x86_64-apple-darwin # build for Intel
cargo build --release --target aarch64-apple-darwin # build for Apple Silicon
# combine the executables into a single file and put it in the bundle
lipo "target/x86_64-apple-darwin/release/${RUST_CRATE_NAME}" \
"target/aarch64-apple-darwin/release/${RUST_CRATE_NAME}" \
-create -output "${APP_NAME}.app/Contents/MacOS/${APP_NAME}"
Note: please ensure the Bevy dynamic_linking cargo feature is not enabled.
Creating a DMG file
It is common for Mac apps downloadable from the internet to be distributed as
DMG files – Apple’s “disk image” format. Users can drag-and-drop the app bundle
inside into their Applications folder on their system.
create-dmg
If you want to create a fancy DMG file, you can install and use the
create-dmg tool.
If you are using Homebrew, you can install it easily from there:
brew install create-dmg
Then, you can use it as follows:
create-dmg \
--volname "My Bevy Game" \
--volicon "AppIcon.icns" \
--background "DMG-background.png" \
--window-size 800 400 \
--icon-size 128 \
--icon "MyGame.app" 200 200 \
--hide-extension "MyGame.app" \
--app-drop-link 600 200 \
"mybevygame_release_mac.dmg" \
"build/mac/"
The options are:
--volname: the name of the device when the user opens the DMG file--volicon: the icon of the device when the user opens the DMG file--background: the background image for the Finder window--window-size: the size of the Finder window--icon-size: the default zoom level (how big the icons should look)--icon: specify the X/Y coordinates where to display a specific file--hide-extension: do not display the file extension for this file--app-drop-link: create a shortcut to Applications for easy drag-and-drop; place at given X/Y coordinates- the name of the DMG file to create
- the name of the folder where you have the files to be added to the DMG (your app + anything else you want to add)
hdiutil
If you don’t want to install any special tools, you can create a very simple
DMG file using hdiutil, which comes with macOS:
hdiutil create -fs HFS+ \
-volname "My Bevy Game" \
-srcfolder "MyGame.app" \
"mybevygame_release_mac.dmg"
Specify the Volume Name (how it appears when opened), the name of your app
bundle, and the name of the output DMG file, respectively. You can use
-srcfolder multiple times, if you want to add more files and folders to the
DMG image.
GUI
If you want to create a DMG file using a GUI, you can use Apple’s “Disk Utility” app that comes preinstalled with macOS. Then, just use Finder to set up everything inside how you like it.
| Bevy Version: | 0.12 | (outdated!) |
|---|
This entire book is outdated and no longer maintained. I am keeping it online, in case anyone still finds any of the information in it useful. To adapt to newer versions of Bevy, please consult Bevy's migration guides.
Windows Desktop
If you have any additional Windows-specific knowledge, please help improve this page!
Create Issues or PRs on GitHub.
Windows is one of the best-supported platforms by Bevy.
Both the MSVC and the GNU compiler toolchains should work.
You can also build Windows EXEs while working in Linux or macOS.
If you want to work inside WSL2, see this guide.
Distributing Your App
The EXE built with cargo build can work standalone without any extra files or DLLs.
Your assets folder needs be distributed alongside it. Bevy will search for it in
the same directory as the EXE on the user’s computer.
The easiest way to give your game to other people to play is to put them
together in a ZIP file. If you use some other method of installation,
install the assets folder and the EXE to the same path.
If built with the MSVC toolchain, your users may need the Microsoft C/C++ Runtime Redistributables installed.
DXC Compiler Support
Bevy (technically wgpu) supports using the Microsoft DXC compiler for
improved shader compilation when using DirectX 12.
To do this, you need to download it from Microsoft’s
repo and put dxcompiler.dll and dxil.dll
alongside your game’s EXE.
Bevy should detect these DLL files automatically and use them.
Disabling the Windows Console
By default, when you run a Bevy app (or any Rust program for that matter)
on Windows, a Console window also shows up. To disable this,
place this Rust attribute at the top of your main.rs:
#![windows_subsystem = "windows"]This tells Windows that your executable is a graphical application, not a command-line program. Windows will know not display a console.
However, the console can be useful for development, to see log messages. You can disable it only for release builds, and leave it enabled in debug builds, like this:
#![cfg_attr(not(debug_assertions), windows_subsystem = "windows")]Creating an icon for your app
There are two places where you might want to put your application icon:
- The EXE file (how it looks in the file explorer)
- The window at runtime (how it looks in the taskbar and the window title bar)
Setting the EXE icon
(adapted from here)
The EXE icon can be set using a cargo build script.
Add a build dependency of embed_resources to your Cargo.toml allow embedding assets into your compiled executables
[build-dependencies]
embed-resource = "1.6.3"
Create a build.rs file in your project folder:
extern crate embed_resource;
fn main() {
let target = std::env::var("TARGET").unwrap();
if target.contains("windows") {
embed_resource::compile("icon.rc");
}
}Create a icon.rc file in your project folder:
app_icon ICON "icon.ico"
Create your icon as icon.ico in your project folder.
Setting the Window Icon
See: Setting the Window Icon.
Working in WSL2
| Bevy Version: | 0.12 | (outdated!) |
|---|
This entire book is outdated and no longer maintained. I am keeping it online, in case anyone still finds any of the information in it useful. To adapt to newer versions of Bevy, please consult Bevy's migration guides.
Working in WSL2
If you prefer to have a more Linux-centric development workflow, you might want to work inside of WSL2 and build your project there. Another reason to do it is compile times; they are often much faster in WSL2 than on the Windows host system. Linux has faster I/O and filesystem than Windows, and that makes a big difference to compile times.
Cross-compiling to run Windows Native
The recommended way to run your Bevy app from WSL is to cross-compile for Windows. The Windows EXE you build inside of WSL2 can be run just fine from the Linux commandline, and it will seamlessly run on the host system! This way, you don’t need any GPU drivers or GUI support inside your WSL2 Linux environment. Also, you will be running and testing the Windows build of your game, so you can see how it will really perform on Windows. It will run with full performance and use your host Windows GPU drivers.
Note that when you run Windows binaries from WSL2, they don’t get the Linux
environment variables. cargo run does not just work, because your Bevy game
will look for its assets folder in the path where the EXE is (which would be
in the target build output folder). My simple solution is to just copy the
EXE into the project folder after building, and run it directly from there.
For non-Bevy Rust projects, this would be unnecessary.
The process can be automated with a little script, to use instead of cargo run:
#!/bin/sh
cargo build --target x86_64-pc-windows-gnu &&
cp target/x86_64-pc-windows-gnu/debug/mygame.exe . &&
exec ./mygame.exe "$@"
This way you also don’t have to type the cross-compilation target every time (and you can also add any other options you want there).
Just save the script (you can call it something like win.sh) and run your
game as:
./win.sh
Running Linux builds using WSLg
This is an alternative way of running your Bevy game from WSL. It does not require cross-compilation, but is likely to have other issues and limitations.
Newer installs of WSL2 should have support for WSLg: Microsoft’s Linux GUI support. It should allow you to simply compile your Bevy game in Linux and run it. WSLg will do the dark magic needed to forward graphics and audio to the Windows host.
Your game will run locked to 60 FPS, and there will be other performance problems. WSLg is effectively RDP (Remote Desktop) under the hood. It’s like streaming video from the VM to the host. Some functionality might be broken/unsupported.
Both Wayland and X11 should work. Wayland is recommended, so be sure to
enable the "wayland" cargo feature in Bevy.
There are many dependencies (such as graphics drivers) needed for GUI support in Linux, which are likely missing if you have never used any other GUI app from your WSL environment. The easiest way to make sure you have everything installed, is to just install some random Linux GUI app. For example:
sudo apt install gucharmap # the GNOME Character Map app
It will pull in everything needed for a Linux GUI environment. Bevy should then also be able to work.
This will be sufficient for OpenGL support. However, to use all features of Bevy, you need Vulkan. For Vulkan in WSL, it is recommended that you use a PPA (unofficial repository) to get an updated version of Mesa (graphics drivers). Here is how to install everything:
sudo add-apt-repository ppa:kisak/kisak-mesa
sudo apt update
sudo apt upgrade
sudo apt install vulkan-tools
(dzn, Microsoft’s Vulkan driver for WSL2, is technically non-conformant,
so there may be bugs and other issues, but it seems to work fine)
Now, you can simply run your Bevy project in Linux in the usual way:
cargo run
| Bevy Version: | 0.12 | (outdated!) |
|---|
This entire book is outdated and no longer maintained. I am keeping it online, in case anyone still finds any of the information in it useful. To adapt to newer versions of Bevy, please consult Bevy's migration guides.
Browser (WebAssembly)
Introduction
You can make web browser games using Bevy. This chapter will help you with the things you need to know to do it. This page gives an overview of Bevy’s Web support.
Your Bevy app will be compiled for WebAssembly (WASM), which allows it to be embedded in a web page and run inside the browser.
Performance will be limited, as WebAssembly is slower than native code and does not currently support multithreading.
Not all 3rd-party plugins are compatible. If you need extra unofficial plugins, you will have to check if they are compatible with WASM.
Project Setup
The same Bevy project, without any special code modifications, can be built for either web or desktop/native.
However, you will need a “website” with some HTML and JavaScript to contain the game, so that the browser can load, run, and display it.
For development and testing, this can just be a minimal shim. It can be easily autogenerated.
To deploy, you will need a server to host your website for other people to access. You could use GitHub’s hosting service: GitHub Pages. You can also host your game on itch.io.
Additional Caveats
When users want to play your game, their browser will need to download the files. Optimizing for size is important, so that your game can start faster and not waste data bandwidth.
Note: the dynamic_linking feature flag is not supported for
WASM builds. You cannot use it.
Quick Start
First, add WASM support to your Rust installation. Using Rustup:
rustup target install wasm32-unknown-unknown
wasm-server-runner
The easiest and most automatic way to get started is the
wasm-server-runner tool.
It is great for testing during development.
Install it:
cargo install wasm-server-runner
Set up cargo to use it, in .cargo/config.toml (in your project folder,
or globally in your user home folder):
[target.wasm32-unknown-unknown]
runner = "wasm-server-runner"
Alternatively, you can also set the runner using an environment variable:
export CARGO_TARGET_WASM32_UNKNOWN_UNKNOWN_RUNNER=wasm-server-runner
Now you can just run your game with:
cargo run --target wasm32-unknown-unknown
It will automatically run a minimal local webserver and open your game in your browser.
Higher-level Tools
Here are some higher-level alternatives. These are feature-rich tools that can do more for you and automate much of your workflow, but are opinionated in how they work.
Custom Web Page
If you are a web developer and you want to make your own website where you embed your Bevy game, see here.
| Bevy Version: | 0.12 | (outdated!) |
|---|
This entire book is outdated and no longer maintained. I am keeping it online, in case anyone still finds any of the information in it useful. To adapt to newer versions of Bevy, please consult Bevy's migration guides.
Optimize for Size
When serving a WASM binary, the smaller it is, the faster the browser can download it. Faster downloads means faster page load times and less data bandwidth use, and that means happier users and happier server hosts. ;)
This page gives some suggestions for how to make your WASM files smaller for deployment / release builds. You probably don’t need small WASM files during development, and many of these techniques can get in the way of your workflow! They come at the cost of longer compile times and less debuggability.
Depending on the nature of your application, your mileage may vary, and performing measurements of binary size and execution speed is recommended.
Twiggy is a code size profiler for WASM binaries, which you can use to make measurements.
For additional information and more techniques, refer to the Code Size chapter in the Rust WASM book.
Do you know of more WASM size-optimization techniques? Post about them in the GitHub Issue Tracker so that they can be added to this page!
Compiling for size instead of speed
You can change the optimization profile of the compiler, to tell it to prioritize small output size, rather than performance.
(although in some rare cases, optimizing for size can actually improve speed)
In Cargo.toml, add one of the following:
[profile.release]
opt-level = 'z'
[profile.release]
opt-level = 's'
These are two different profiles for size optimization. Usually, z produces
smaller files than s, but sometimes it can be the opposite. Measure to
confirm which one works better for you.
Link-Time Optimization (LTO)
In Cargo.toml, add one of the following:
For some big improvements with moderate slowdown to compile times:
[profile.release]
lto = "thin"
For the biggest improvements at the cost of the slowest compile times:
[profile.release]
lto = true
codegen-units = 1
LTO tells the compiler to optimize all code together, considering all crates as if they were one. It may be able to inline and prune functions much more aggressively. This typically results in smaller size and better performance, but do measure to confirm. Sometimes, the size can actually be larger.
Use the wasm-opt tool
The binaryen toolkit is a set of extra tools for working
with WASM. One of them is wasm-opt. It goes much further than what the
compiler can do, and can be used to further optimize for either speed or size:
# Optimize for size (z profile).
wasm-opt -Oz -o output.wasm input.wasm
# Optimize for size (s profile).
wasm-opt -Os -o output.wasm input.wasm
# Optimize for speed.
wasm-opt -O3 -o output.wasm input.wasm
# Optimize for both size and speed.
wasm-opt -O -ol 100 -s 100 -o output.wasm input.wasm
You should run this command on the final WASM file you deploy to your website,
after wasm-bindgen or other tools. If you run it before, wasm-bindgen can
get confused and panic.
| Bevy Version: | 0.12 | (outdated!) |
|---|
This entire book is outdated and no longer maintained. I am keeping it online, in case anyone still finds any of the information in it useful. To adapt to newer versions of Bevy, please consult Bevy's migration guides.
Create a Custom Web Page
If you want full control over your website, such as if you are a web developer and you want to embed your Bevy game into a nice website you made, this page will offer some tips.
wasm-bindgen
This is the “low level” tool for exporting/preparing a Rust WASM binary, so it can be integrated into HTML/JS. It generates the bridge to JavaScript, so that Rust/Bevy can work with the browser.
You will need to run it whenever you rebuild your game, to process the WASM
binaries generated by cargo.
You can install it using cargo:
cargo install wasm-bindgen-cli
Now, to build your game, run:
cargo build --release --target wasm32-unknown-unknown
wasm-bindgen --no-typescript --target web \
--out-dir ./out/ \
--out-name "mygame" \
./target/wasm32-unknown-unknown/release/mygame.wasm
You need to provide the path to the compiled WASM binary in cargo’s target directory.
It will be renamed according to the --out-name parameter.
./out/ is the directory where it will place the processed files. You will be
uploading these files to your server. You need to also put the assets folder
there. Bevy will expect to find it alongside the WASM file.
The final list of files for a minimal website will look something like this:
assets/ index.html mygame.js mygame_bg.wasm
In a more compex website, you might want to have the game files be in a subdirectory somewhere, and load them from a HTML file elsewhere.
For the HTML file, you can use this as a starting point:
index.html
<!doctype html>
<html lang="en">
<body style="margin: 0px;">
<script type="module">
import init from './mygame.js'
init().catch((error) => {
if (!error.message.startsWith("Using exceptions for control flow, don't mind me. This isn't actually an error!")) {
throw error;
}
});
</script>
</body>
</html>
Note: change mygame.js above to the actual name of the file outputted by wasm-bindgen.
It will match the --out-name parameter you provided on the commandline.
This minimal index.html will just display the Bevy game, without giving you
much control over the presentation. By default, Bevy will create its own HTML
canvas element to render in.
You can optionally run tools like wasm-opt on the final WASM file, to
optimize the WASM further for size. Run such tools after
wasm-bindgen, not on the original WASM file. Otherwise, wasm-bindgen will
panic with an error if you give it a file processed with wasm-opt.
Embedding into a complex web page
You probably want control over how/where the game is displayed, so you can place it on a fancier web page, alongside other content.
IFrame
A simple/hacky way is using an IFrame. The advantage is that you don’t need any modifications to the Rust code.
You can create a minimal index.html as was shown previously.
You can then embed that into your larger webpage using a HTML IFrame element:
<iframe id="mygame-iframe" src="wasm/index.html" width="1280" height="720"></iframe>
You can place it wherever you like on your web page and style it however you like using CSS. It is recommended to explicitly specify its dimensions.
Make sure to use the correct path to the HTML file in src. You might want to
rename/move it according to your website’s needs.
Custom Canvas
A more elegant way to accomplish this is by using your own canvas element. You don’t need a separate HTML file.
Create a HTML canvas and give it an ID string of your choice.
<canvas id="mygame-canvas" width="1280" height="720"></canvas>
You can place it wherever you like on your web page and style it however you like using CSS. It is recommended to explicitly specify its dimensions.
On the Rust side, we need to tell Bevy the ID of the canvas element, so it can use our canvas instead of trying to create its own.
fn main() {
let mut app = App::new();
app.add_plugins(DefaultPlugins.set(WindowPlugin {
primary_window: Some(Window {
// provide the ID selector string here
canvas: Some("#mygame-canvas".into()),
// ... any other window properties ...
..default()
}),
..default()
}));
// ...
app.run();
}Unfortunately, this means if you want to rename the ID of the canvas, you will have to make sure to update the Rust code and rebuild/redeploy the game.
General Advice
Bevy WASM binaries are big. Even when [optimized for size][wasm::opt-size], they can be
upwards of 30MB (reduced down to 15MB with wasm-opt).
To make your page fast to load, you might want to delay the loading of the WASM. Let the user see and interact with the page before you trigger it.
You could use some JavaScript to detect when the user clicks on the canvas, or have a special button or link to trigger it.
Further, after the WASM loads and your Bevy game is running, your game will probably want to load assets at runtime. Make sure your assets are well-compressed/optimized, so they can load quickly. Try to design your game so that it isn’t unresponsive or making the user suffer annoying waits.
| Bevy Version: | 0.12 | (outdated!) |
|---|
This entire book is outdated and no longer maintained. I am keeping it online, in case anyone still finds any of the information in it useful. To adapt to newer versions of Bevy, please consult Bevy's migration guides.
Hosting on GitHub Pages
GitHub Pages is a hosting service that allows you to publish your website on GitHub’s servers.
For more details, visit the official GitHub Pages documentation.
Deploying a website (like your WASM game) to GitHub pages is done by putting the files in a special branch in a GitHub repository. You could create a separate repository for this, but you could also do it from the same repository as your source code.
You will need the final website files for deployment.
Create an empty branch in your git repository:
git checkout --orphan web
git reset --hard
You should now be in an empty working directory.
Put all files necessary for hosting, including your HTML, WASM, JavaScript,
and assets files, and commit them into git:
git add *
git commit
(or better, manually list your files in the above command, in place of the * wildcard)
Push your new branch to GitHub:
git push -u origin web --force
In the GitHub Web UI, go to the repository settings, go to the “GitHub Pages”
section, then under “Source” pick the branch “web” and the / (root) folder.
Then click “Save”.
Wait a little bit, and your site should become available at
https://your-name.github.io/your-repo.
| Bevy Version: | (any) |
|---|
This entire book is outdated and no longer maintained. I am keeping it online, in case anyone still finds any of the information in it useful. To adapt to newer versions of Bevy, please consult Bevy's migration guides.
Cross-Compilation
This sub-chapter covers how to set up a Rust toolchain to allow you to build for a different Operating System than the one you are working on.
| Bevy Version: | (any) |
|---|
This entire book is outdated and no longer maintained. I am keeping it online, in case anyone still finds any of the information in it useful. To adapt to newer versions of Bevy, please consult Bevy's migration guides.
Build Windows EXEs from Linux
(also check out the Windows Platform page for info about developing for Windows generally)
If you are working in WSL2, please also see this page for additional instructions.
Rust offers two different toolchains for building for Windows:
The instructions on this page use the x86_64 architecture, but you could also
set up a toolchain to target i686 (32-bit) or aarch64 (Windows-on-Arm) the
same way.
First-Time Setup (GNU)
On many Linux distros, the GNU/MINGW toolchain is the easier option. Your distro likely provides packages that you can easily install. Also, you do not need to accept any Microsoft licenses.
Setup Instructions:
Rust Toolchain (GNU)
Add the target to your Rust installation (assuming you use rustup):
rustup target add x86_64-pc-windows-gnu
This installs the files Rust needs to compile for Windows, including the Rust standard library.
MINGW
The GNU toolchain requires the MINGW environment to be installed. Your distro likely provides a package for it. Search your distro for a cross-compilation mingw package.
It might be called something like: mingw-w64-x86-64-dev, cross-x86_64-w64-mingw32, etc.,
the name varies in different distros.
You don’t need any files from Microsoft.
First-Time Setup (MSVC)
The MSVC toolchain is the native Microsoft way to target Windows. It is what the Rust community usually recommends for targetting the Windows platform. It may provide better compatibility with Windows DLLs / libraries and tooling.
Even though it is meant to be used on Windows, you can actually set it up and use it on Linux (and other UNIX-like systems). It requires downloading the Windows SDKs and accepting the Microsoft license. There is a script to automate that for you.
Setup Instructions:
Rust Toolchain (MSVC)
Add the target to your Rust installation (assuming you use rustup):
rustup target add x86_64-pc-windows-msvc
This installs the files Rust needs to compile for Windows, including the Rust standard library.
Microsoft Windows SDKs
You need to install the Microsoft Windows SDKs, just like when working on
Windows. On Linux, this can be done with an easy script called xwin. You
need to accept Microsoft’s proprietary license.
Install xwin:
cargo install xwin
Now, use xwin to accept the Microsoft license, download all the files
from Microsoft servers, and install them to a directory of your choosing.
(The --accept-license option is to not prompt you, assuming you have already
seen the license. To read the license and be prompted to accept it, omit that
option.)
To install to .xwin/ in your home folder:
xwin --accept-license splat --output /home/me/.xwin
Linking (MSVC)
Rust needs to know how to link the final EXE file.
The default Microsoft linker (link.exe) is only available on Windows. Instead,
we need to use the LLD linker (this is also recommended when working on Windows
anyway). Just install the lld package from your Linux distro.
We also need to tell Rust the location of the Microsoft Windows SDK libraries
(that were installed with xwin in the previous step).
Add this to .cargo/config.toml (in your home folder or in your bevy project):
[target.x86_64-pc-windows-msvc]
linker = "lld"
rustflags = [
"-Lnative=/home/me/.xwin/crt/lib/x86_64",
"-Lnative=/home/me/.xwin/sdk/lib/um/x86_64",
"-Lnative=/home/me/.xwin/sdk/lib/ucrt/x86_64"
]
Note: you need to specify the correct full absolute paths to the SDK files, wherever you installed them.
Building Your Project
Finally, with all the setup done, you can just build your Rust/Bevy projects for Windows:
GNU:
cargo build --target=x86_64-pc-windows-gnu --release
MSVC:
cargo build --target=x86_64-pc-windows-msvc --release
Bevy Caveats
As of Bevy 0.12, a workaround is needed for building with MSVC. If you
use the MSVC toolchain, the blake3 dependency assumes you are building
on Windows and tries to run some EXEs during its build process, which do
not exist in the Linux cross-compilation environment. The solution is
to tell it to not do that and use pure Rust code instead.
Set an environment variable when building:
export CARGO_FEATURE_PURE=1
cargo build --target=x86_64-pc-windows-msvc --release
Or add blake3 to your Cargo.toml if you want to persist the configuration:
[dependencies]
blake3 = { version = "1.5", features = [ "pure" ] }
| Bevy Version: | (any) |
|---|
This entire book is outdated and no longer maintained. I am keeping it online, in case anyone still finds any of the information in it useful. To adapt to newer versions of Bevy, please consult Bevy's migration guides.
Build Windows EXEs from macOS
(also check out the Windows Platform page for info about developing for Windows generally)
Rust offers two different toolchains for building for Windows:
The instructions on this page use the x86_64 architecture, but you could also
set up a toolchain to target i686 (32-bit) or aarch64 (Windows-on-Arm) the
same way.
First-Time Setup (GNU)
The GNU/MINGW toolchain is the easier option. It does not need much in terms of special configuration. Also, you do not need to accept any Microsoft licenses.
Setup Instructions:
Rust Toolchain (GNU)
Add the target to your Rust installation (assuming you use rustup):
rustup target add x86_64-pc-windows-gnu
This installs the files Rust needs to compile for Windows, including the Rust standard library.
MINGW
The GNU toolchain requires the MINGW environment to be installed.
There is a package for it conveniently available in Homebrew. You can just install it from there:
brew install mingw-w64
You don’t need any files from Microsoft.
First-Time Setup (MSVC)
The MSVC toolchain is the native Microsoft way to target Windows. It is what the Rust community usually recommends for targetting the Windows platform. It may provide better compatibility with Windows DLLs / libraries and tooling.
Even though it is meant to be used on Windows, you can actually set it up and use it on macOS (and Linux, and others). It requires downloading the Windows SDKs and accepting the Microsoft license. There is a script to automate that for you.
Setup Instructions:
Rust Toolchain (MSVC)
Add the target to your Rust installation (assuming you use rustup):
rustup target add x86_64-pc-windows-msvc
This installs the files Rust needs to compile for Windows, including the Rust standard library.
Microsoft Windows SDKs
You need to install the Microsoft Windows SDKs, just like when working on
Windows. This can be done with an easy script called xwin. You need to accept
Microsoft’s proprietary license.
Install xwin:
cargo install xwin
Now, use xwin to accept the Microsoft license, download all the files
from Microsoft servers, and install them to a directory of your choosing.
(The --accept-license option is to not prompt you, assuming you have already
seen the license. To read the license and be prompted to accept it, omit that
option.)
To install to .xwin/ in your home folder:
xwin --accept-license splat --disable-symlinks --output /Users/me/.xwin
On Windows and macOS, the filesystem is case-insensitive. On Linux and BSD, the
filesystem is case-sensitive. xwin was made for Linux, so it tries to work
around this by default, by creating symlinks. On macOS, we need to tell xwin
not to do this, using the --disable-symlinks option.
Linking (MSVC)
Rust needs to know how to link the final EXE file.
The default Microsoft linker (link.exe) is only available on Windows. Instead,
we need to use the LLD linker (this is also recommended when working on Windows
anyway).
Installing LLD
Unfortunately, last I checked, neither brew nor macports offer packages (LLD
is not commonly used when developing for macOS).
We can, however, build it ourselves from source. You need a C++ compiler and CMake. You probably already have the C++ toolchain installed, if you have installed Apple XCode development tools.
CMake can be installed from brew (Homebrew):
brew install cmake
Now, we are ready to compile LLD from the LLVM project:
Note: the --depth=1 option to git clone allows us to save a lot of disk
space and download bandwidth, because the LLVM respository is huge.
git clone --depth=1 https://github.com/llvm/llvm-project
cd llvm-project
mkdir build
cd build
cmake -DCMAKE_BUILD_TYPE=Release -DLLVM_ENABLE_PROJECTS=lld -DCMAKE_INSTALL_PREFIX=/usr/local ../llvm
sudo make -j10 install # adjust `-j10` based on your number of CPU cores
cd ../../; rm -rf llvm-project # delete the git repo and build files to free disk space
This will install it to /usr/local. Change the path above if you would rather
have it somewhere else, to not pollute your macOS or need sudo / root privileges.
Using LLD
We also need to tell Rust to use our linker, and the location of the Microsoft
Windows SDK libraries (that were installed with xwin in the previous
step).
Add this to .cargo/config.toml (in your home folder or in your bevy project):
[target.x86_64-pc-windows-msvc]
linker = "/usr/local/bin/lld"
rustflags = [
"-Lnative=/Users/me/.xwin/crt/lib/x86_64",
"-Lnative=/Users/me/.xwin/sdk/lib/um/x86_64",
"-Lnative=/Users/me/.xwin/sdk/lib/ucrt/x86_64"
]
Note: you need to specify the correct full absolute paths to the SDK files, wherever you installed them.
Building Your Project
Finally, with all the setup done, you can just build your Rust/Bevy projects for Windows:
GNU:
cargo build --target=x86_64-pc-windows-gnu --release
MSVC:
cargo build --target=x86_64-pc-windows-msvc --release
Bevy Caveats
As of Bevy 0.12, a workaround is needed for building with MSVC. If you
use the MSVC toolchain, the blake3 dependency assumes you are building
on Windows and tries to run some EXEs during its build process, which do
not exist in the Linux cross-compilation environment. The solution is
to tell it to not do that and use pure Rust code instead.
Set an environment variable when building:
export CARGO_FEATURE_PURE=1
cargo build --target=x86_64-pc-windows-msvc --release
Or add blake3 to your Cargo.toml if you want to persist the configuration:
[dependencies]
blake3 = { version = "1.5", features = [ "pure" ] }
| Bevy Version: | (any) |
|---|
This entire book is outdated and no longer maintained. I am keeping it online, in case anyone still finds any of the information in it useful. To adapt to newer versions of Bevy, please consult Bevy's migration guides.
Credits
While the majority of this book was authored by me, Ida Iyes (@inodentry), a
number of folks have made large contributions to help! Thank you all so much! ❤️
- Alice I. Cecile
@alice-i-cecile: review, advice, reporting lots of good suggestions - nile
@TheRawMeatball: review, useful issue reports @Zaszi: writing the initial draft of the WASM chapter@skairunnerand@mirenbharta: developing the Pan+Orbit camera example
Thanks to everyone who has submitted GitHub issues!
Big thanks to all sponsors! ❤️
Thanks to you, I can actually keep working on this book, improving and maintaining it!
And of course, the biggest thanks goes to the Bevy project
itself and its founder, @cart, for creating this awesome community and
game engine in the first place! It makes all of this possible. You literally
changed my life! ❤️
| Bevy Version: | (any) |
|---|
This entire book is outdated and no longer maintained. I am keeping it online, in case anyone still finds any of the information in it useful. To adapt to newer versions of Bevy, please consult Bevy's migration guides.
Contact Me
You can find me in the following places:
- Discord:
@iyesgames, old:Ida Iyes#0981 - Mastodon:
@iyes@mastodon.gamedev.place - GitHub:
@inodentry - Reddit:
iyesgames - E-mail: iyesgames dot social at gmail (sorry, i’m writing it out like this to avoid spam bots)
For improvements or fixes to this book, please file an issue on GitHub.
If you need help with Bevy or Rust, I offer private tutoring. Reach out if you are interested, to discuss rates and how I could best help you. :)
| Bevy Version: | (any) |
|---|
This entire book is outdated and no longer maintained. I am keeping it online, in case anyone still finds any of the information in it useful. To adapt to newer versions of Bevy, please consult Bevy's migration guides.
Contributing to Bevy
If you want to help out the Bevy Game Engine project, check out Bevy’s official contributing guide.
| Bevy Version: | (any) |
|---|
This entire book is outdated and no longer maintained. I am keeping it online, in case anyone still finds any of the information in it useful. To adapt to newer versions of Bevy, please consult Bevy's migration guides.
Contributing
Be civil. If you need a code of conduct, have a look at Bevy’s.
If you have any suggestions for the book, such as ideas for new content, or if you notice anything that is incorrect or misleading, please file issues in the GitHub repository!
GitHub Issues
If you want something to be added or changed in the book, file an issue! Tell me what you want, and I will figure out how to present it in the book. If you have some code snippet or other thing you want to include, you can put it in the issue.
That sort of workflow works much better for me, compared to Pull Requests. I am quite opinionated and meticulous about how everything is presented in the book, so I often can’t just merge/accept things as written by someone else.
GitHub Pull Requests
PLEASE DO NOT CREATE PULL REQUESTS FOR BOOK CONTENT.
The only exception to this might be trivial fixes. If you are just fixing a typo or small mistake, or a bug in some code example, that’s fine.
If you are adding or changing any of the book content, your PR will probably be ignored or closed. I will probably treat it like I do issues: go do the thing myself eventually, and then close your PR.
Licensing
To avoid complications with copyright and licensing, you agree to provide any contributions you make to the project under the MIT-0 No Attribution License.
Note that this allows your work to be relicensed without preserving your copyright.
As described previously, the actual published content in the book will be my own derivative work based on your contributions. I will license it consistently with the rest of the book; see: License.